Jose Guia has also responded to the challenge. Here is a direct link to the program he created:
RevitUsageAnalyzer.zip

EDIT: Jose’s blog seems to be down, here is a link that works
https://docs.google.com/file/d/0B1dGdRkpk2beU1Y2dHBMY085RkU/edit?usp=sharing

He has done a nice job – his program is a little bit more advanced than Rod Howarth’s version. He includes a few more statistics, and the folders are already setup for RAC.  It also links into the Revit Forum thread.

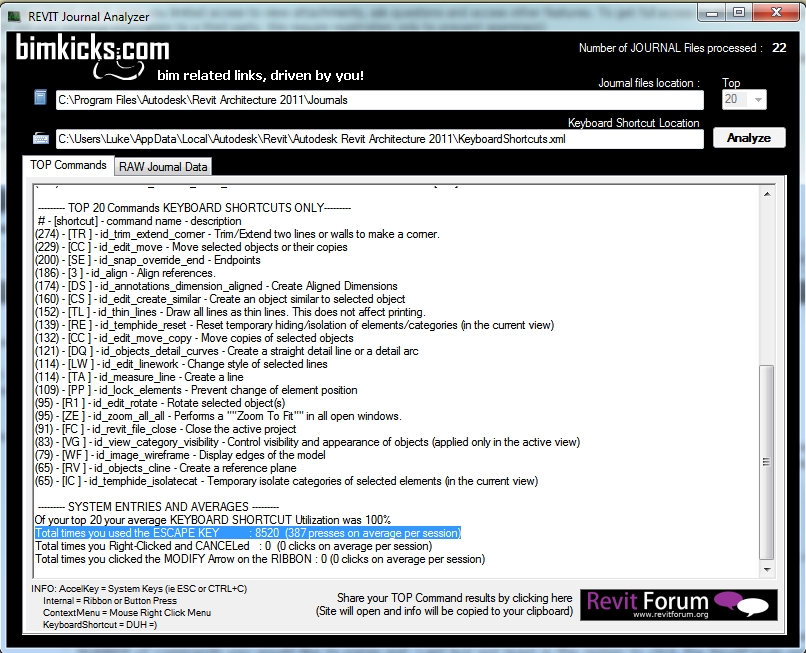
This is a scary stat from my analysis:
Total times you used the ESCAPE KEY          : 8520  (387 presses on average per session)
Nasty!

Here is his blog post:
blog.bimkicks.com | Revit Journal Analysis and Parsing Program (Rank Keyboard Shortcut Use)

Here is the Revit Forum post.  You can put your results here.
Revit Journal Analysis and Parsing Program (Keyboard Shortcut Use)

Give it a go.

Rod Howarth has done a great job in responding to the challenge I presented a fortnight ago.  He has created a simple yet effective program that analyzes your journal files and tells you the Top 20 commands that you are triggering WITH Keyboard Shortcuts, and the Top 20 commands you are triggering WITHOUT Keyboard Shortcuts.

Most of us realize that the fastest way to trigger a command is by using the keyboard.  Yes, the Ribbon is lovely in its own way, but once you know what command you want, why would you want to spend 3 or 4 clicks getting there, when a simple press or two on the keyboard will do the same thing?

Here is a link to the Journal File Analyzer post by Rod.

Here is a direct link to the Journal File Analyzer program.

I will post later about the paths to use if you don’t know them already.

Also, don’t include “” marks in the path entries.

jfa-3590565

Here is a challenge for you API and programming wizards out there:  make a tool that monitors the performance and productivity of a Revit user.

What am I talking about?  Mainly, I want to know how I can improve my productivity.  I can see two big ways:

  1. Ensure I am using keyboard shortcuts where possible
  2. Avoid triggering commands unnecessarily, and thus having to abort them and retry

Here is the kind of output I would be looking for:

start sample data
REVIT SESSION Productivity Analysis

Number of commands initiated: 2493

Top 50 commands initiated:
Zoom Extents
Trim
Scale
Copy
…etc…


% of Top 50 initiated using keyboard shortcut:
43%

List of Top 50 commands initiated WITHOUT keyboard shortcut:
Align
…etc…

Total number of commands initiated and then aborted without doing anything:
176

List of commands most commonly aborted:
Cut Geometry
…etc…
end sample data

You get the idea?  Such a utility could show me which tools I should add to my arsenal of keyboard shortcuts.  It would also show me which commands I am not using correctly or triggering unnecessarily.

How could this tool be developed?  I see two main ways:

  1. Create a tool to parse and analyse the output of the journal file for the session.
  2. Create an API tool that monitors and logs the necessary data, then displays it

Who is going to rise to the challenge?

To quote one of my favourite shows:
And if ever a challenger wins over the Iron Chef, he or she will gain the people’s ovation and fame forever!

If you have lots of materials in a project, it can become a chore to actually ‘choose’ them in the Material dialog box.

Here is a quicker way:

Scroll down for step by step version…

  1. In the Element or Type Properties box, select the Name of the material you want.
  2. Use Ctrl+C to copy the text.
  3. Go to the other Element or Type Properties box.
  4. In the appropriate material parameter location, select existing text with your cursor and then use Ctrl+V to paste the text.

I recently received a comment on one of my previous posts about the program Folder Menu.  I had actually been meaning to post about it – it currently seems to be the best 64-bit replacement for Folder Guide.  It is relatively simple to use, and seems to work in all dialog boxes.

You can download Folder Menu from the Sourceforge page here.

Basically, middle button on the mouse brings up the menu, left-click to ‘navigate’ folders within the menu, right-click to actually Explore a folder.  If you want to always just Explore using left-click, change the Use browse mode when capslock is off option on the ‘Menu’ tab of the Options.

Give it a go and feel free to post your comments.

(image from Sourceforge page)

A sure-fire way to become more productive when using Revit is to utilise the Project Browser effectively. It can allow you to quickly find and navigate your project, instead of laboriously searching for views or families.

In Revit 2011, you can use the persistent Properties Palette to quickly sort the Project Browser views.

  1. Click on top-level of Browser (Views…)
  2. Click on Properties Palette and choose option.


This method also works when sorting Sheets in the Project Browser.

The above post assumes that you know how to create new sort groups for the Project Browser. If you don’t, have a look at this page.

Productivity tip for loading families:

  1. Open a new Explorer window and browse to the location of your Families (or the Metric Library)
  2. Use Vista ‘Search’ to quickly find the family you want to load.
  3. Multi-select (using Ctrl) the files you want to load and drag them to Revit.
  4. Release your mouse button while over the Revit window.
  5. Revit has now loaded your families (and upgraded them if necessary)!

It has been a while since I made an I.T. specific post, so here is a little gem for you.

Do you find that your desktop gets cluttered and difficult to navigate, with heaps of icons, shortcuts and rubbish?

Well, give this a go. It is a little program that makes your desktop into a ‘List View’ – meaning it is far easier to find things. Here is a direct link to the zip file.

I also recommend you set your desktop to black or a dark image to improve visibility of the desktop font.

Sometimes you will want to produce a large set of PDFs where each drawing sheet is in its own PDF file. You also want the PDFs to be automatically named and created. There are a number of ways to accomplish this – here is the simple way that I use.

  1. Download and install PDFCreator ( if you don’t have it already)
  2. Download the following ini file: pdfcreator settings
  3. Open the PDFCreator application
  4. Go to Printer – Options, and then ‘load’ the settings from the ini file you downloaded (use the little folder at the top of the window to load settings), then hit ‘Save’ at the bottom of the window.
  5. Now, when you print from Revit, be sure to choose the options to ‘Create separate files…’
  6. When you click ‘Print’ in Revit, each sheet will be sent individually to PDFCreator. PDFCreator will then use the View or Sheet name (as per the REDMON_DOCNAME_FILE setting) to Autosave the PDFs to a specified folder – the above ini file uses C:TEMP_PLOT by default.

You can tweak these settings to your own individual taste – you may want to change the Autosave folder, for example.
Revit wants you to work efficiently, and it wants you to maximise the value of the data inherent to the BIM model. In this case, we leverage the View/Sheet name to automatically name the PDF files.
But what if you want to modify the filenames – perhaps adding a prefix or suffix to all PDF filenames? Well, you will just have to subscribe and wait for the next post…

Go to Part 2

Have you ever wanted to ‘re-issue’ or revise a large group of sheets such that they all receive the same, updated revision in the Revision Schedule?

Lets say you have 100 sheets and these form the ‘Approval’ set of documents – how do you go about amending and reissuing them?

For significant revisions, it is our company policy that all revised sheets have the same entry in the Revision Schedule. Therefore, we use the following method (it takes a little setting up the first time, but it is worth it):

  1. On the first sheet you would like to re-issue, create a small section of Revision Cloud that is associated with the appropriate revision in from the Sheet Issues/Revision dialog box.
  2. Select this small section of Revision Cloud and Group it into a detail group. Call this group whatever you like – something like ‘Approval Revision Set 1’
  3. Select the Detail Group and Ctrl-C (copy to Clipboard)
  4. (At this point we usually Hide the Revisions from the sheet by Tab-selecting the Revision Cloud and Hide Category in View, as we don’t really use Revision Clouds in the traditional sense)
  5. Go to the next sheet in the set and Paste-Aligned
  6. Repeat this for each sheet you would like in the ‘Revision Set’ (you will notice that as you do this, a new entry appears in the Revision Schedule – as you would expect)

Now, you can quickly re-issue that entire set. How?Just edit the ‘Approval Revision Set 1’ Detail Group that you created, and:

  • Add a new piece of Revision Cloud that is associated to the appropriate entry in the Revision Schedule. All your sheets have now been issued with the new entry, and the Revision Schedule on each sheet shows the new entry!

You can do some tricky things with ‘nesting’ these Detail Groups to give you more flexibility or add new sheets to sets.