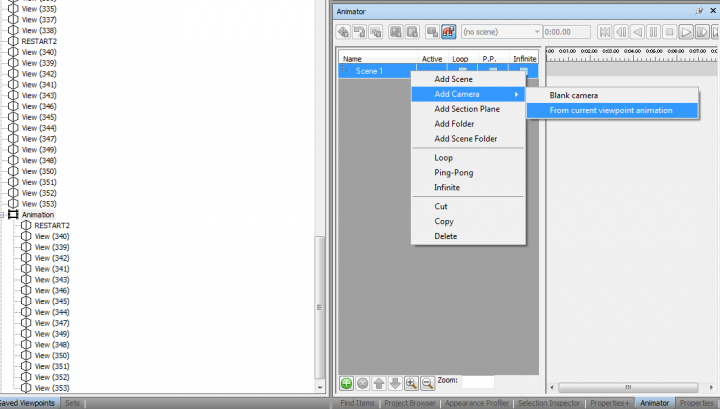
You probably know that you can import a Viewpoint animation into a Scene animation in Navisworks, like this:

  1. Animation Ribbon – Animator
  2. Add Scene
  3. Right click on the Scene, Add Camera, From Current Viewpoint Animation

Ok, that’s fine. But what if you do some work on the Scene Animation, add keyframes, adjust pacing, and then you want to convert it back into a Viewpoint Animation? Here’s how you do it:

  1. Open Animator and get a Scene animation ready to press “Play”
  2. Animation Ribbon – Click the Record button 
  3. Click the Scene name, and the Play button will activate in Animator
  4. Press Play in Animator, and wait for your animation to complete
  5. Press Stop in the Ribbon
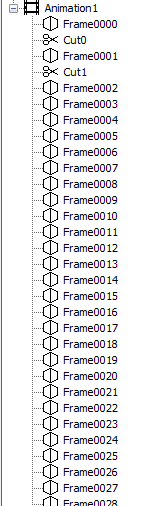
  6. Press the Record button again to toggle it “off”. Navisworks will now save the Animation into your Saved Viewpoints
  7. Delete any unnecessary Cuts etc

With this tip, you can now convert to and from a Scene and Viewpoint animations as needed. Viewpoint animations are a bit easier to put together, but it might be easier to adjust the pacing in the Animator. Obviously, the Animator has more power and control if you intend to actually animate objects in your scene.

On a related note…
I’ve come across a bit of a bug in Navisworks 2015 with Viewpoint animations and huge models (like 2gb huge). If you have a Home view with Hide/Required and Materials set, and all your Animation views have those options unticked, then you should be able to flick to your animation without losing your colours, right? Well, in some cases it seems to work, but in others it seems to reset the appearance whenever I switch to the animation, meaning I lose colour overrides.

I tried working around the color issue like this:

  1. Open project
  2. Make a new folder
  3. In the folder make a new animation
  4. Drag all of the views from previous animation to the new one
  5. Collapse the Animation
  6. Switch to a view with Hide/Required and Color applied (ie. Home view)
  7. Click on the new animation name (OK, doesn’t seem to reset colours)
  8. Expand and click a view (sometimes works, maybe, but can also fail)

Another workaround is to switch to your coloured Home view, save a 2013 version NWD and work in Navisworks 2013. Sometimes the downgrade bakes the colours into the elements, meaning you don’t lose them when you switch to and from the Viewpoint Animation.

    You can use the “Require” option. Any item that is set to “Required” will show as red, while normal unrequired items will remain black. This allows you to quickly, visually review two sets of models for differences, without having to check the Properties – Source File Name constantly:

    Obviously, the Required function isn’t really meant for this – Navisworks will try to always keep those items drawn in the scene, so keep that in mind if you are having performance problems after making many items Required.

    Also, don’t forget about Properties+… I have also shared my JSON property set for this Navisworks addin over here. You can put it into your UsersUsername folder to get started quickly:

    To simulate a temporary search set in Glue, select an object and view its properties. Then, right-click on the desired “search” property and click Select Similar:

    To merge Clash Groups in Navisworks:

    1. Select the Groups you want to Merge with Ctrl key
    2. Right-click, Explode (the child clashes will remain selected)
    3. Right-click, Group

    Screencast of above:

    Did you know that you can access Navisworks Options directly from the Start Menu? Just click on Start and type “Options Editor”. Then, if you hover over the entries in that list you can pick the Options Editor for the right version of Navisworks by reading the tooltip.

    Why would we want to do this? Well, if you have a Graphics Driver problem, it might cause Navisworks to continually crash when you start the program. If you head into the Options Editor, you can go to Interface – Display – Drivers and disable various options until Navisworks decides to load up again.

    For example, try unticking everything except OpenGL – you might find that Navisworks can now load (this tip may particularly help if you are trying to run Navisworks in a virtual machine).

    Another stable choice may be to select only the software-mode drivers:


    Uploaded by youtube user BIMcoach:
    “When working with Autodesk Navisworks you may run into mapping errors or omissions. This is due to the limitations of property mapping in Navisworks 2014. This video provides a solution to workaround this issue by creating a new property mapping definition.”

    Also, remember this if you want to import MasterFormat catalog: at the very end of the Quantification Workbook tab there’s the import/export catalog icon (on top).

    Sometimes it can be difficult to get Autodesk Rendering lights in Navisworks to work properly. When doing services coordination, you don’t really want to have to deal with placing new lights just so you can see things in the federated model. In this situation, you could try using these ‘Baseline’ settings:

    1. Options – Interface – Display – Autodesk – Shader Style, set to Basic
    2. Viewpoint set to Shaded
    3. Viewpoint lighting set to Headlight

    These Headlight sliders seem to work pretty well:

    Personally, I prefer using Gooch and Rendered with some nice lights if I can, but this can occasionally cause problems (depending on your Graphics Card and other material settings). That is when I fall back to the baseline settings above.

    On latest R2 version of Revit 2015, with Navisworks 2015 SP3 and Navisworks Exporters R3, there remains a Navisworks export bug that affects some projects after upgrade from previous versions of Revit.

    Error: documented at http://knowledge.autodesk.com/support/revit-products/troubleshooting/caas/sfdcarticles/sfdcarticles/Error-No-suitable-geometry-found-when-exporting-from-Revit-to-Navisworks-2015.html

    Workaround: You can use the selection method to Export and the error does not seem to occur:

    1. Open the 3D view to export 
    2. Select all visible objects 
    3. Go to Addins ribbon, 
    4. choose External Tools – Navisworks 2015 (Exporter) 
    5. In the settings, choose “Selection” (see attached screenshot) 
    6. Name the file and export as usual

    Other suggested workarounds (did not work in this instance):

    1. Turn off Detail Items
    2. Try exporting again

    or

    1. Remove View Template
    2. Set Level of Detail of view to something other than Fine
    3. Set Level of Detail of categories in V/G to the setting you desire (can be Fine)
    4. Try exporting again 

    or
    Try turning off categories one at a time to find out which Category the problem geometry resides in.

    or
    using “uncut” in the Family Editor to uncut the voids from everything, and then using ‘cut’ to cut them again. after reloading back through into the project, this also allowed the export to continue.

    or
    some other way…

        The log file reports:
        Autodesk.Revit.Exceptions.ExternalApplicationException: Object reference not set to an instance of an object.
           at Autodesk.Revit.DB.CustomExporter.Export(View3D view)
           at NavisWorks12.LcIRevitBase.Export3DView(View3D view_3d, StateDictionary state_dict)
           at NavisWorks12.LcIRevitBase.ExportDocument(String& return_message, ElementSet elements, LcIRevitParameters* params)

        Related forum:
        v2015 – Navisworks Can’t Import Revit – Autodesk Community

        Have you seen the BIM One Batch NWC Exporter? Its a free little addin for Revit that allows you to select multiple views and export them to NWCs all in one go. It works well, but it doesn’t have all the power of a full featured export addin (like RTV Xporter Pro – full review coming soon).

        Important: during the signup process, you will have to choose a BIM One key – like a password. This is what will allow you to activate the addin manager, and use the installer. So, make sure you choose a BIM One Key before pressing ‘Save’ on the registration page.

        Here’s what the addin manager looks like:

        Quick demo of using the addin in Revit 2015:

        From the BIM One site: 
        Here are the steps to install the application:

      1. Sign up on our website: Sign Up
      2. Download the Add-Ins Manager: bimone.com/addinsmanager/setup.exe
      3. Open the Add-ins Manager and log in
      4. Select the apps you want to install and click Install
      5. Here is more information about the Add-Ins Manager: User Guide – 
        See more at: https://bimone.ca/Apps/Product?productId=8#sthash.vcuO5zSl.dpuf 

        via
        Virtual Construction and Technology BIM One Inc. – NWC Batch Export

        Most of you would be aware of keyboardshortcuts.xml in Revit. However, did you know about RoamerCommands.xml? This file lives in the Layout folder under you Navisworks install, and it can be edited to modify keyboard shortcuts in Navisworks.

        Note: This process is very risky, so this file should be backed up before editing it. During experimentation, I had a lot of crashes and often had to restore this file to fix the issues.

        1. Backup RoamerCommands.xml (rename the backup or copy it somewhere, like this)
        2. Edit it in a text editor like Notepad++ or Sublime Text
        3. Look for something you want to change / add
        4. Modify the file
        5. Make sure there are no duplicate entries, like this
        6. Save it
        7. Restart Navisworks
        8. If Navis crashes on opening, restore the old file from Step 1 and start again
        9. If it doesn’t crash, see if your keyboard shortcut works

        I was able to change the keyboard shortcut for File Open as shown below:

        Video showing that my modified RoamerCommands.xml worked:

        File location on my system:
        “C:Program FilesAutodeskNavisworks Manage 2015LayoutRoamerCommands.xml”

        There is a good list of the vanilla shortcuts at this post (this is also where Lee mentions RoamerCommands):
        Keyboard Shortcuts (Hotkeys) for Autodesk Navisworks – Beyond Design: the Construction and BIM blog