In Revit, we often have to input RGB values for various color properties, such as shaded view colors for a particular material, or if you want a specific Paint color for a rendered material.  To do this, you can use Paint.NET and the Color Picker tool – the resultant properties include the RGB values you need.

However, you may obtain a sample image of a material, but the color is irregular.  For example, you scan in a paint sample and there is a color variation in the scanned image.  Or perhaps you simply want to take a detailed pattern sample image and find out the average color of a particular part of that image.

Here’s how you do it:

  1. Download Paint.NET
  2. Download Average Color plugin
  3. Copy the DLL file from the extracted Average Color ZIP you downloaded into the ‘Effects’ folder, which is in you Paint.NET installation directory (for example: C:Program FilesPaint.NETEffects)
  4. Open Paint.NET
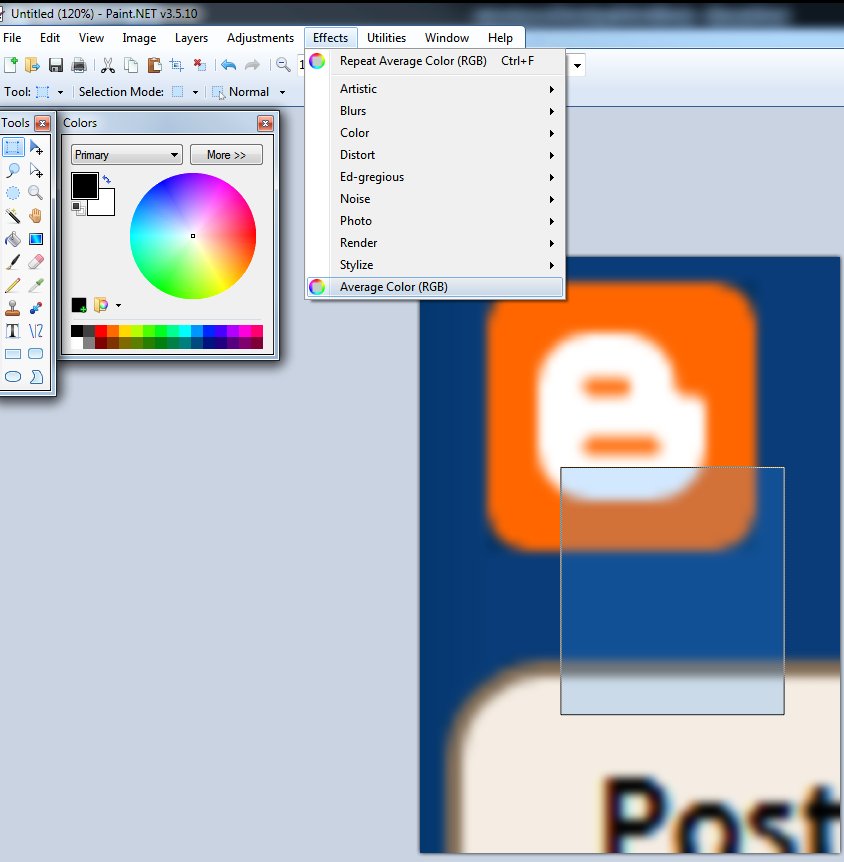
  5. Open the image you want to find an average color from.
  6. Make a rectangular selection.
  7. Click on the Effects menu – Average Color
  8. Now click on the Color Picker tool (looks like an Eyedropper)
  9. On the ‘Colors’ palette, click the More>> button
  10. The RGB values for your selected color are shown.
  11. In Revit, input those RGB values for the desired color or material

Average Color of Selection forum thread
Plugin to Average Color of Selection – Paint.NET Forum
Primary post
Main post

Package download link

You can open the BlueScope LYSAGHT.adsklib file in the Manage – Materials dialog in Revit.  This allows you to apply all of the nice, proper material properties to your Revit Material.

There is a step by step guide on how to use this at the following link:
Lysaght Designer Website – Powered by SteelSelect� – COLORBOND� steel Texture Library for Revit – LYSAGHT� Content

“information can be provided to the material by linking to a seperately defined property set (by Property Set), or can be input directly into the material (Independent). This allows several materials to share a single set of properties and changes to that property set to propagate to all those materials.

Read the rest of this informative post at:
Revit OpEd: Revit 2012 Materials and Property Sets

Creating an Appearance Library – WikiHelp

Also from the WikiHelp on this subject:
Each material can have two types of properties referred to as aspects: appearance and structural. You can store appearance and structural property sets in their own library. Appearance property libraries adhere to the Autodesk standard Protein format and have the following file extension: .adsklib. 
 Structural property libraries are written in an XML format and have the following file extension: .adstlib. 

When a user appearance property set library is loaded, it is always available in the Materials dialog. Structural user libraries are available per project. They will not load unless you specifically load them into a project. 

You can create new property set libraries in Revit or by creating .adsklib files with an external editing application.
Managing Property Set Libraries – WikiHelp
 

If you have lots of materials in a project, it can become a chore to actually ‘choose’ them in the Material dialog box.

Here is a quicker way:

Scroll down for step by step version…

  1. In the Element or Type Properties box, select the Name of the material you want.
  2. Use Ctrl+C to copy the text.
  3. Go to the other Element or Type Properties box.
  4. In the appropriate material parameter location, select existing text with your cursor and then use Ctrl+V to paste the text.

EDIT In Revit 2012 and newer, the quickest way to identify paint is to use the Remove Paint tool.  This does not load the Material selection panel, and will thus be faster.  Also, switch 3D view to wireframe with Remove Paint to globally scan the project with your cursor for painted surfaces…

To find out what material is currently painted onto a surface, simply start the ‘Paint’ tool, then Tab select the surface (face region).

Revit will produce a tooltip showing the currently painted material, and this will also show up in the status bar at the bottom of the screen.

When you use the Join Geometry tool in Revit, you may notice that it sometimes just doesn’t seem to ‘work’. You do everything right, join the two adjacent surfaces – and there is still an ugly join line!

The problem is that Revit only wants to join surfaces correctly IF they are the same material. You could go into each object (floor, wall etc) and make sure all the materials are the same. However, the quick fix is shown below:

  1. Use the Paint tool to apply the same material to the two faces you want to join.
  2. If you have already ‘joined’ the surfaces, you need to unjoin them from each other. With walls, the easiest way to unjoin two objects is to physically disconnect the wall using grips (I do this in 3D). Revit will give you a warning – and you can then Unjoin the elements.
  3. Now, pull the objects back together, so they are in the same plane and they meet at a clean edge.
  4. Use Join Geometry again between the two surfaces – now that they are the same material, Revit is happy to join them properly, and it all works beautifully!

In short, Revit wants joined surfaces to be the same material before it will join them properly.

RevitTV.com are offering a free ‘Paint’ plugin for Revit 2010.

The features are:

  • Import and automatically create Revit paint materials from existing AutoCAD Color Book (.acb) files.
  • Search and filter hundreds of Revit paint materials by colour name.
  • Manage hundreds of manufacturers paint materials in Revit with ease, including Resene and Sherwin-Williams.
  • RevitTV.com Paint for Revit 2010 – Beta (download page)
    RTV Paint ver 2010 – Windows 32 bit Installer
    RTV Paint ver 2010 – Windows 64 bit Installer, coming soon…