You ever face a problem and you just can’t stop until you solve it? I came across a model recently that was like that… it was an Revit 2015 MEP file that had a serious problem:
Whenever you created a Duct or Pipe Fitting, it would always be created with System Classification and System Type “Undefined”.

problem-3359078

No matter I did, I could not fix this. I tried all of the usual steps. Then, I took this pretty severe one: deleting all warning elements with dynamo:

And it kinda sorta worked, but not every time. I must have been doing something else as well. Was it Audit? Was it Purge?

Turns out it was Purge. And that was all this model actually needed – a good purge. But what element specifically was causing the problem? Well, does this look right to you?!?

purge2bgroups-5248372

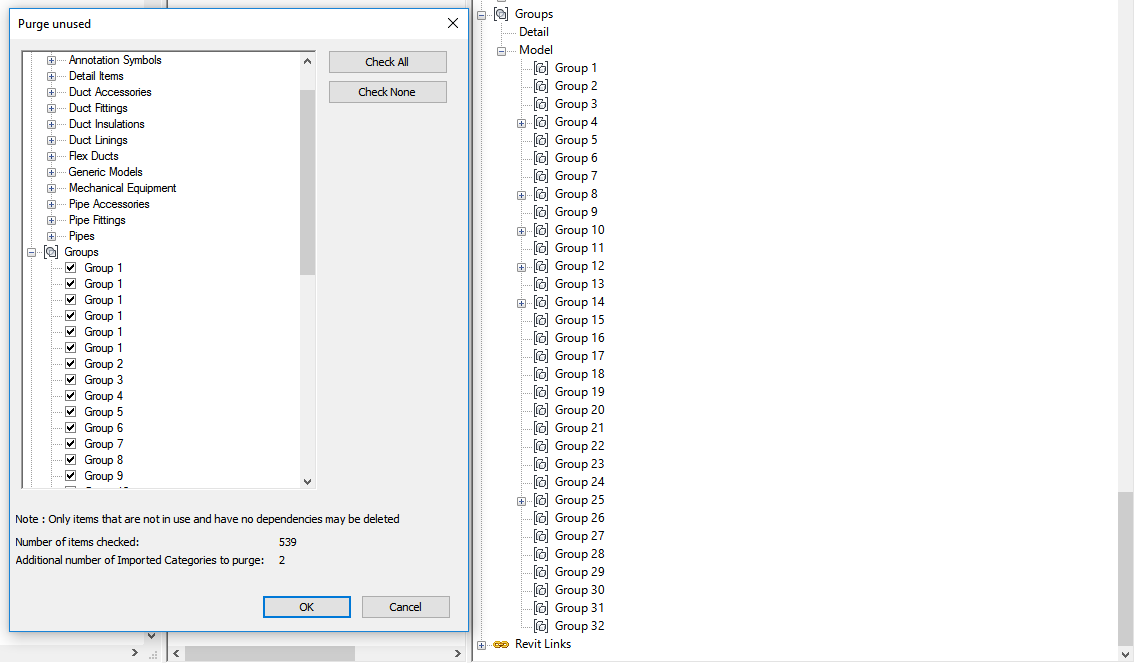
Somehow there are multiple copies of Group 1. But purging Group 1s only didn’t fix it…

To fix this model all that was needed was to

  1. Purge
  2. select all Groups, using Shift to multi-select
  3. press Ok
Immediately, Duct and Pipe fittings were created properly.

To fix any that were in a broken state, all you have to do is momentarily drag to disconnect one element, and drag it back into position. The system will heal itself, and all Duct and Pipe Fittings will adopt the system they are connected to (as they should).

When troubleshooting, try to always test one thing at a time. In that way, you can more quickly isolate the problem… and the solution 🙂

Links:
https://www.revitforum.org/mep-general/28759-pipe-duct-fittings-all-undefined-no-system.html

https://forums.autodesk.com/t5/revit-mep-forum/systems-not-working/m-p/6653133/highlight/false#M35799

Systems not working | Revit Products | Autodesk Knowledge Network

Translated quote:
Please download the macro down here: Download DeleteStandardMaterials

  1. Connect Revit.
  2. Unzip the zip file. The ZIP contains a DeleteStandardMaterials folder with two subfolders (AddIn + Source).
  3. Copy the addin + Source folder on the following path: C: \ Program Data \ Autodesk \ Revit \ Macros \ 2015 \ Revit \ AppHookup \ DeleteStandardMaterials
  4. Start Revit.
  5. Open the file.
  6. Open Manage / Macro Manager / Application tab: The macroDeleteStandardMaterials” appears under the Application tab.
  7. Select “Execute” and start the “Run” command. > The standard materials are removed.

via
http://translate.google.com/translate?u=http%3A%2F%2Fbimblog.typepad.com%2Fautodesk_bim_blog%2F2014%2F08%2Fdatei-performance-issue-in-revit-2015.html&hl=en&langpair=auto|en&tbb=1&ie=UTF-8

unusedmats-2670369

I saw a question like this on the forum so I had a quick go at it (see image below). Basically it checks what Family Types are placed against those loaded into the project, and then deletes unplaced component Families using SteamNodes Tool.Eraser:

Post flight family list:

Future versions of this could start looking at system families / types using similar methodology.

… is not easy.  Revit prefers that you don’t clog up your drawing with View Templates rather than trying to clean them out later.  You can use various methods to transfer just one Template from project to project, such as this example.

I would assume there is an add-in somewhere that finds unused View Templates and allows you to delete them, but it must be done manually with vanilla Revit.

Further reading:
Deleting a View Template – WikiHelp

View Filters & View Templates – Revit

Revit Beginners: Additive Views vs. Subtractive Views

Purging Unused Views – Sheets | BD Mackey Consulting | The Revit Geek Blog

Sometimes you will have some junk imported DWG definitions residing in your project.  These may be present due to the long history of the project, perhaps using Transfer Project Standards – View Templates, or just poor RVT model management.

How can you get rid of them?

There are various paid tools that will let you do it, but if you already have access to the Whitefeet Tools, you can use them to easily delete any import definitions (they don’t have to be DWGs) that you no longer want in the model.

Here’s how to do it:

  1. Install the WhiteFeet Tools, if you haven’t already.
  2. Open Revit
  3. Go to Add-Ins, Utility Tools (the W logo) and click on Management Tools
  4. Click on Manage Attachment Links
  5. Select the definition you want to remove.  Make sure to select a line with the Type ‘definition’. (See image below).
  6. OK and close out of the dialogs
  7. Once back in Revit, use the Manage – Select by ID tool and press Ctrl+V.  This will paste the element ID for that import definition.  The Properties Palette will show the proper import name, but everything will be grayed out.
  8. Press the Delete key on your keyboard
  9. Done!

Now, when you go to your VG – Imported Categories list, that particular Import will no longer be present.

Congratulations, your model just got cleaner!

A couple of concise tweets from some Revit legends:

Do you need to clean up your Revit files for transmission?
It is a common task to remove as much from a model as possible prior to sharing it with your consultants for the purpose of linking into their model or sometimes you want to lighten up a model that was sent to you for the same purpose. Delete Sheets, Views. and Revit Links does just what it says. You can select which of the three options you chose using the provided check-boxes.
This tool should only be used on models detached from central as it can be quite destructive.

Download at:
Delete Sheets, Views, and Revit Links | case apps

It must be hard to make money as a Revit application developer – because there are some cool free add-ins getting around.  From revit-app.com, check out these three free utilities:

Easy Family Loader
It will filter the path name, then the file name, and it’s quite easy to use.

Materials batch delete tool
This little tool will help you a lot when you want to delete multiple materials.

Auto Dimension

Download them all, for both Revit 2012 and Revit 2011, at:
Revit Applications – download center