Basically, the issue goes something like this:
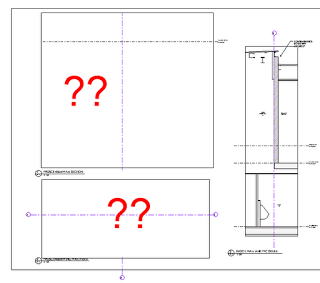
Revit 2012 can’t find a linked dwg anymore. When I try to reload it, Revit says the file doesn’t exist. There is an other linked dwg in the same folder, which still loads fine.

Here are some relevant forum threads:
http://www.revitforum.org/architecture-general-revit-questions/3432-problem-revit-cant-find-linked-dwg.html

http://forums.augi.com/showthread.php?t=111157

http://forums.augi.com/showthread.php?t=73434

http://www.revitcity.com/forums.php?action=viewthread&thread_id=23907

Here is one solution.  Well, its not really a solution, more of a method that can be used to fix this problem:

1) make view templates for the graphical overrides of the imported dwg (Overrides import)
2) remove the file from the project
3) save under new name
4) reopen the project and Link CAD the same dwg file
5) apply the view template for graphical overrides
6) check all views, if you imported to all views
7) redo dimensions, if there were any connecting the linked dwg with the model

via this post

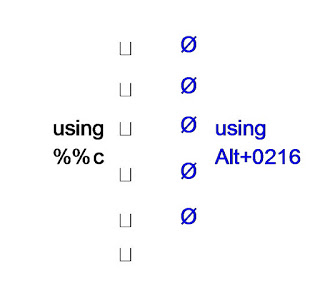
In AutoCAD, you can type %%c and it will get translated into a diameter symbol.  Other control codes may be found here.

However, I have found that this method does not import into Revit correctly.

Instead, you need to use the Alt+0216 code in the AutoCAD DWG file.  When this is imported or linked into Revit, the diameter symbol will display correctly.

You can use the FIND command in AutoCAD to quickly find and replace the offending %%c diameter symbols with Revit-friendly Alt+0216 diameter symbols.

Image and video below to demonstrate:

For related information, check out:
What Revit Wants: How to add symbols to Schedules and Text in Revit

This recent post by RevitKing has a nice list of the main codes you will use:
Revit.King’s BIM coordinator/ Revit Blog: Adding Revit text symbols like (diameter)

ƒ = ALT +0131
™ = ALT +0153
® = ALT +0174
© = ALT +0169
° = ALT +0176
± = ALT +0177
² = ALT +0178
³ = ALT +0179
× = ALT +0215
Ø = ALT +0216
÷ = ALT +0247

This happened to me recently on a very big workshared project.  Turning off the Crop of the view made the links reappear, but when I zoomed in, they disappeared again!

The solution?  Turn off the Far Clipping for the view in question.  This made the Linked Import reappear and act in a predictable manner.  Most of the views I’m working with already have Display Model set to ‘Do not display’, so it doesn’t cause graphical problems for me to turn off the Far Clip.

This is why upgrading large projects to the next version of Revit is scary to me.  I thought waiting to Web Update 2 would be safe – but it still wasn’t!

Now I need to go through lots of views that have Linked DWGs and check if they are ‘broken’ and need the Far Clip to be turned off…

UPDATE
Some more information:

  1. The views in question seem to Print Preview and Print correctly, suggesting this is some sort of graphical problem?
  2. The Linked CAD Import is selectable, but not visible.  Once selected, it is shown highlighted like any other element.
  3. Not all views are affected, only certain ones (most affected seem to the Linked Imports living in Detail Views and Sections).  Drafting Views appear to be immune.
  4. If no one else has this problem, I may have to look into my hardware configuration.
  5. If a file ALREADY had No Clip set, the Import may STILL not display.  Toggled the view to ‘Clip with Line’ and then back to ‘No Clip’ – and the Import reappeared!
  6. New Revit session has no effect
  7. New Local from Central has no effect
  8. Synchronise has no effect
  9. Reloading the affected Import has no effect

See video below (to prove that what I’m saying is true)

Sometimes you may have trouble using a DWG that contains ‘points’ to create a Revit topography.

There are two main ways around this.

METHOD 1
Here is a LISP routine to export points in a DWG to CSV file:
http://www.revitcity.com/forum_files/69930_RegCoorPointsCsv.lsp 

These points can then be imported when making a Revit topography by selecting ‘Specify Points File’ on the Ribbon.

via
RevitCity.com | Topo point does not import?

METHOD 2
Alternatively, you can Replace the points with some other object that Revit will make use of more easily (for instance, a block with some very short lines).  To do this, use the ‘RP’ LISP routine from the following post:
Re: Replace point with block/object – Autodesk Discussion Groups

You have two views, and you want a DWG Import or Link to be displayed the same in both views.  What is the quickest way to accomplish this?

  1. Copy DWG from first view.
  2. Paste Aligned into second view.
  3. On second view, right-click in Project Browser.
  4. Apply View Template – then ‘Show Views’
  5. Select the first view.
  6. Uncheck everything except the item related to ‘Import’ visibility.
  7. OK!

Here is a quick video:

A big tip for new players:

Never import a DWG file.  

And never, ever explode an Imported DWG file.

Nothing good will come of it.  Trust me.  Instead, do this (in order of preference):

  1. Use Revit natively, without adding messy DWG or CAD import data.
  2. Link DWG files, rather than import.
  3. Import DWG files into a Detail Component family, and then load that family in.
  4. Eat a very sour lemon.
  5. Import DWG file.
  6. Import DWG file and explode it.
  7. Cry

If you have any thoughts, or any other methods that you use (like Importing a DWG file into a RVT link and then using ‘Linked Views’, feel free to comment).

Erik Egbertson over at Inside the Factory made a comment about modeling a Stealth Aircraft in a recent post, and it got me thinking. How would you go about it?

Now, I’m sure it would be possible to do it with the Conceptual Modeling tools, but it could take a while.

Why not utilise some existing 3D content and import it into a family? I described that workflow in my post Contextual 3D Views – Shaded vs Rendered. Basically, you need to:

  • Download a Sketchup model that you like the look of (from http://sketchup.google.com/3dwarehouse/).
  • In Revit, create a New-Generic Model family.
  • Import the SKP file using Import CAD.
  • Make sure the resulting geometry is of an appropriate size.
  • Save the family and load it into your project.

Please note that there may be copyright on these models.So, about that Stealth Aircraft. Here is the link.