It is pretty difficult to change the Workset of Pipe Insulation. The Properties Palette allows you to change them one at a time (but not multiple), while the method I posted about previously can change multiple Pipe Insulations to a different Workset, but it didn’t have a nice filtering mechanism.

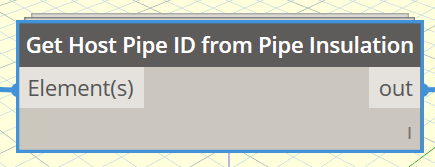
Enter Dynamo… I made a custom node that takes a list of Pipe Insulations and gives you the Host Pipe element:

Then, I packaged this up in another node that collects all Pipe Insulations, checks their Workset, finds their Host Pipe, and then saves those Pipes to a SelectionSet:

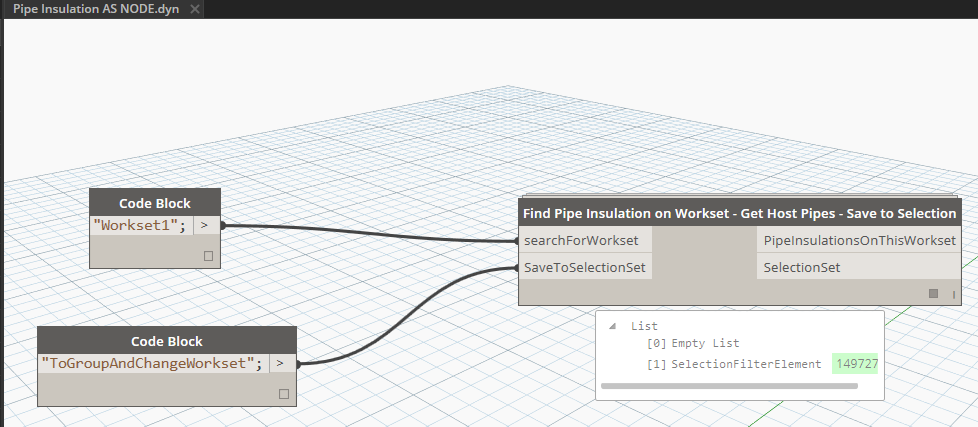
So, if you have Pipe Insulations on the wrong workset:
1.    Install Bakery package in Dynamo
2.    Run definition as in image above
3.    Close Dynamo
4.    Load the Saved Selection
5.    Group these Pipes (which groups the Insulations too)
6.    Change workset (it will have already adopted the current workset)
7.    Ungroup
8.    Done

Thanks to Konrad and Andreas for archi-lab and Clockwork packages respectively. I get a few comments about my Bakery package having a lot of dependencies, but I like the fact that I just need to install Bakery and I get archi-lab, Clockwork, Lunchbox etc. Its like a rough and ready deployment solution…

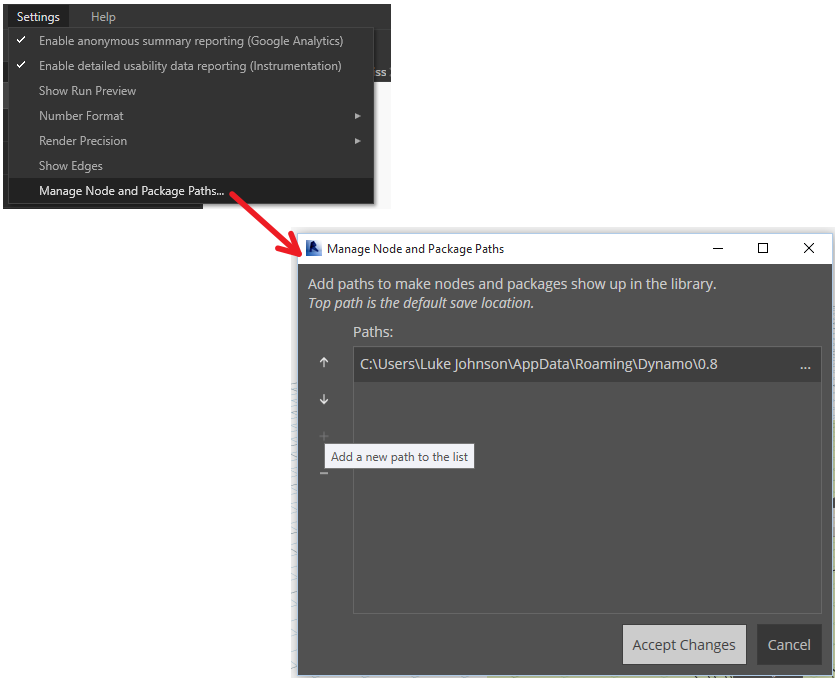
Oh, one more thing. You may notice in recent versions (like 0.8.2 RC) that there is now some custom path management for Dynamo resources:

Good stuff!

Check out Project Alexandria:
http://www.projectalexandria.io/

Thanks to @michaelclothier for the heads-up on this one…

You can enter your email and sign up to find out more. They will send you this summary of the solution:
Welcome to Project Alexandria

The complete, connected solution for construction project teams

Congrats! You’re now in the know.  Project Alexandria is still under wraps, but we’ll be starting to spread the word soon.  And you’ll be the among the first to learn more.

Project Alexandria is being built to connect your construction project teams, with capabilities like:

  •     Management of all your 2D plans, 3D models and any other project documents
  •     Automatic updates to document set versions, and powerful workflows and approvals
  •     Anytime, anywhere access to project documents for your entire project team

We’ll be sharing more details soon, so stay tuned for updates as we make them available.  Future updates will be posted to projectalexandria.io (but not before you see them first, of course)!

A big thank you for your interest, welcome to the “in crowd”, and please help us share the word using the social links below.

Project Alexandria Team

This uses the Media Creation Tool. I was running Tech Preview build 10041 on one of my devices and it wasn’t automatically getting the Windows 10 RTM upgrade, so I used this method instead of waiting for Windows Update…

1) Go to: https://www.microsoft.com/en-us/software-download/windows10

2) Select appropriate version to download:

3) Run the downloaded tool:

4) Choose “Upgrade this PC now“:

Wait for download and install to finish:

Update
Method 1: after seeing my post, Troy Wright kindly shared his take on this. It uses only one custom node – Eraser by Julien – and it also works for Revisions that have been ‘ticked’ as issued, so this is probably the more powerful method.

Here is a download link to his DYN. Thanks Troy!

I will also add his email as a comment to this post.
Method 2
Steps:

  1. Install Dynamo
  2. Install Bakery package 
  3. Open a Revit project where you want to delete Revision Schedule rows
  4. Open this definition
  5. Run it
  6. Close Dynamo window
  7. Manage – Select by ID
  8. Paste
  9. Delete
  10. Done!

As always in Revit, it leaves behind the first row in the Revision Schedule… However, this method is more robust than deleting Revision Clouds as it also removes items appearing based on the “Revisions on Sheet” schedule. It is also much faster than laboriously using the Merge Up command one by one in the Revision Schedule.

As always, use with care 🙂

Video:

I think its safe to say that Dynamo package deployment is still a work in progress, particularly when considering issues of intellectual property along with the complexity of IT networks in large organizations. For that reason, any step to make Dynamo easier to deploy and use is a good idea.

Dyno Browser gives us a very simple way to share and view DYN definitions using a certain file structure and the Roaming directory inside a user’s profile.

Steps to setup and use Dyno Browser on one PC:

  1. Close Revit
  2. Install Dyno Browser (download link)
  3. Open Revit
  4. Start Dyno Browser from the Dynamo ribbon dropdown (Visual Programming)
  5. Right-click in the pane and select “Open Workspaces Storage”
  6. In this folder, make a new top level folder and then put some DYN files in it, like this:
  7. Once we have some DYN files in the right location, we can right-click in Dyno Browser and select “Rescan Workspaces Storage”. This will update the list of available definitions in the Dyno Browser pane.
  8. Now, right-click on the definition you want to run and select “Open Workspace in Dynamo”
  9. You may not see your definition straight away, so just press the X button on the Start tab to close that tab. Your definition should now be visible
  10. Click Run

 So, what is good about this? Because now we can create a shortlist of important or ‘approved’ DYN files and deploy them using the appropriate file structure to the team, using Roaming profiles.

There is actually a bit more functionality available in Dyno Browser: it supports using JSON to feed certain preset values to Dynamo nodes. This is a bit more in-depth, and can be review at the home page.

Video:

The current alpha version is 0.2.52

Main site:
Dyno – Organising, deploying and running <strong>Dynamo</strong> workspaces tool for <strong>Autodesk Revit</strong>: Alexey Lobanov

After Google Reader was decommissioned, I was happy to find that inoreader was an excellent replacement. But one feature was missing: free and easy RSS Feed Translation. Did you know you can deploy your own Google Script to translate RSS feeds, and then subscribe to them in your preferred RSS Reader (like inoreader?)

Here are the steps, from labnol.org:

  1. Open the Google Script and choose File -> Make a copy to create a personal copy of that feed translation script into your Google Drive.
  2. Replace the source language (line #4), the target language (line #7) and the RSS feed URL (line #10) with your own values. (some language codes here)
  3. Go to File -> Manage Versions and choose Save a new version. You may leave the description field blank.
  4. Go to Publish -> Deploy as Web App, choose “Anyone, even Anonymous” under “Who can access the app” and click the Deploy button.

Google Script will now offer you a link to the web app. That’s actually the new URL of the translated RSS feed which you can directly subscribe in Google Reader or any other news reader app like Reeder, Flipboard, etc.

If you wish to translate another RSS feed, or offer the same feed but in another language, just go back to step #1.

via
How to Translate RSS Feeds with Google Scripts

This fixes the relatively nasty addin incompatibility issue that was floating around…

Direct link for Revit 2015:
http://download.autodesk.com/SWDLDDLM/Updates/RVT/2015/Autodesk_Collaboration_v7_for_Revit_2015.exe

Direct link for Revit 2016:
http://download.autodesk.com/SWDLDDLM/Updates/RVT/2016/Autodesk_Collaboration_v2_for_Revit_2016.exe

Known issues and Fixes:
http://download.autodesk.com/SWDLDDLM/Updates/RVT/2016/KnownIssuesA360Collaboration_v7_2015and_v2_2016.htm

A while back I started using the hashtag GoodRevit to share workflow tips that I’ve found useful when working in large teams and on large projects. Here are some of those tweets:

Do you have any tips for Good Revit? Join the hashtag, or freel free to comment at this post.