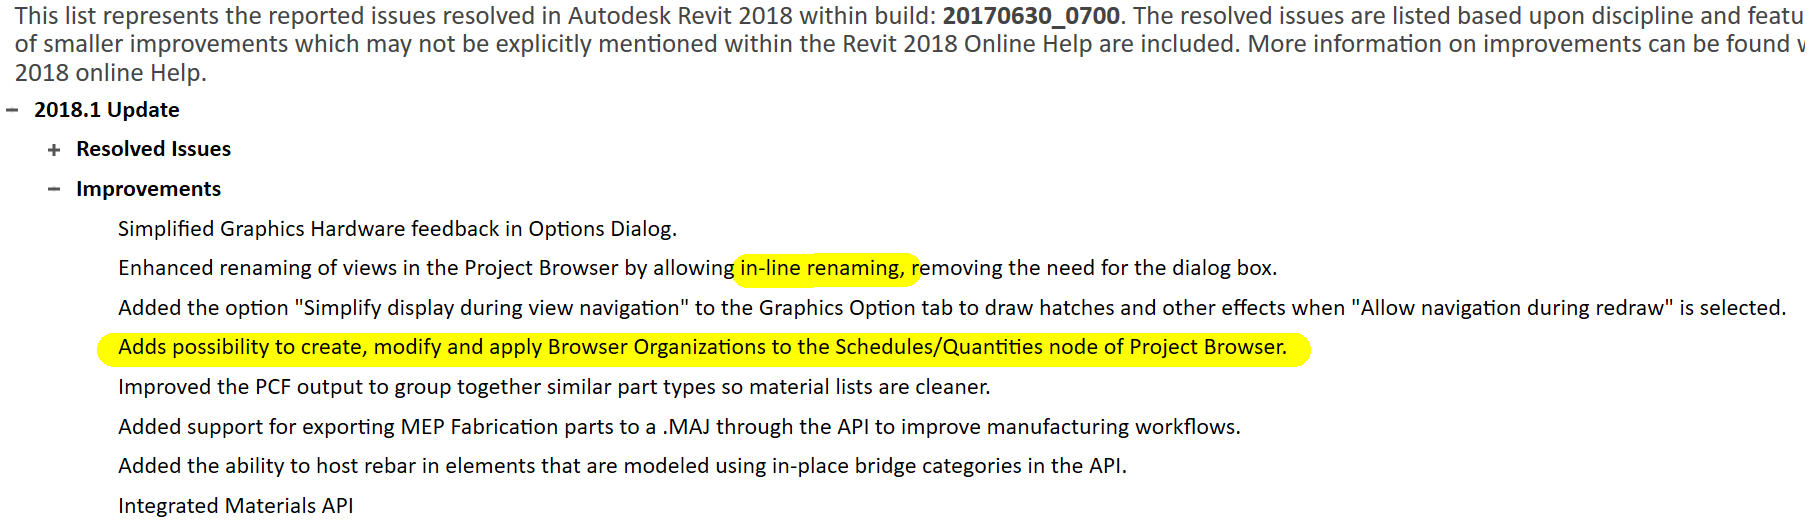
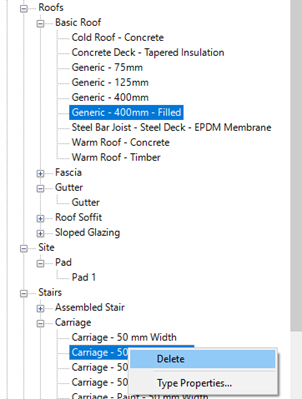
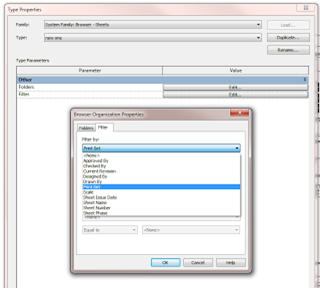
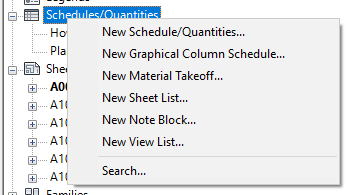
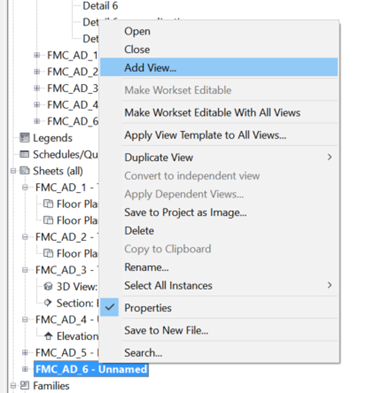
The first Revit point update each year typically brings some features that the dev team didn’t quite have cooked for the initial release, and this year we get something pretty special… the ability to apply Browser Organisation to Schedules node of the Project Browser. It has been that one long, messy part of the PB for a while, and I welcome that this long-requested feature has now been implemented! Good job Factory 🙂
Note that after this update is applied, there will be two versions of Dynamo Core installed, 1.2.2.373 and 1.3.1.1736…
The paper aims to provide market insight into organisational strategic issues and the role and functions of project managers in BIM implementation. The paper also looks to the future, at how roles might evolve as BIM continues to develop.
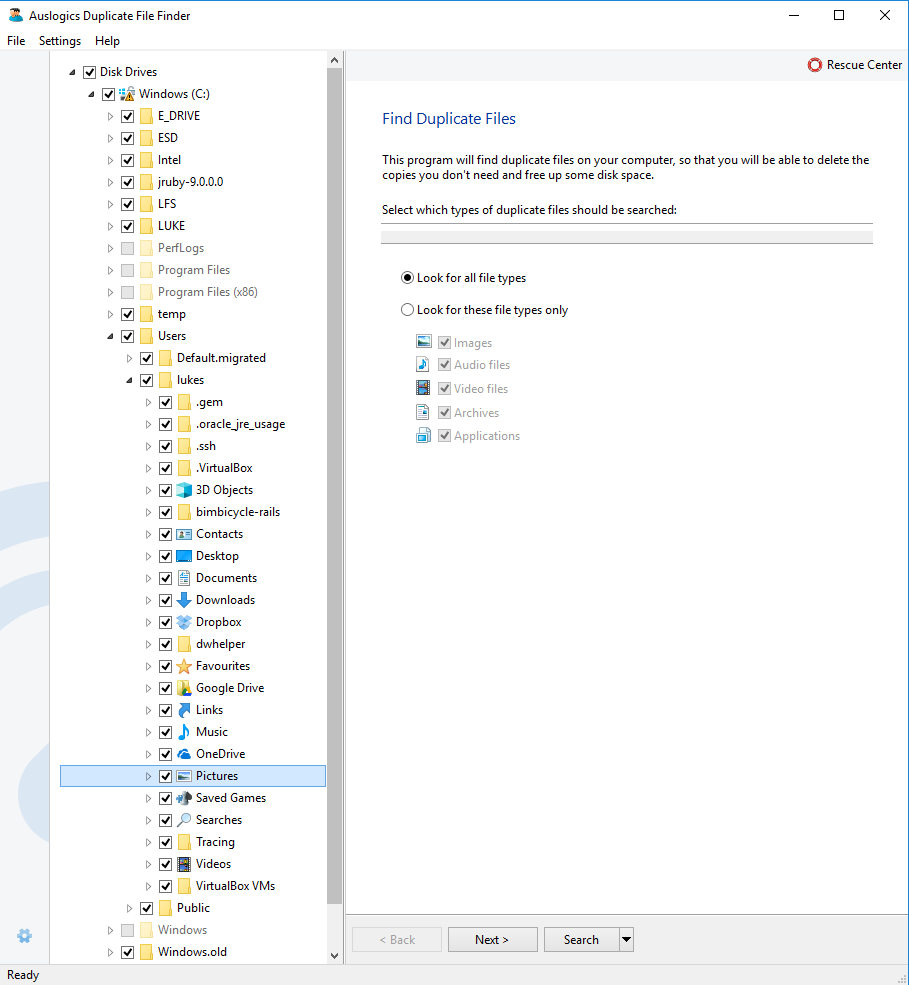
Recently I wanted to start ‘unduplicating’ some files in my Pictures folder on OneDrive. There are a lot of tools out there to look for duplicate files, but here were the two that I found to be the best:
I tweeted this today and I thought it was worth a repost here for all the Facebook and LinkedIn followers…
There are no LODs.
There are only:
Design Models,
Construction Models, and
Operations Models
What does the above statement mean?
Firstly, that if you are going to try and standardise something you need to make it simple and practical. Secondly, the content of a BIM dataset is best described by its current purpose. It won’t always be a Design model. Once it starts to become a Construction Model, the Design Model needs to die or be used only for crude reference. And once it becomes an Operations Model, it may need some extra data added, but it will likely need a lot of Design and Construction junk removed.
Don’t try and make a model that lasts forever, for every purpose, and then attempt to standardise that as a point-in-time deliverable with some ridiculous metrics.
Make the BIM standards simple, practical, and closely tied to the current purpose of the model.
The second post in this series is focused on the Project Browser. The first post in the series described how to get your user interface and lab environment ready…
Note:
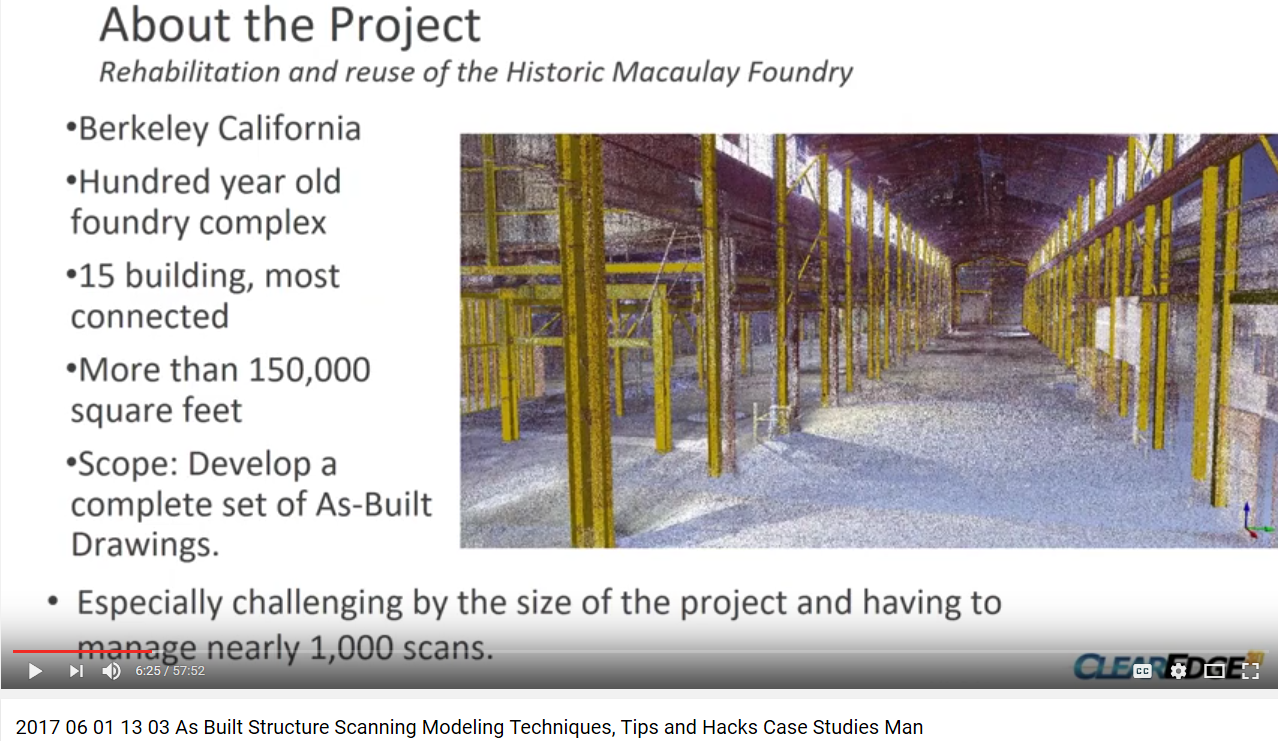
Please open Revit, and open the rac_advanced_sample_project.rvt
Please download and import the supplied KeyboardShortcuts.xml
I’m excited to share this release with you, because it has some amazing improvements. Here are my top 3 new features:
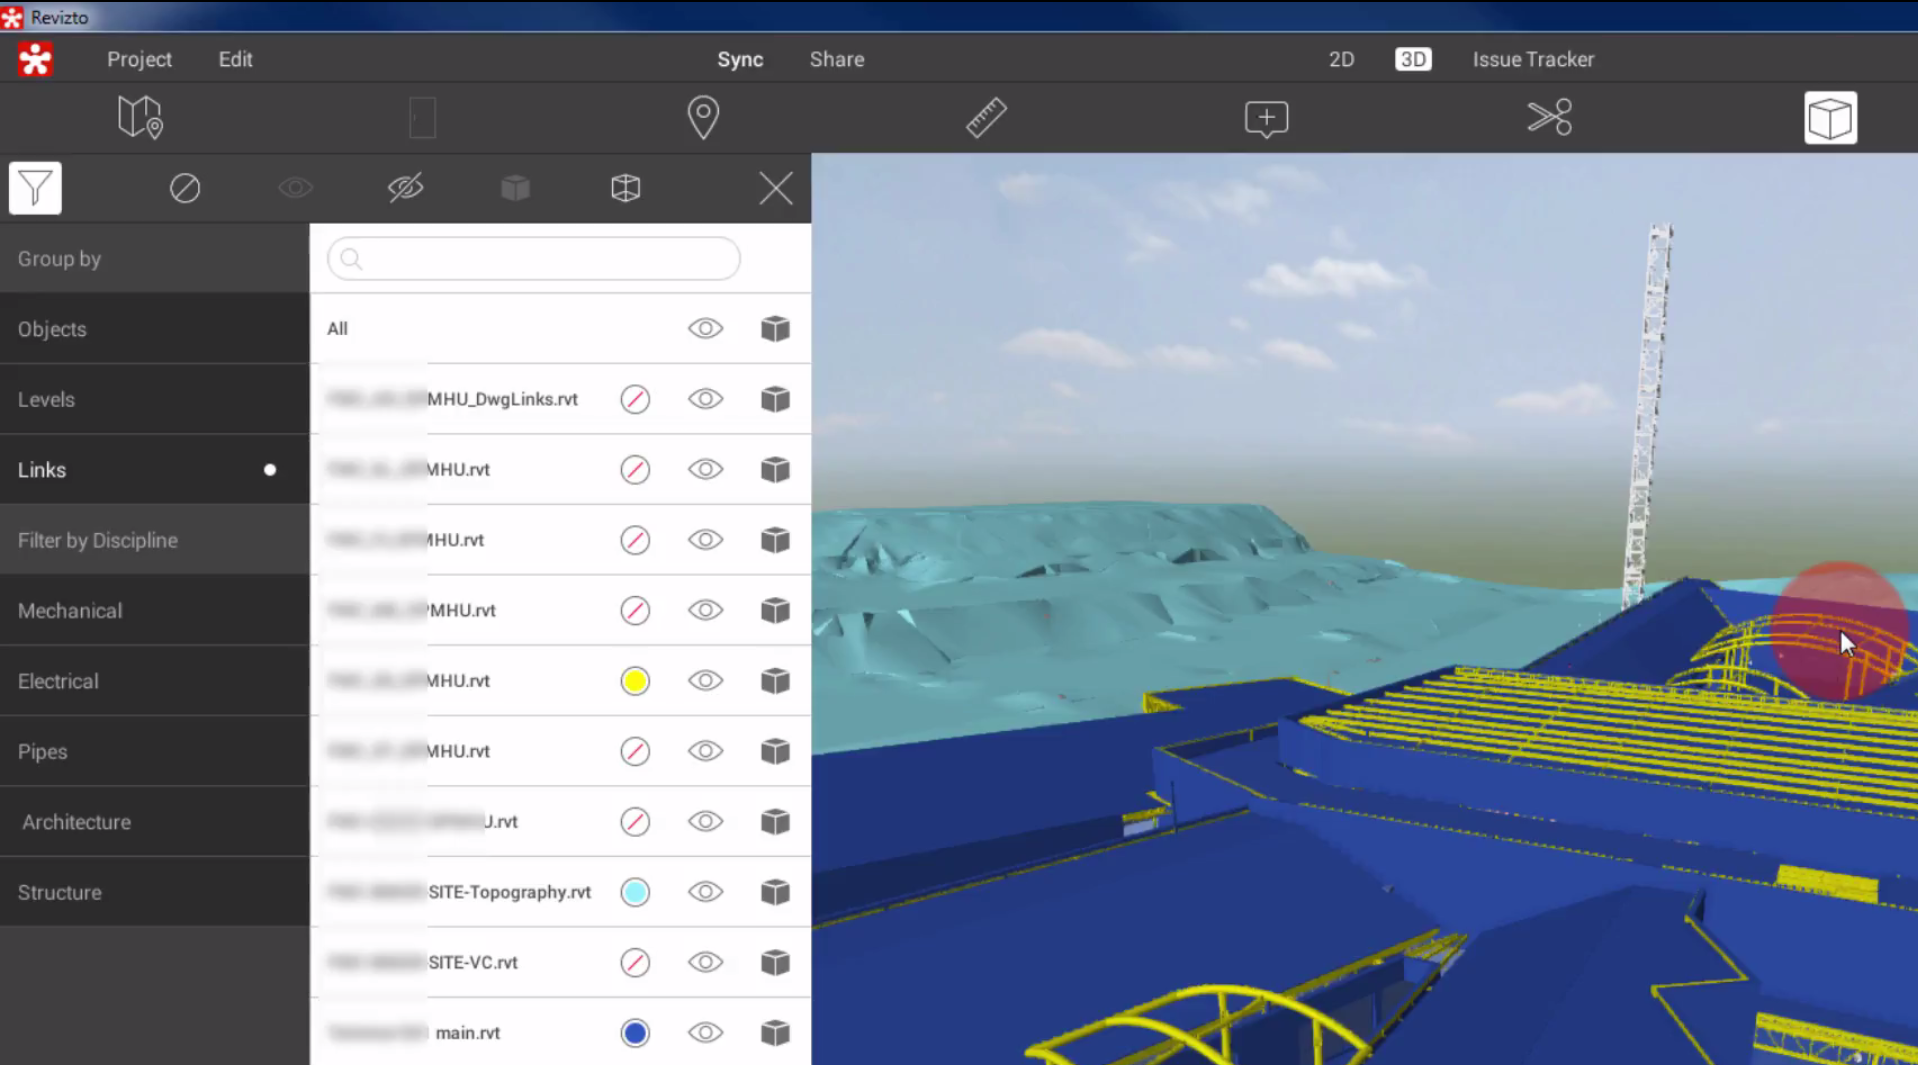
Visibility control of Linked Models. Basically, you can now turn individual models on and off like you would in Glue or Navisworks, and you can override colours! Those colour overrides can be saved into a viewpoint or issue. This is a massive enhancement.
Phases Support like Revit. There are some really nice visual effects possible, now that Revizto can show you Existing and subsequent phases, along with various phase filters. This opens up a range of new possibilities for sharing and discussing work in and around existing buildings. You can now ‘markup’ a demolition phase directly in the model, and assign issues to get items resolved quicker.
Clickable Links on Sheets. For sheets you export from Revit, you can now immediately jump to the related views by using the view symbol hyperlink, just like you would in Revit.
As you can see, the integration with Revit is getting tighter. This means Revizto is now even stronger for fully in-house review workflows, like model review and drawing markup within an Architectural firm. Of course, Revizto remains my favourite way to handle coordination for large multi-discipline teams, whether that be design coordination or services coordination tasks.
This image shows how you use the new Objects dialog to select ‘Links’ and then override the colours and visibility of each linked model:
What’s new in Revizto 4.4 release:
– Ability to color code links, categories and levels. New “Objects” dialog.
– Visibility control of linked models and individual objects.
– Phases support from Revit.
– Tag management system for the Issue Tracker.
– Clickable links on sheets.
– Console app for getting XLS reports from the Issue Tracker.
– Ability to attach new file formats to issues. The complete list of supported formats: pdf, txt, csv, xls, xlsx, doc, docx, jpg, png.
– Interface improvement. 3D tab: reconfigured toolbar.
– Brand new installer. Minor updates will come through as patches, containing only the differences and therefore being much less in size.
– Rhino support (direct plugin in Rhino).
Here is a direct link to the release build, or you can download from here:
This recent announcement revealed some new features coming to 3dsMax 2018.1, primarily a real-time VR engine in Max based on Stingray. This page has the steps to install it. Basically, you install update 2018.1, then install Max Interactive:
Here are some ‘facts at a glance’ coming from Autodesk:
What’s the news with 3ds Max 2018.1?
Autodesk 3ds Max 2018.1 now includes 3ds Max Interactive, a real-time engine based on Autodesk Stingray. This new 3D to VR workflow is designed to provide 3ds Max users with a new way to create interactive and virtual reality (VR) experiences. It is included with the 3ds Max 2018.1 update.
Who is 3ds Max Interactive designed for?
3ds Max Interactive is a real-time engine for design visualization specialists based on Autodesk Stingray. It can be used in a number of different contexts but its focus is on helping to simplify the process of turning animations, such as architectural visualizations, into stunning virtual reality experiences.
How does this relate to Autodesk Revit Live?
Autodesk is committed to creating VR solutions for the widest spectrum of users. Last year we rolled out Autodesk Revit Live, the powerful, easy-to-use cloud-based visualization service for architects that transforms Autodesk Revit models into VR experiences in one click. Autodesk Revit Live is designed for architects who require a solution to quickly explore, understand, and share Autodesk Revit designs on their desktop or in virtual reality. The new VR tools in 3ds Max 2018.1 we are announcing today are aimed at design visualization specialists working to produce high-end, photoreal experiences. With the new 3ds Max to VR workflow, we’re shoring-up data drudgery with capabilities like support for translating materials from the popular V-Ray renderer in 3ds Max to VR – freeing visualization artists to focus on the part they care most about: creating stunning imagery.
How much does 3ds Max Interactive cost?
3ds Max Interactive is available to all current 3ds Max subscribers – either as a standalone product, or as part of an Autodesk industry collection – at no additional cost. It cannot be purchased separately.