In the top right corner of the window, you can choose In–rfa to show only the Revit content.
Polantis – 3D Catalog technology – Free CAD objects for architects
Heads-up from Village BIM
AI Empowered Project Management
In the top right corner of the window, you can choose In–rfa to show only the Revit content.
Polantis – 3D Catalog technology – Free CAD objects for architects
Heads-up from Village BIM
Will Autodesk release more information on Revit LT (formerly Project Spark) at the upcoming ‘Lead the Way’ event? BIMnova thinks so:
It is likely that later this month for the virtual event Autodesk Lead the Way , to be presented this year’s version for different Autodesk product families. That’s when you know new version brings Revit 2013 and hopefully will include more information about Revit LT.
via
Google Translate of BIMnova post
The event is 22 days away – it is scheduled for 29 March 2012.

To further promote the BIM approach to those who think it is too complicated and too expensive, Autodesk will launch a version of Revit LT, which will be delivered at the same time that Autocad LT for 200 € more, or a total investment of € 1 500. “We have more than one million legal licenses of AutoCAD LT in the ACS in the world which we will propose a change and this bundle.” For the record, a license of Revit is worth about € 6,500. “For those who have complex needs but punctual, we will also propose in the course of a monthly rental for € 200 per month for a full Revit or € 40 per month for Revit LT”.
via Google Translate of (PLM: Autodesk at the forefront of BIM – Industry and Technologies)
of http://www.industrie.com/it/plm-autodesk-a-la-pointe-du-bim.12697
It seems that this information originated with Nicolas Mangon, Senior Director AEC Strategy and Marketing at Autodesk.
Heads-up from Revitez
When Acrobat X was released, most of the powerful 3D functionality of Acrobat was removed and placed into 3rd party tools.
However, you can still download trial versions of Acrobat 8 and Acrobat 9 that include the enhanced 3D functionality. Links are provided below:
Adobe Acrobat 3D Version 8 (includes Adobe Acrobat 3D Toolkit)
http://te.hu/download/adobe/demo/acrobat/acro3D80_efg.zip
Adobe Acrobat 9 Pro Extended
http://www.adobe.com/cfusion/tdrc/index.cfm?product=acrobat%5Fpro%5Fextended
You may be interested in my previous posts:
Create Adobe 3D PDF directly from Autodesk 3D DWF
Feel free to login to http://openrevitstandards.com and add links to the page:
Links to Revit Materials online | Open Revit Standards
Most of you probably already know about the Links to Revit Content page.
There is also a LinkedIn group for the Open Revit Standards.

In response to Andy’s musing that “I can’t help thinking though that there must be a better way of delivering Revit materials definitions to Architects,” I would like to direct attention to the method used by Lysaght. I previously posted about it here.
Essentially, you download a .adsklib file that you can then access through the Revit material manager / dialog.
Personally, I have struggled to keep up with the way that material definitions have changed over the past couple of years in Revit. The sheer number of tabs and inconsistent screen divisions kinda confuses me (I don’t like having this split screen effect with 2 tabs on one side and 3 on the other… :-S )
In any case, currently the .adsklib method is, in my opinion, the quickest and best way for Suppliers to deliver appropriate Material Appearances into Revit – if any suppliers are listening…

In response to:
Shades of Grey: RUBBER CONTENT
FXI Cotton Candy – approx $199

Quad Core ARM® Mali™-400MP Graphics Processing Unit
– Quad-core ARM Mali-400MP 720p / 1080p OpenGL ES v2.0
– 30M Polygons, 1.2 GPixels / s
Connectivity
Wifi 802.11 b/g/n
Bluetooth 2.1 + EDR
Memory
1GB DRAM
Up to 64GB memory local storage (microSD)
Raspberry Pi – approx $35
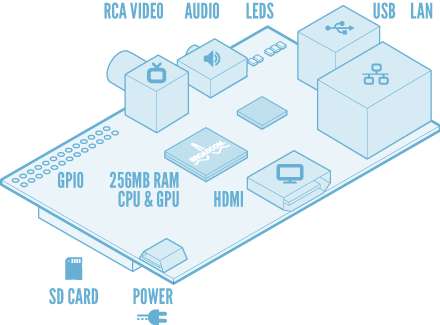
CPU: 700 MHz ARM1176JZF-S core (ARM11 family)[3]
GPU: Broadcom VideoCore IV,[45] OpenGL ES 2.0, 1080p30 h.264/MPEG-4 AVC high-profile decoder[3]
Memory (SDRAM): 256 Megabytes (shared with GPU)
Onboard storage:[10] SD / MMC / SDIO card slot
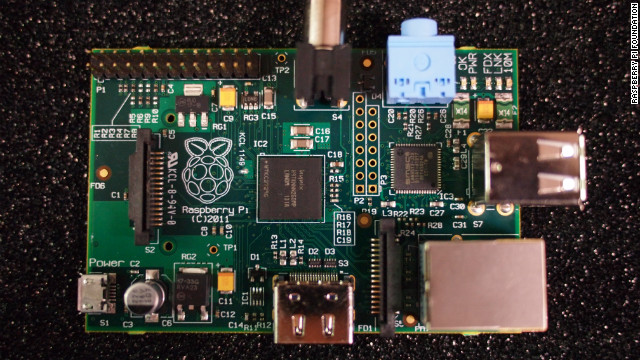 |
| Image from CNN.com |
Tiny $35 Raspberry Pi computer causes big stir on launch day – CNN.com
Previous post:
PC on a USB Stick for $25
Here is what we want – you select an in-place family and click ‘Convert to Component Family‘ on the Ribbon. Through API Wizardry, the following happens without any further user interaction:
This can all be done manually of course, using the workflow described here.
I’m sure that many users would find this tool helpful, and for some of you advanced Revit API programmers, this utility should be a piece of cake!
Also: if you release this utility for free, just think of the Revit API street cred that would give you.
Finally, if you want to take it to the next level – make a Batch Convert option, that allows the user to ‘pick’ which In-place families (from the current project) that they would like converted, after which the Batch tool goes ahead and does steps 1 to 7 above on each and every in-place family you selected.

The Five Stages are actually different to the 6 Phases of a Revit User (you need to read it if you haven’t before).
I think its interesting that both of these could be roughly mapped to the Gartner Hype Cycle.
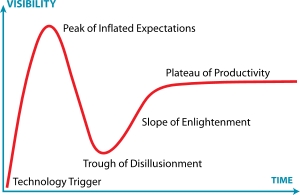
Does anyone want to take the time to draw a Five Stages – 6 Phases – Hype Cycle diagram (mapping each element to specific points on the hype cycle)? I think it would be quite popular in the Revit blogosphere… Go bloggers go