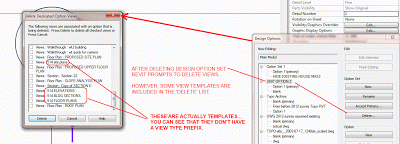
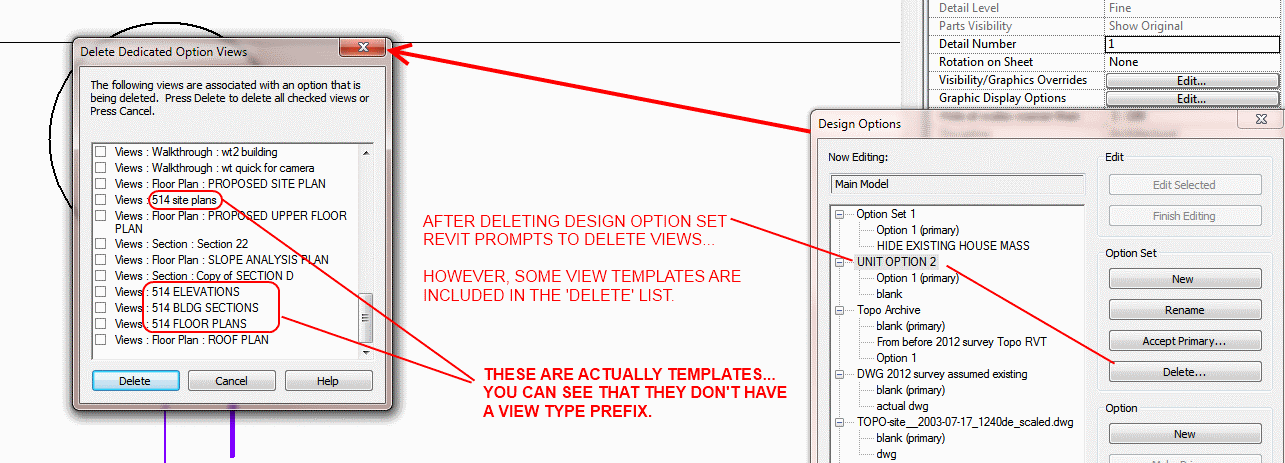
If a View Template includes a Design Option visibility setting, and then the associated Design Option Set is deleted, Revit will prompt you to delete the View Template:
Obviously, you can untick the box to retain your View Template.
Until we have full multi-core implementation on Revit, it is essentially looking at one core at a time (except for certain uses, such as Rendering). Mark Cronin has tested whether Hyper Threading helps standard Revit – and his benchmarks indicate that it does not… the number to look at below is 318 (no HT) vs 335 (with HT).
He “averaged the results from the workstation, and the scores can be seen below: They clearly show that there is at least a marginal improvement in the model creation portion of the testing, and a substantial performance reduction in the rendering section with Hyper-Threading disabled.” via Hyper-Threading for Revit? | betterREVIT
How far has multi-core implementation come in Revit? Gordon Price on RFO: File and view open are both multi-threaded, as are exporting of DWGs and images. Pretty sure printing is multi-threaded now too. And I am sure that updating a curtain wall is, just not sure yet if that is a function of curtain walls specifically, or if updating any family in a project is multi-threaded. Pretty sure it is not everything, as I just tested changing a wall thickness and it pegged my dual core VM at 50%. Edits to doors hit 49-50% for just a second. I suspect curtain walls got the optimized code because 1: it was easier and 2: really complex curtain walls kill performance
I recall that the revit.ini used to have a setting for multi-core wall join cleanup. Steve mentions it in quoting a Revit technical note: In Revit 2010, multi-threaded methods for printing and wall join cleanup have been made available. Multi-threaded hidden line removal for printing has been enabled by default. via Revit OpEd: Multi Core/Processors – Tech Note
So the revit.ini used to have ParallelWallJoins and ParallelPrintProcessing switches. I’m not sure if these are still implemented in Revit 2013 (my .ini was at “C:UsersLukeAppDataRoamingAutodeskRevitAutodesk Revit 2013Revit.ini” but didn’t include any lines for these multi-core switches … However, it might still be possible to add them.)
If you open PDF files using the embedded vector data (ie. lines), you can then use ADR (Autodesk Design Review) to snap to PDF lines in order to measure them.
This may be useful to you if you are using ADR for markup tasks. In our office, we are still very much PDF-centric, and various PDF readers allow you to measure PDFs anyway, so … you get the idea.
If you want to force ADR to open PDFs as vectors, follow the steps on the following post at RevitForum: Design Review Tutorial
Some direct links (you will need to login to download):
Thanks to Tim West for the post, the training guide and the registry tweak. Nice job!
From Tim West’s PDF linked above
Manual steps from Instructions.txt: XP Open your system registry editor with command ‘regedit’ ‘HKEY_CURRENT_USERSoftwareAutodeskDesign ReviewPreferences’ If there is not a key called ‘PDFImport’ please create it. Create a DWORD value whose name is ‘PDF Conversion Method’ and set its value as 2. Close your registry editor. Open your PDF files with ADR2012 PDF will be converted to DWF as vector; you can save this DWF file by then.
Vista/7 Open your system registry editor with command ‘regedit’ Expand ‘HKEY_CURRENT_USERSoftwareAppDataLowSoftwareAutodeskDesign ReviewPreferences’ or ‘HKEY_CURRENT_USERSoftwareAutodeskDesign ReviewPreferences’ If there is not a key called ‘PDFImport’ please create it. Create a DWORD value whose name is ‘PDF Conversion Method’ and set its value as 2. Close your registry editor. Open your PDF files with ADR2012 PDF will be converted to DWF as vector; you can save this DWF file by then.
Adopting BIM is a difficult and often unrewarding task.
“Open BIM” is what people on the leading edge are aspiring to and solves all your problems.
You’ll be expected to do extra work at a much earlier stage than you would have traditionally at a much lower fee.
BIM is based on a 3D model and therefore requires everything to be modelled as an exact copy of the final manufactured building component.
the quicker your architects can become qualified in structural engineering, the more benefit you’ll gain from BIM.
Mention that your closest competitors have all migrated to Revit and within a short space of time you’ll be promoted and your bosses will be able to smile smugly over their 5-iron and confidently state “We do BIM. What do you think about them apples?”
You cannot do BIM if you are a civil engineer, as civil engineers don’t build buildings.
To be safe, always leave an empty space at least 300mm clear of another discipline’s object.
Question from Alaa El Kabbany: I’m asking if anyone knows how to show the local file path on the revit file interface (like autocad)…..is there a way?
Answer: Download the Revved tool package from here. After it is installed, on your Add-Ins bar you can click on ReVVed — Open Folder to access the “local file path” in explorer.
Because the old CS2 activation servers have been switched off, Adobe have provided links and serial numbers needed to install CS2 products at: Adobe – CS2 Downloads
Includes products like full Acrobat, Indesign, Photoshop and Illustrator.


 Attached Files