It is Autodesk’s mobile-centric implementation of an integrated FM system… It hasn’t been around for long, but it already allows you to export Equipment directly from BIM 360 Field. It also allows you to view the equipment in context, and attach photos and other information.
It would seem like the current cloud model and sharing workflow from Autodesk currently looks something like this:
OwnCloud is a free file sharing and syncing software, and for the most part it works ok. I don’t think it really compares with a full featured, appliance based enterprise solution… but, its free. You may find it useful for sharing folders on a BIM project, but it can be prickly at times.
If you are using it and want to run multiple instances, perhaps to work with multiple folder structures or different OwnCloud permission accounts, you can do it this way (tested on Windows 7 and 10):
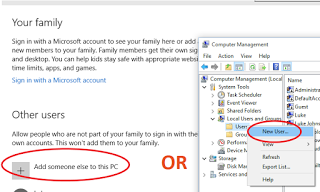
Make a new local PC user account to run the instance. In Windows 10 this is by: “Add, edit or remove other users” settings option from Start menu, then “I don’t have this person’s sign-in information”, then “Add a user without a Microsoft account”
In Windows 7 it was the more traditional user management, which you can access from Computer Management – Local Users and Groups – Users – rightclick “New User”
Set a password for this new user and give them Admin permissions (consider security of this in your environment…) You can set a password using Control Panel: User AccountsManage AccountsChange an AccountCreate Password
Make a CMD with contents like this: psexec -u YourNewOwncloudUser -p YourNewOwncloudUserPassword -d -i “C:Program Files (x86)ownCloudowncloud.exe” This cmd will launch a new instance of OwnCloud executable under a different username using psexec…
Go to %APPDATA%MicrosoftWindowsStart MenuProgramsStartup in Windows Explorer
Make a shortcut to the CMD from step 4
Double click the shortcut now to test it
First run will give you the setup stages for OwnCloud (Server, Username, Password). You don’t ever need to use that user account you made for anything else, it is just there as a separate identity for the OwnCloud process
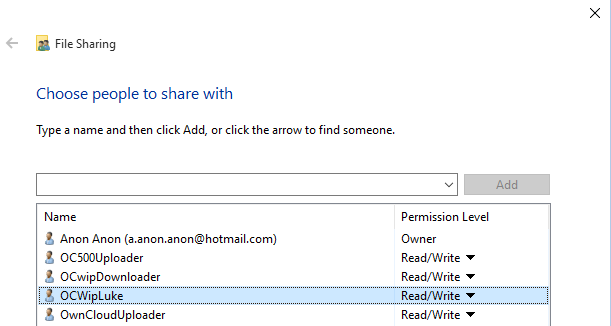
Before adding folders to sync, you should add Read/Write permissions to a Folder on your pc to that new user you created in step 2, something like this:
In Task Manager, it will look something like this:
Now, you have a new instance of OwnCloud, running at startup and syncing with different OwnCloud credentials to a folder on your PC.
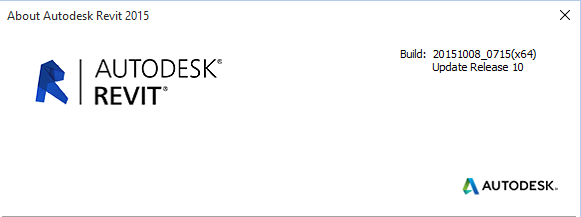
For Revit 2015 R2: This update requires one of the following: Autodesk Revit 2015 R2 for subscription customers (build: 20140905_0730) Autodesk Revit 2015 Update Release 9 for R2 for subscription customers (build: 20150704_0715)
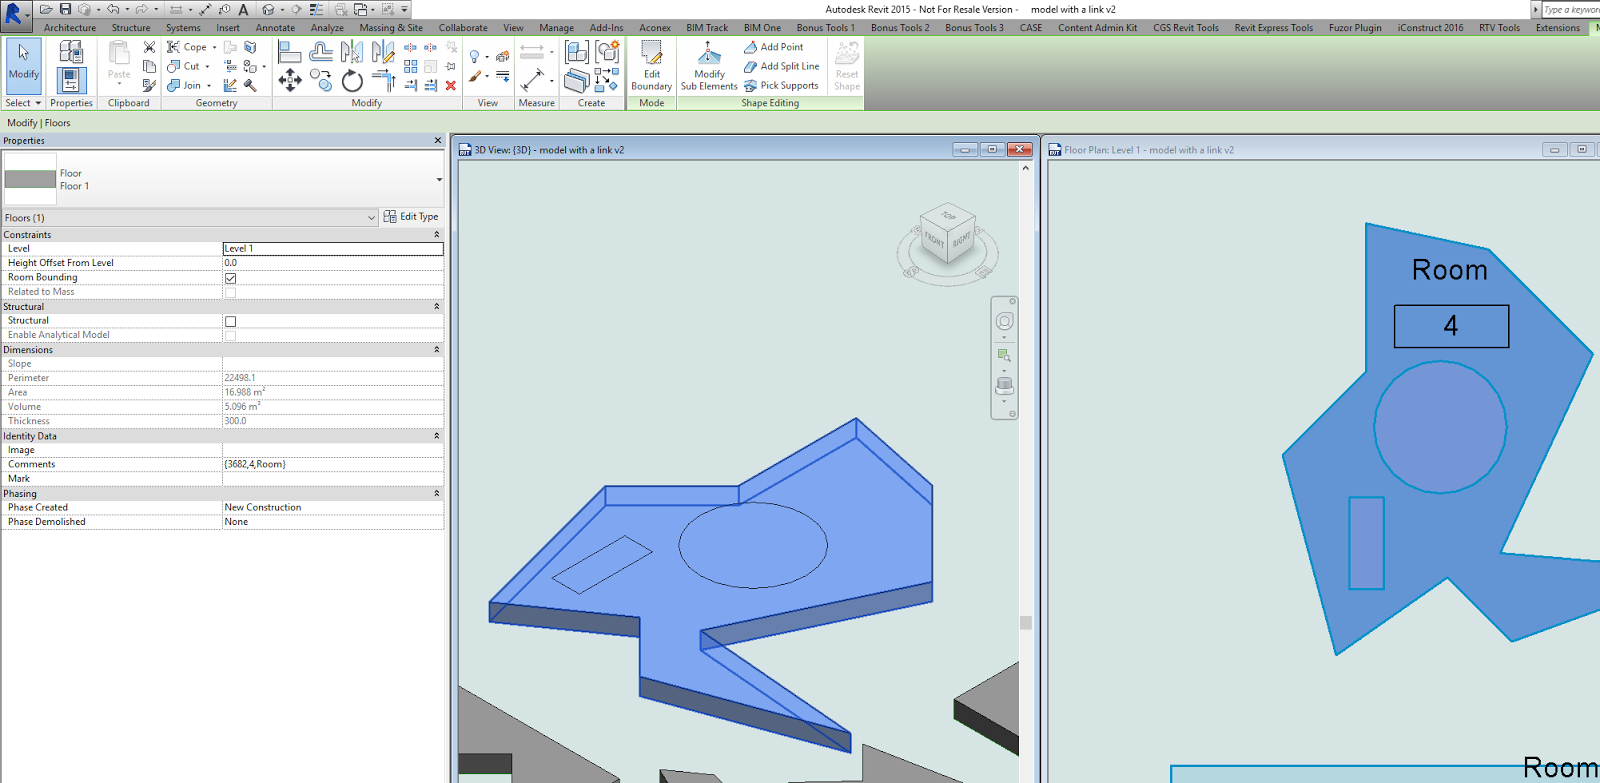
It uses a two different methods to get Room Boundary outlines: first try is with a Clockwork node, next try is by Element.Geometry. It also sets the Room Number to the newly created Floor Comments parameter.
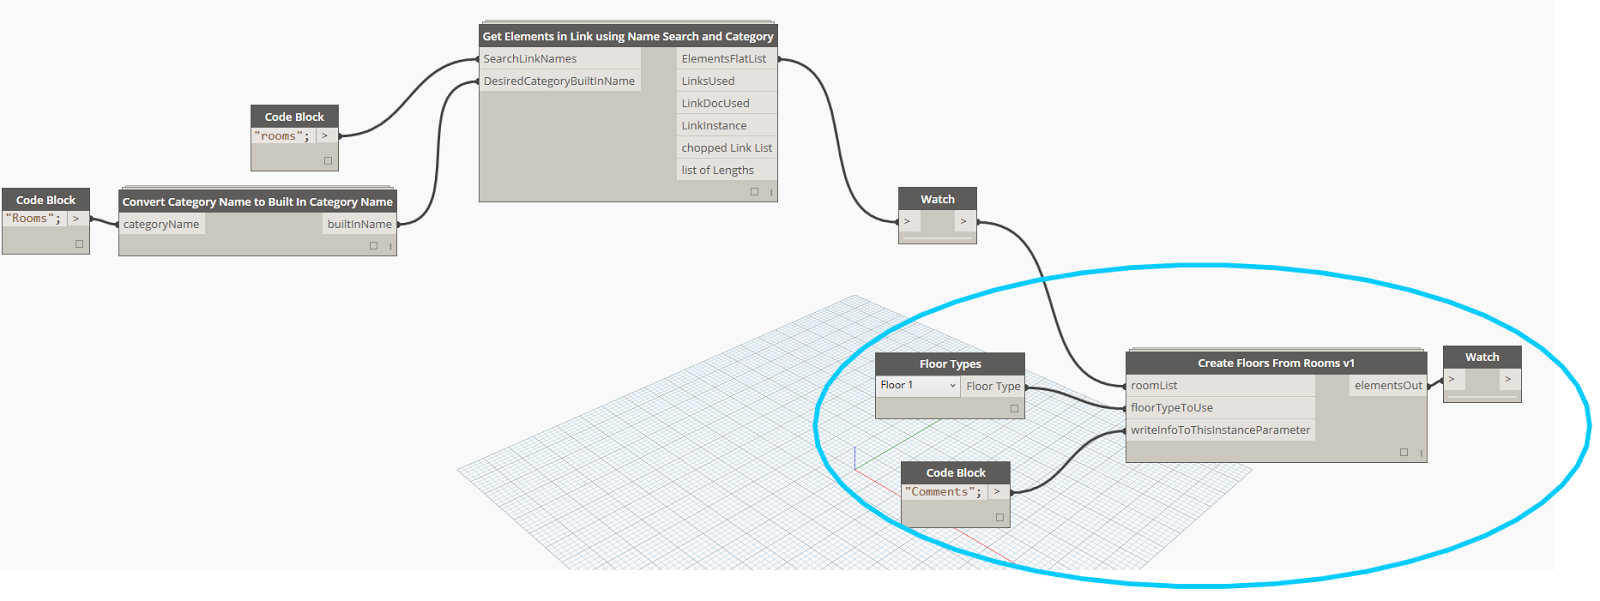
Just letting you all know that this new node has just been published in the Bakery package: Create Floors From Rooms v1.dyf
The scope: This ‘version 1’ node takes the Room elements, converts to Element.Geometry, grabs the face at the host level, gets the curves from the face, uses Konrad Sobon’s Group Curves node to assist with making the Polycurves, then matches the right Polycurve with the outer boundary using a bounding box method. Then, it feeds the outline to a Floor creation node (after matching link Level-host Level if necessary), and then sets Element Id, Room Number and Room Name as one string to the parameter you select.
You can use it across links with some other Bakery nodes too, which would look something like this:
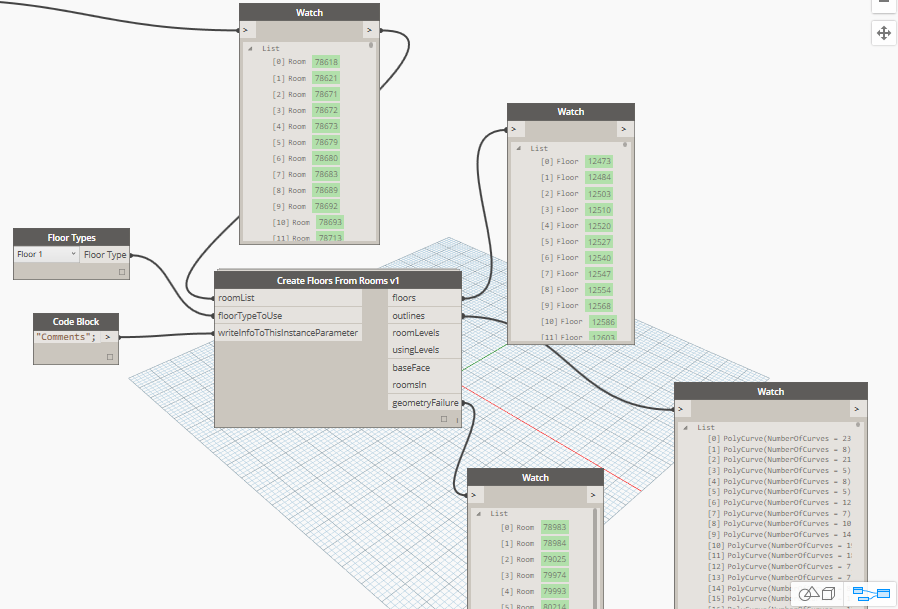
Unfortunately, sometimes the builtin Element.Geometry node will fail to convert the Room to a solid. This warrants further investigation, but only affected about 15 rooms of 718 in this particular test. In the meantime, I simply report which rooms fail in the ‘geometry failure’ output:
Future improvements needed:
handle Element.Geometry failures with some other method
cut out Floor Openings where voids are present in the Room space
match Base Offsets by moving created floors to correct height
get approximate Room Height by Volume and drive or report desired Floor Thickness
Sometimes we make a node that we don’t really want the world (ie. Library / In Canvas search) to see. Can we hide it? Yes. Just add this statement to the dyf header: IsVisibleInDynamoLibrary=”false”
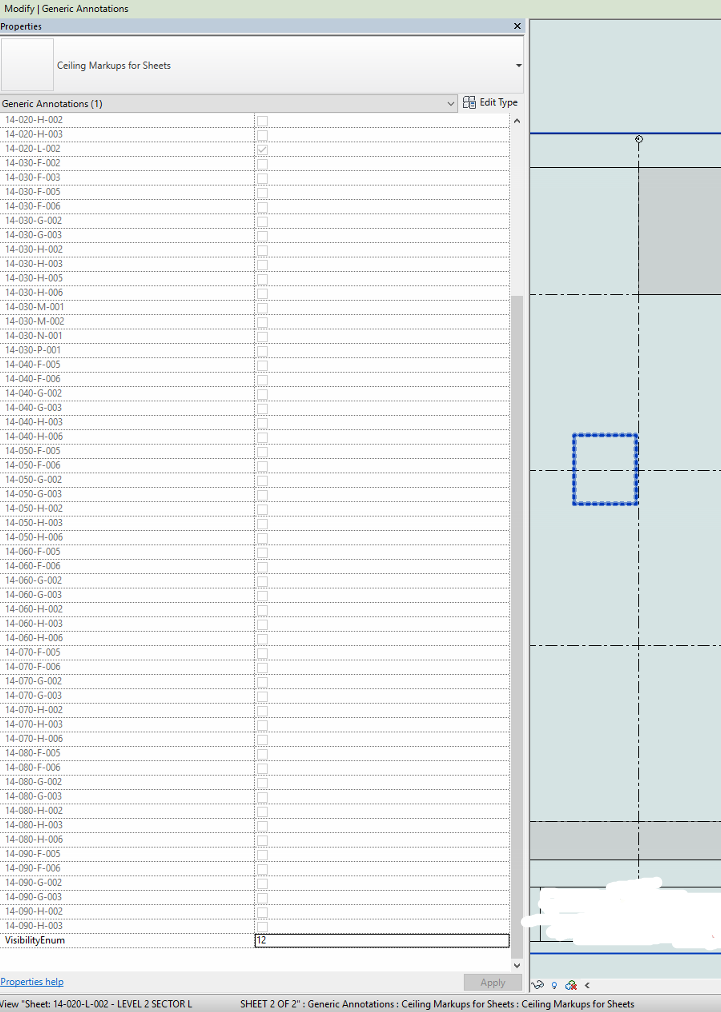
Let’s say you have a Generic Annotation family with about 60 different view states controlled by visibility Yes/No checkboxes. These visibility states are linked to Sheets, and the Generic Annotation families themselves are placed in the Sheet views in Revit. I’m sure you are thinking “why??” at this point, but let’s skip past that part…
Can we drive the Annotation family visibility states based on its ‘host Sheet’ in Revit? Not really.
Can we create a mapping table in Excel, Dynamo-push a single integer value into the Annotation instances based on the host Sheet, and drive the visibility by formula that way? Yep.
Here’s the basic steps:
I used dir and Notepad++ to make the list, one column in Excel for the lookup value (I used Sheet Number), and one for the parameter I want to get and use
This relied on having the Family parameter list sorted Ascending in the Family Editor
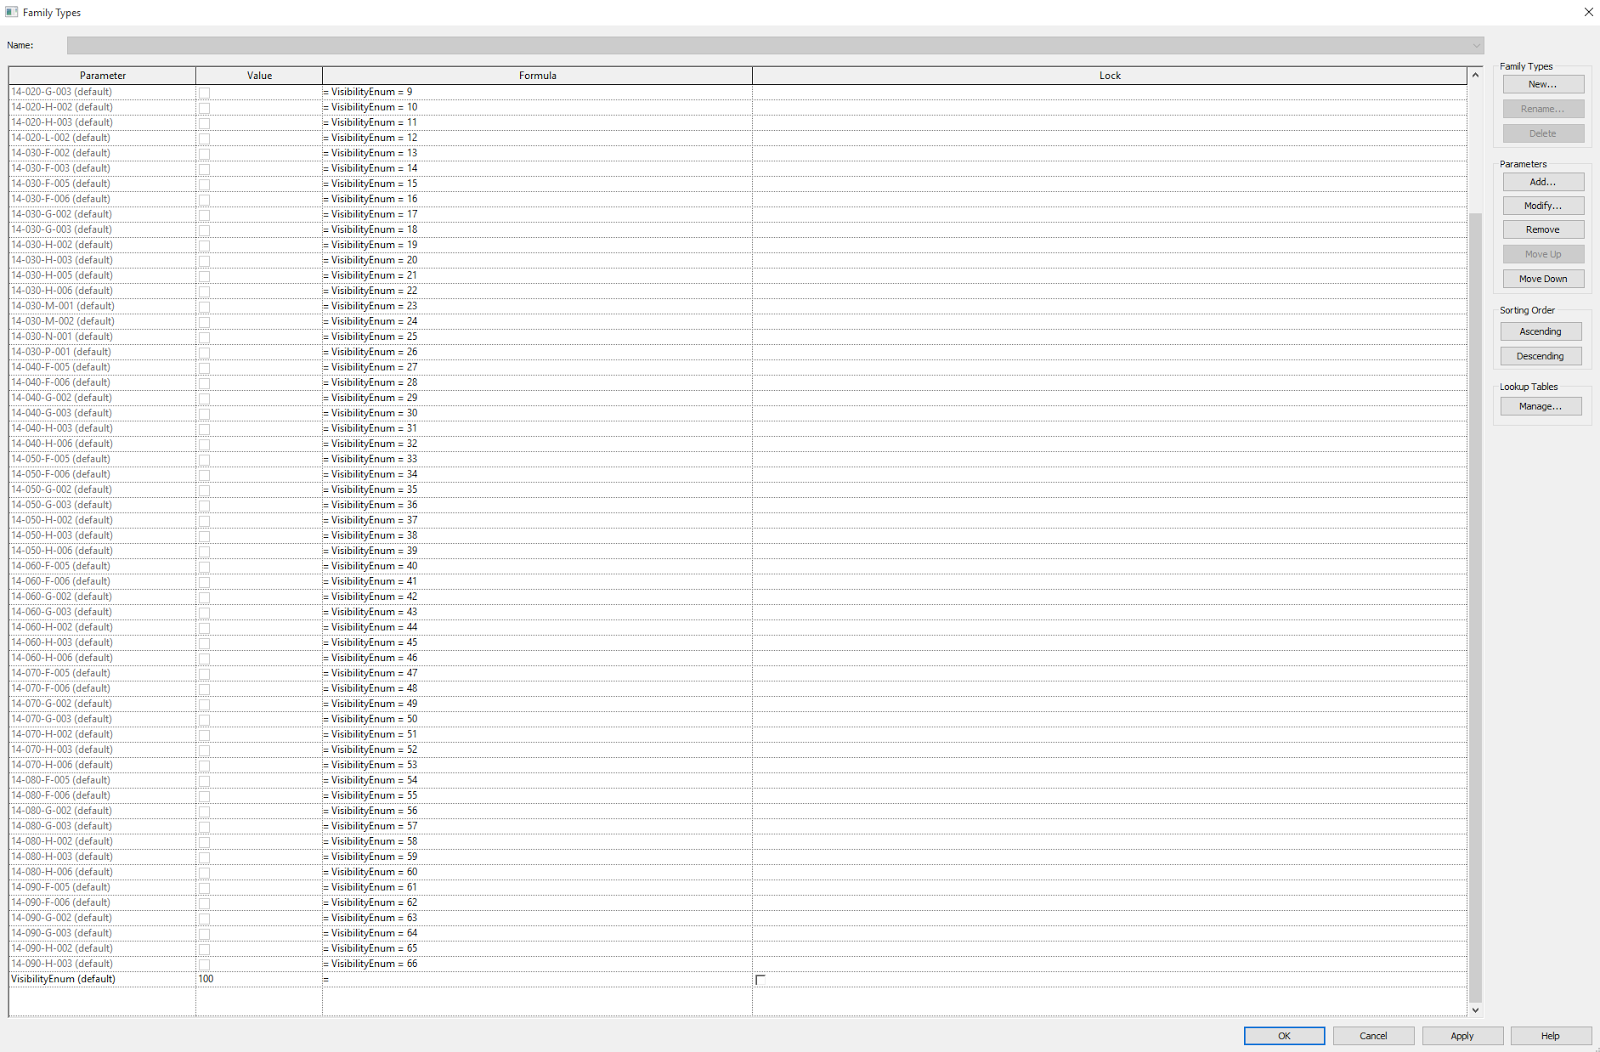
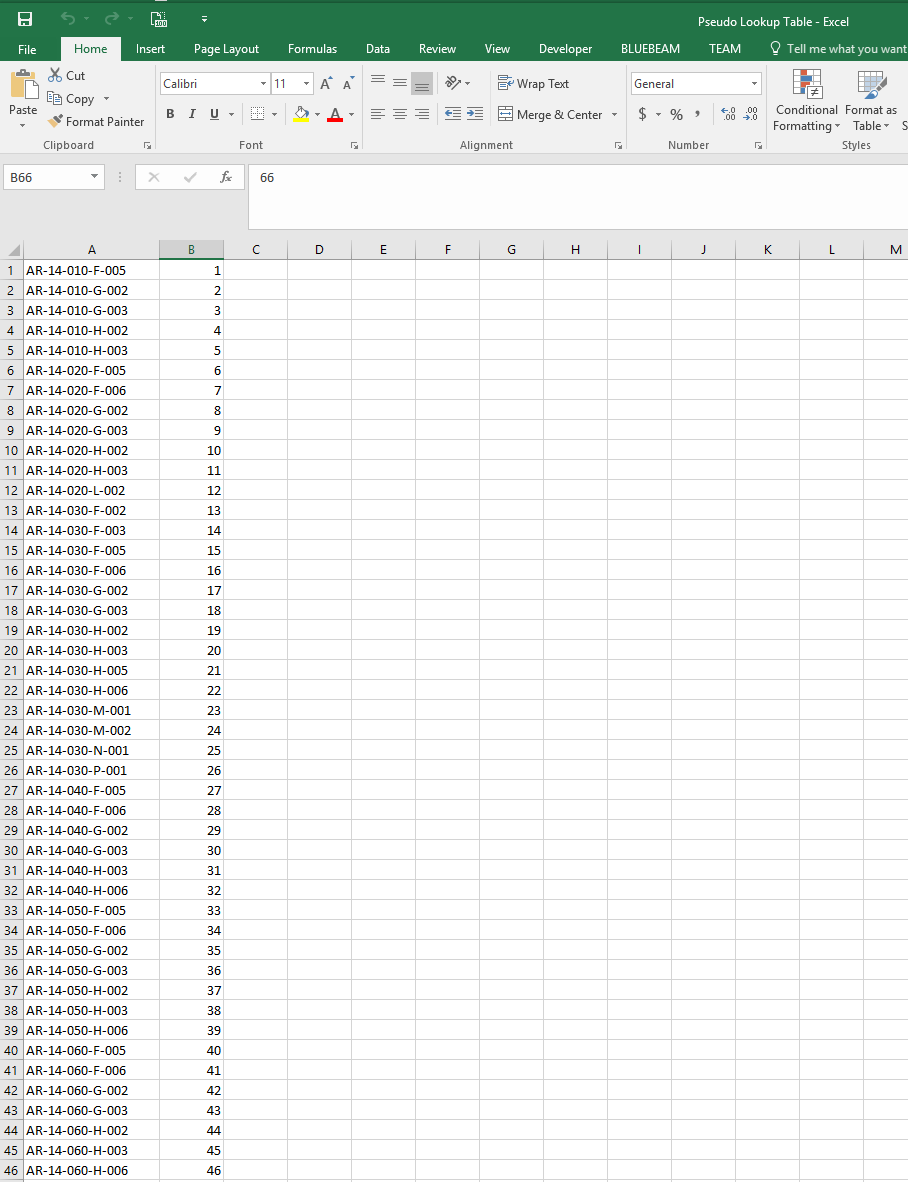
The Excel sheet looked a bit like this – notice how the driving parameter is an Integer?
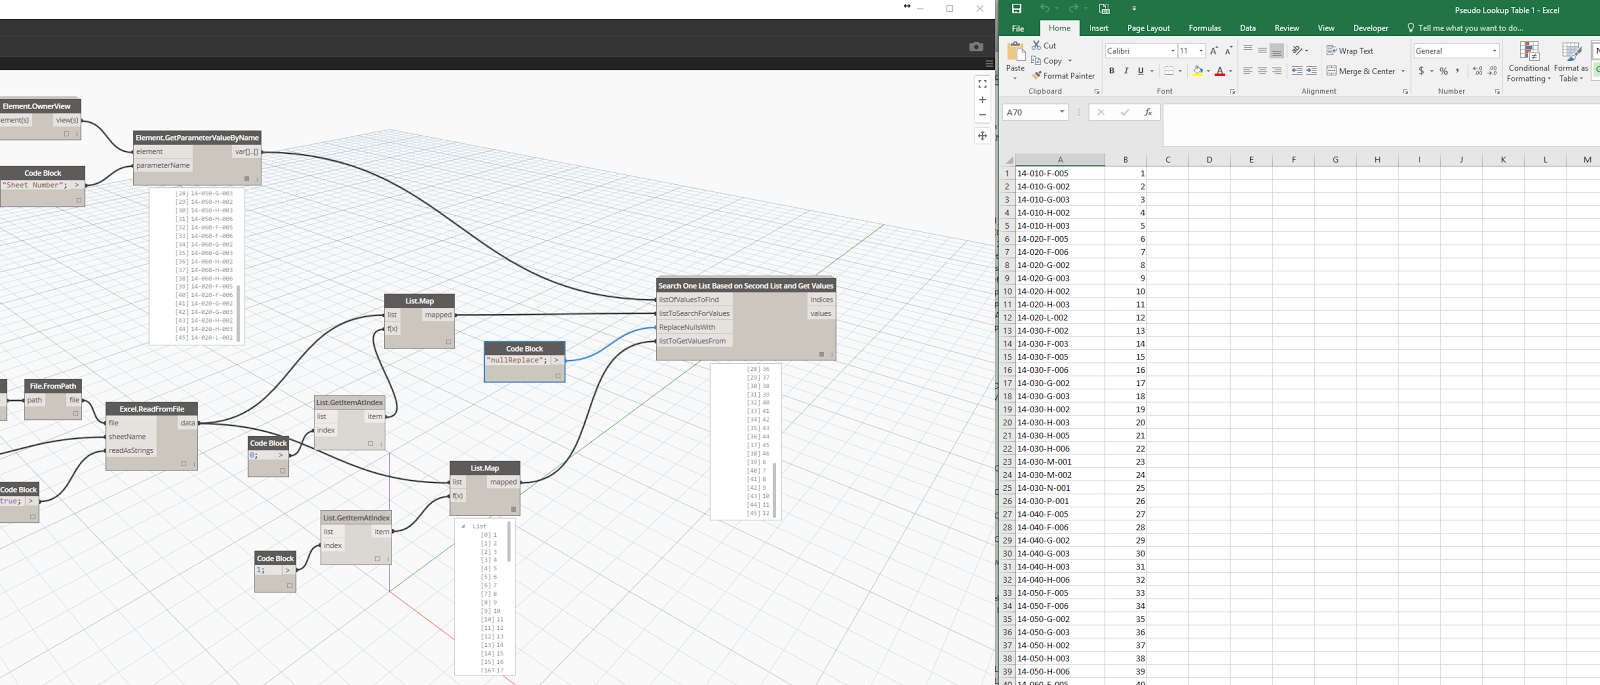
This is the work in progress in Dynamo – getting the Generic Annotation families, matching them up and getting the related Excel integer value
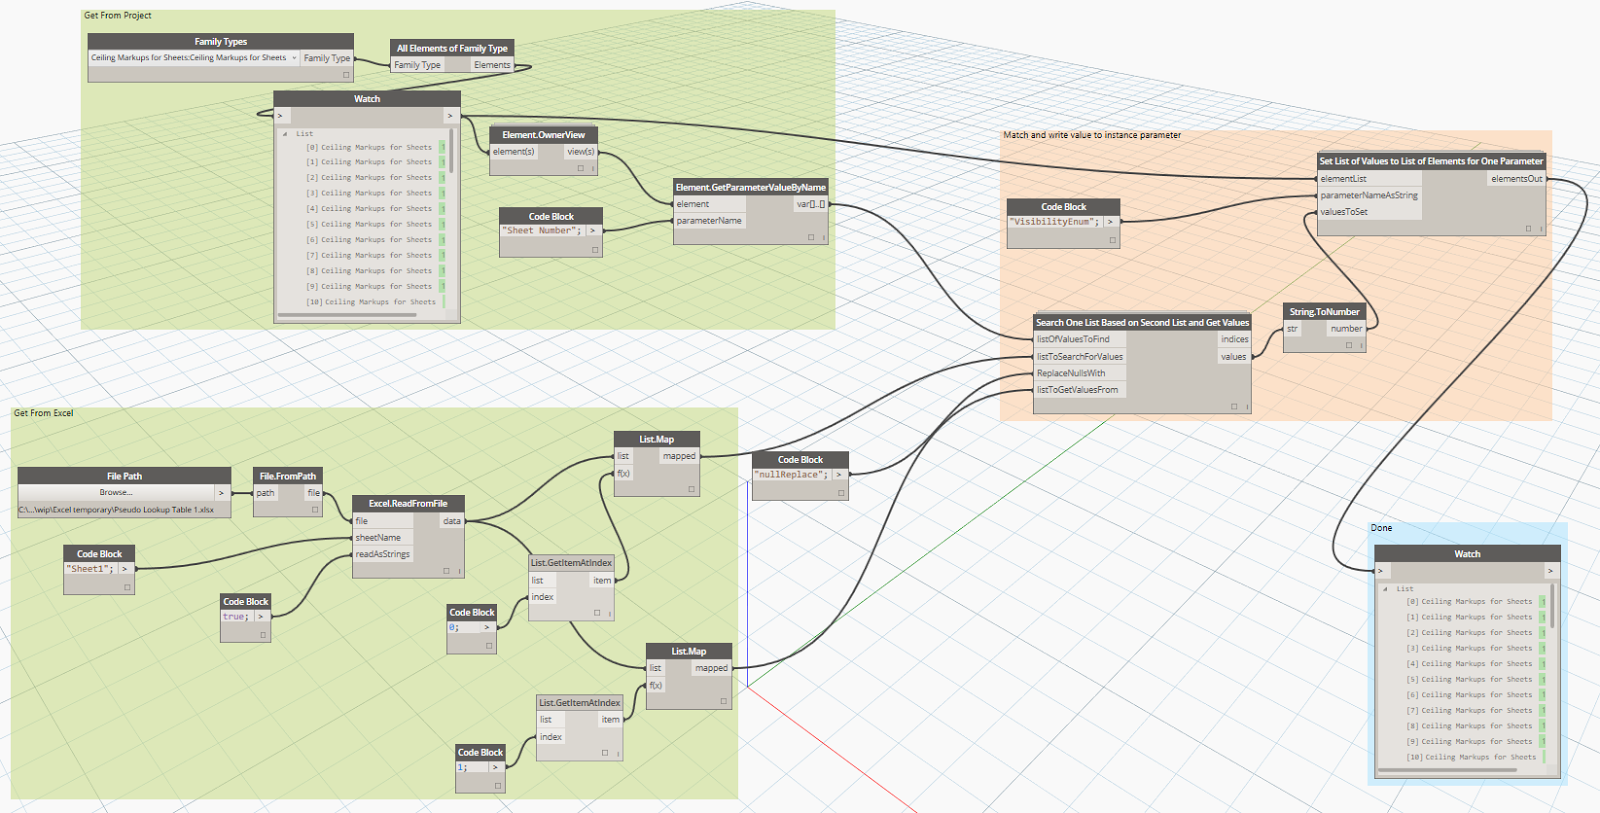
This is the completed dyn, with the push back into the Element Parameter to drive the visibility – see how the string has to get converted ToNumber before pushing into the Integer parameter?
And here is one instance in the project
After running this once, all visibility states are set properly throughout the project
Yet another example of @dynamobim making the Revit-impossible, possible 🙂
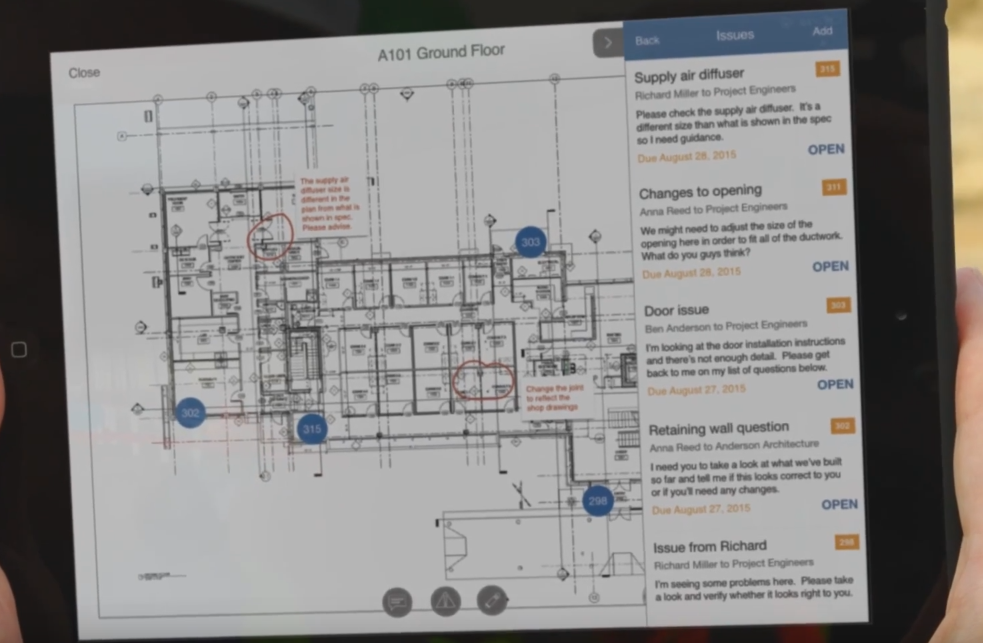
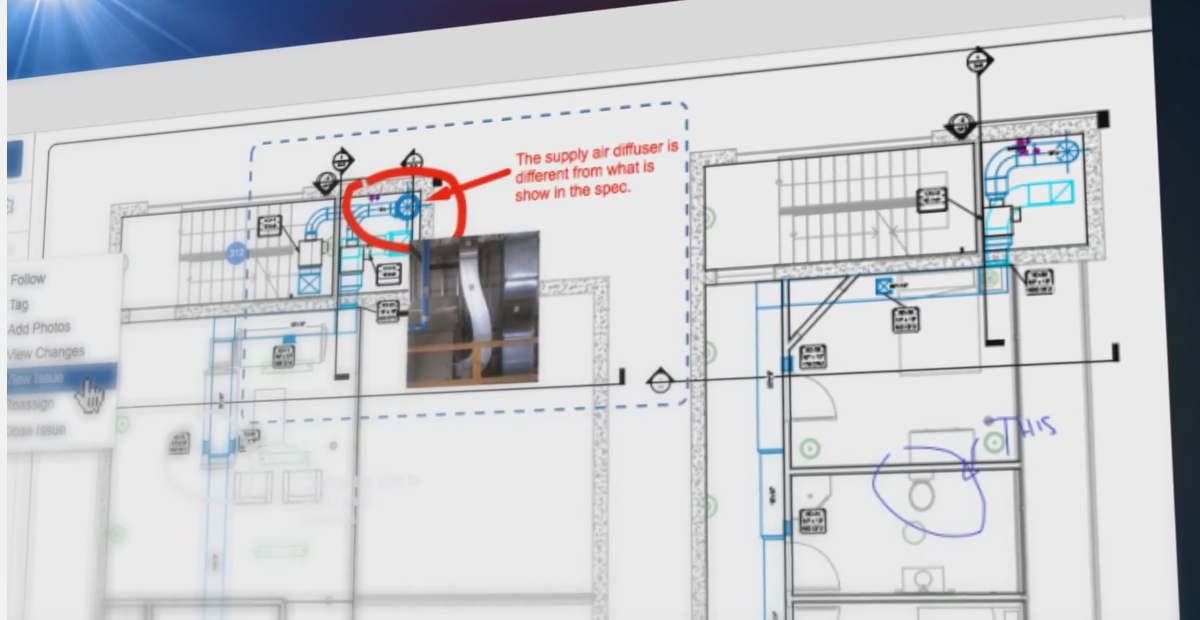
A recent Youtube upload gives us a teaser-style look at what some of the features of Project Alexandria may be, including:
part of BIM360 platform
handling 2D documents like plans, drawings etc
ability to create and assign issues
iPad implementation, possibly able to attach photos to issues etc
This is a competitive market now… Revizto has a good head start on some of this, and FieldLens has a nice mobile implementation. So, the question is, will Project Alexandria (BIM360 Docs??) be compelling enough?
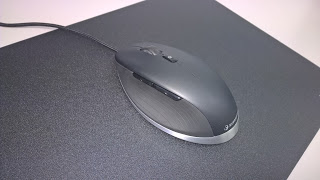
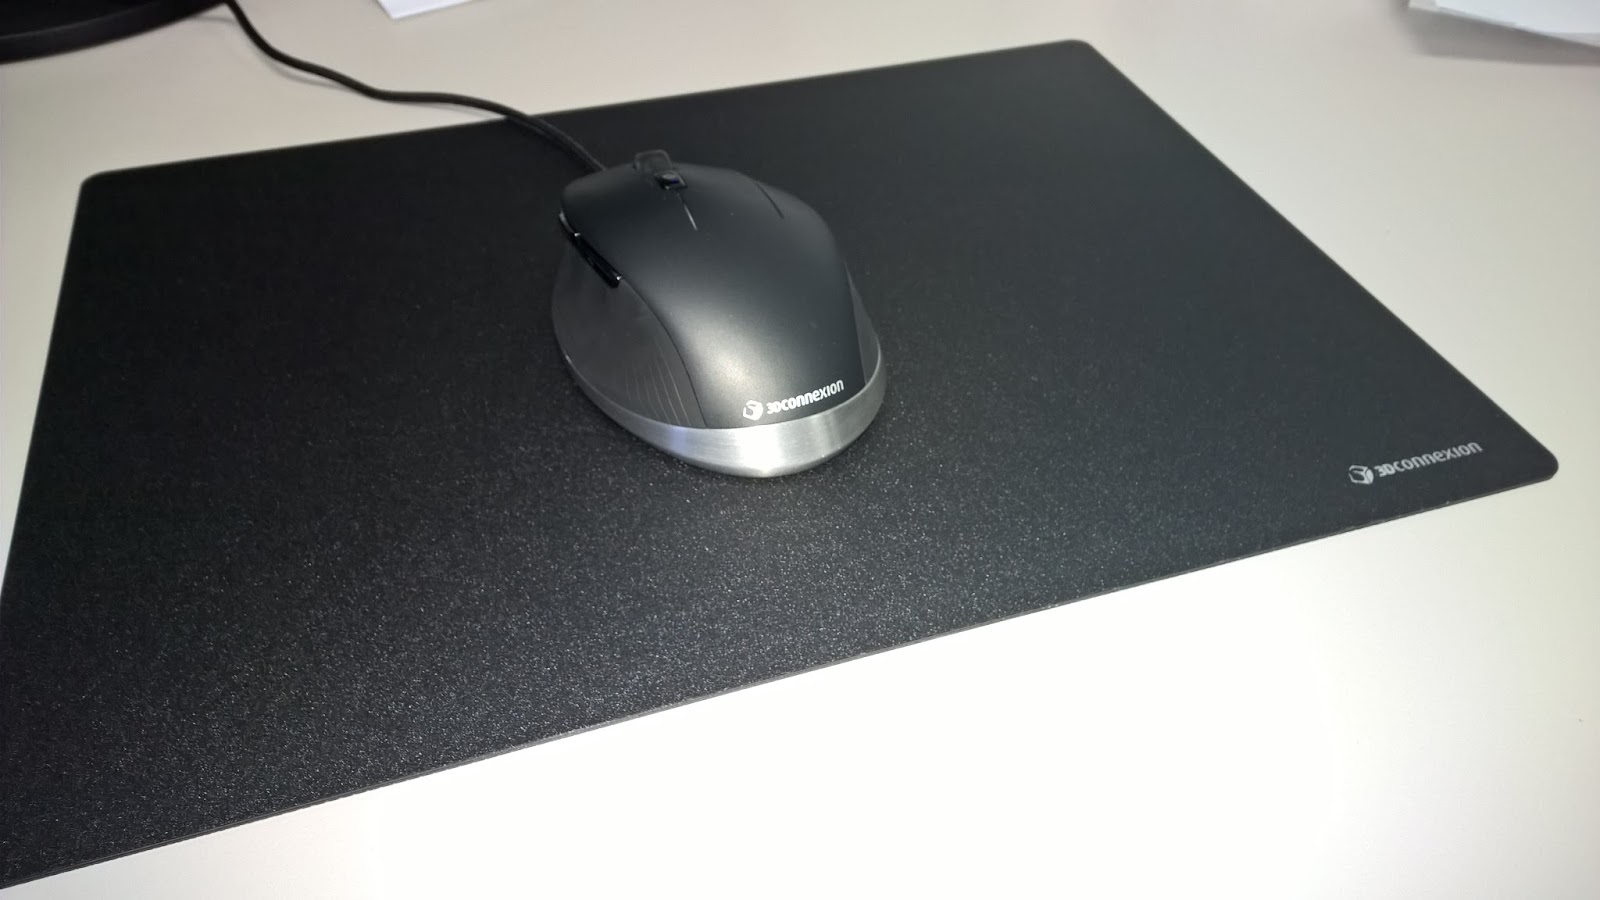
Many months ago I was sitting down having a coffee with one of the top sales reps for 3Dconnexion. He had a strictly confidential release to share with me… ‘a 3 button mouse!’ I was a little skeptical at first, but having received and tested a CadMouse, I can honestly say it is an incredibly high quality device that is smooth, powerful, and very pleasing to use.
Unboxing and Setup My initial impression on unboxing and viewing the device was that it looked amazing: smooth brushed aluminium base and generously sized.
When you pick up the CadMouse, it feels both sufficiently weighted and yet not overly heavy. I received mine with the CadMouse Pad: a very generously sized and high quality mouse pad that pairs perfectly with the CadMouse for precision work.
I expected that setup would be easy, and as it is a USB device it was simply plug-and-play to get started. As I was already a SpacePilot Pro user, I had 3dxWare installed, but I went ahead and downloaded 3dxWare 10 for Windows, version 10.2.8 from this page.**
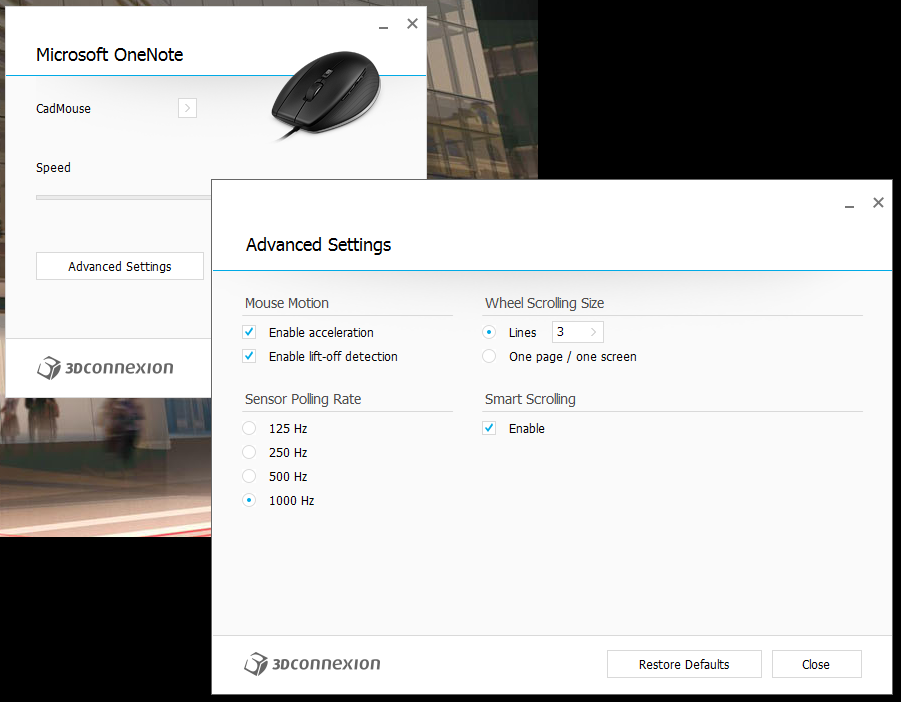
Then I checked out a few of the settings. The Advanced Settings allow a polling rate of 1000hz!
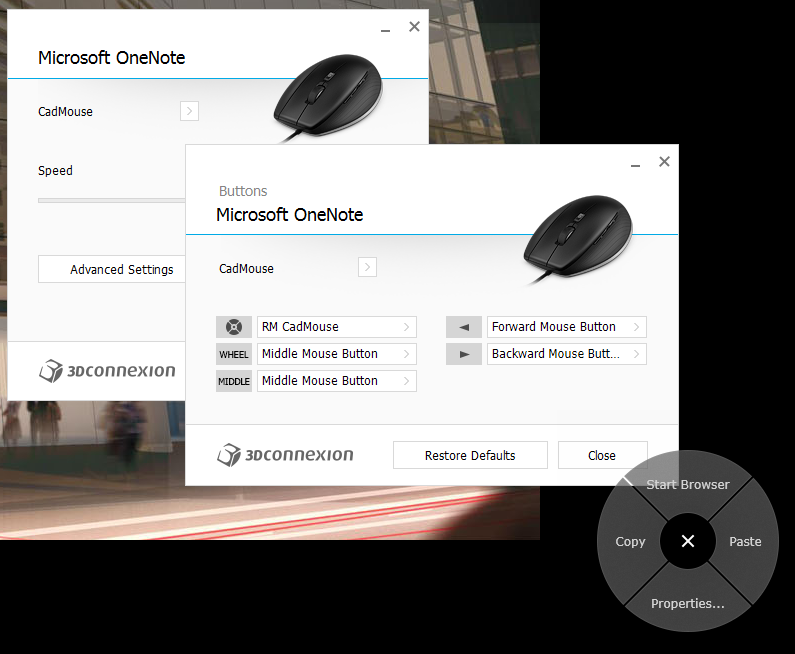
And the Buttons page reminds you just how many buttons and features the CadMouse has available:
A few things to note here: the dedicated middle mouse button, and the wheel ‘click’, are actually separate buttons on the CadMouse, meaning you can apply different commands to these. Also, the small black circle is yet another button that (by default) calls up a Radial Menu: see bottom right of image above. I have written about Radial menus before, and I absolutely love them. Now, I can have Radial Menus on my left hand with the SpacePilot Pro, and on my right hand with the CadMouse. Custom BIM control scheme happiness!
A realisation… How do you hold your mouse currently? I was a ‘fingertip user’, and I would use my middle finger to scroll the mouse wheel. However, I found it much more comfortable to do a palm-hold on the CadMouse, and rest my hand over the mouse. This allowed immediate access to the middle button and the right mouse button. My index finger would then use either the wheel or the left mouse button. It was definitely a significant ‘ergonomic shift’ for me, but in the end it is more comfortable, and ultimately I can click any feature on the mouse at any moment…
Also, this results in more movement being handled by your entire forearm, which puts less strain on your wrist. And it also starts to make sense why that mouse pad is so big 🙂
However, after speaking to a 3Dconnexion global rep, I decided to turn my mouse speed “UP” in the 3dxWare properties (but keep Windows mouse speed at the neutral position). This really helped me get on board with the ‘whole mouse in the hand’ idea.
Also, if you hold the whole mouse in your hand, you have easy access to the 3 main mouse buttons (left, middle and right). And, to use the Radial Menu button, just lift the tip of your middle finger and then the base of your middle finger can click that button. It sounds a little weird, but it does work.
Daily Use The mouse is light and comfortable to use, and being wired it means that you never have to worry about running out of battery. There are plenty of buttons to customize, so you can really tweak the settings (including the Radial menu button) to maximize your productivity. Below I focus on BIM programs, but you can customize individual settings in Excel, your internet browser, Windows Explorer, whatever program you like. These settings are stored in an xml file that can be backed up, shared, and even directly edited if necessary.
In Revit Using the CadMouse in Revit is a real pleasure. The high resolution makes navigation smooth (provided your system can keep up). However, the real benefit is that we can take Keyboard Shortcuts off the keyboard and put them into your hand.
Many of us are probably zooming around in our mouse on the right hand, and possibly smashing Revit keyboard shortcuts with the left. But with Radial Menus, you can map any keyboard command in Revit directly to the mouse. As we know, Revit has a pretty powerful shortcut mapping dialog, so we can map almost any Revit command to the CadMouse with this workflow 🙂
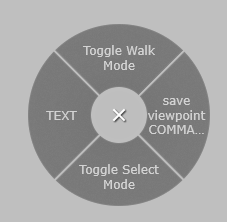
With the Radial Menu and Gestures, it simply takes one click to allow access to 4 different commands, and you just swipe in the direction that you want to trigger that command.
Some other Revit-related possibilities include mapping your basic UI toggle commands like the Properties Palette and Project Browser to the CadMouse. Then you can basically trigger a ‘clean screen’ mode in Revit that hides these panes, all thanks to the customization potential of the CadMouse.
In Navisworks There are two main features that give the 3Dconnexion CadMouse a real edge in Navisworks:
The Quick Zoom buttons If you have set up Navisworks with a pretty fast frame rate, and Guarantee Frame Set in your Display options, the CadMouse Quick Zoom buttons are a really nice way to get in close on a feature in your model, and then step back out quickly. You literally just need to point your mouse at something, and then press Quick Zoom In once or twice to get in real close. Then click the Quick Zoom Out to step back to see the model in context.
This Screencast is a quick demo of the feature:
The Radial Menu button/s There are certain things in Navisworks that are not immediately easy to map to a single keyboard shortcut. However, you can record a multiple key press macro in the powerful 3dxWare software, and then map these macros straight onto your Radial Menu button on top of your mouse.
Added to this is the fact that you can map multiple radial menus to various buttons on the CadMouse. For example, you can have one Radial Menu on the top button, one on the middle mouse button, and more if you want. I set up these two custom menus with custom commands for Navisworks:
For markups
For navigation
And here is a Screencast. Notice how I have enabled gestures and I don’t even need to click, I can just move the mouse in one of the cardinal directions and that command is activated:
Summary 3Dconnexion already had a powerful suite of 3D modelling hardware products. By adding the CadMouse to their lineup, and integrating all of these devices with the 3dxWare software suite, you can have absolute control over your navigation and mouse control schemes, and it is individually customizable to each program you work with!
The 3Dconnexion CadMouse itself is a high quality device, and it is a real pleasure to use. It reminds us why mice used to have 3 buttons, but it adds so much more. If you are someone who loves customizing your working environment to maximize your productivity, the CadMouse will enable a level of control you may not have had before. Overall, the CadMouse would make a great addition to anyone’s BIM hardware kit.
**Note: If you have any problems installing LCD software on Windows 10, you may need to uninstall Logitech Gaming Software to get the 3dxWare LCD driver to install (at least I did). You can also try Microsoft Fixit.
Some general notes and tips are included below: The SpacePilot Pro and CadMouse in Revit Invert your top 3 axis, and drag the CadMouse to drop the orbit point when navigating with the SPP.
Troubleshooting steps To clean up and refresh your profile, you can: …stop the driver (START>>3Dconnexion>>DRIVER>>STOP DRIVER), then browse to: C:Users%username%AppDataLocal3Dconnexion3DxSmartUI.exe_**** This folder contains folder(s) which in turn contain files named: USER.CONFIG …delete these folders while the driver is stopped, start the driver again, and then reconfigure your preferences.
Reinstall Steps If you have any issues with the 3dxWare software, like if it doesn’t remember changes you make to specific profiles, you can reinstall using the steps in the FAQ here. I backed up my xml files first from: C:UsersLuke JohnsonAppDataRoaming3Dconnexion3DxWareCfg to a backup folder.
Profile Sharing While we are talking about 3Dconnexion, I’d like to refer you to the forum where you can share custom XML mapping files for various programs, such as my Navisworks profile for the SpacePilot Pro here: http://www.3dconnexion.com/forum/viewtopic.php?f=37&t=12120
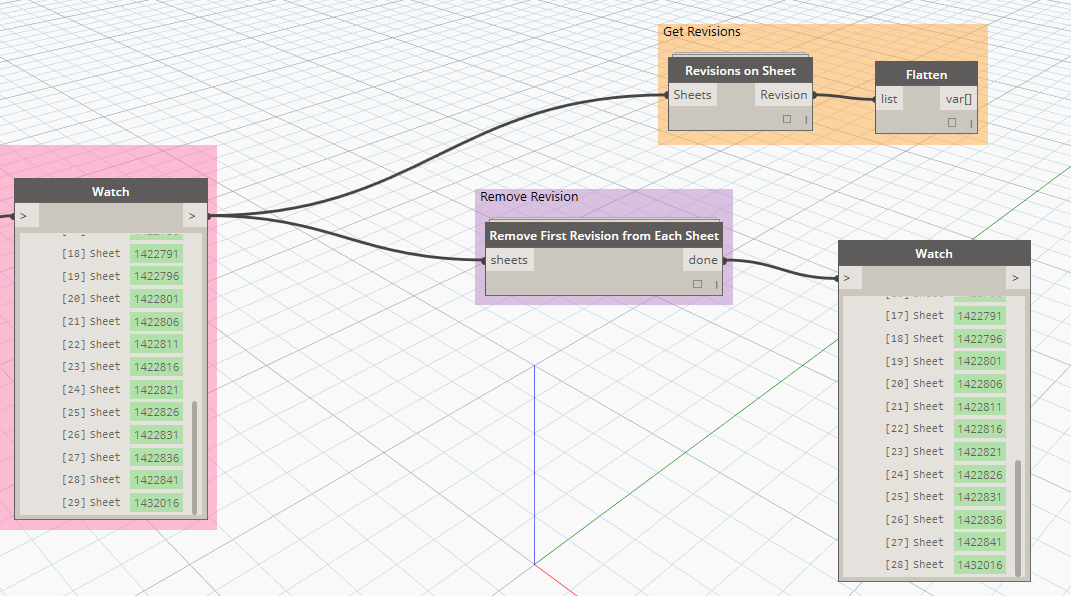
Konrad has put together some very handy nodes to work with Revisions in Dynamo and Revit. I have packaged up a simple implementation of these in my Bakery package that takes a list of sheets, gets the first revision from that sheet, and then removes it (ie. unticks the Revisions on Sheet parameter). It looks like this:
This is useful for when you have copied or inserted sheets into your model, and they have automatically adopted a revision. You want to clean them up? Use the above, but make sure you filter that list of sheets first.
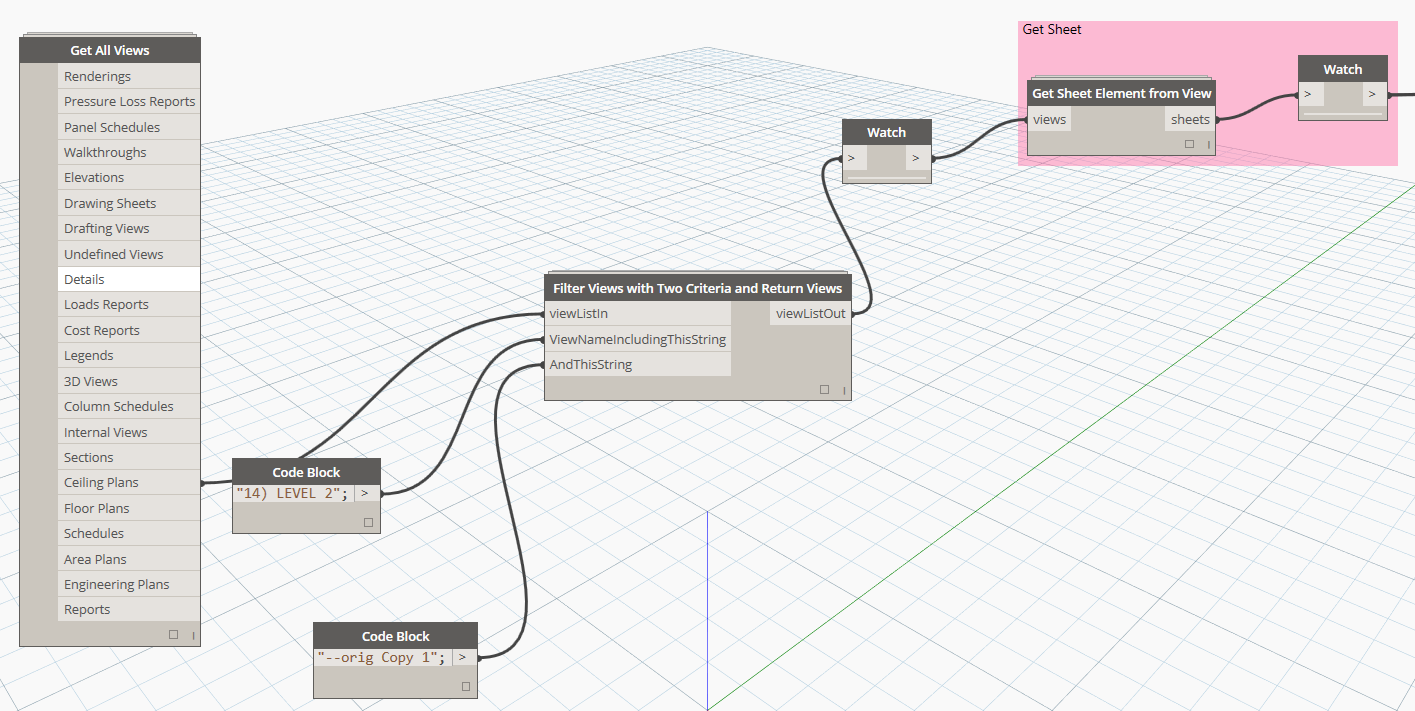
I use some a couple of these nodes from Bakery to grab views, filter them, then get the sheet from the view:
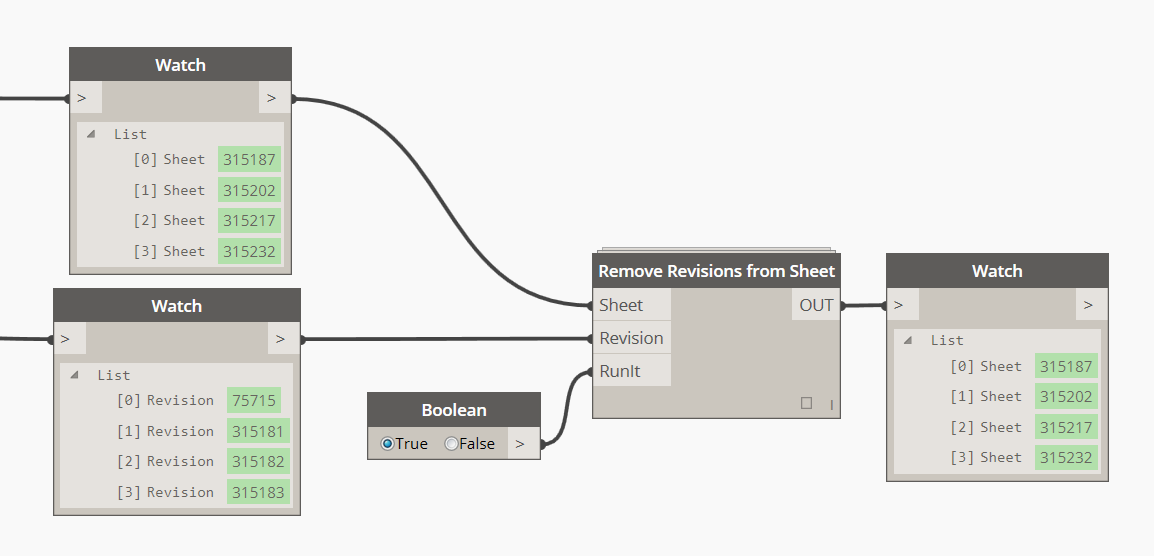
Also, for deleting revision entries from the Revision table: I have an alternate version if you want to test it. I made one that splits off the list of revisions away from the first revision (otherwise you get an error – presumably because Revit needs at least Revision there). You might need the custom node Eraser from the package manager. I used the Eraser tool and a giant list.create to make a tool that deletes everything unwanted from incoming models (ie, sheets, views, tags, schedules, lines, etc) but I’m still testing it. Essentially the code is the same as the attached one. As usual use this how you wish and post if you like. Regards, Troy