via
Point Cloud to NURBS with EvoluteTools PRO for Rhino3d: http://t.co/mKMr0M9mDT
— Evolute (@evolutegeometry) November 13, 2013
What Revit Wants + Black Grid AI
AI Empowered Project Management
via
Point Cloud to NURBS with EvoluteTools PRO for Rhino3d: http://t.co/mKMr0M9mDT
— Evolute (@evolutegeometry) November 13, 2013
Over at this link
There are “generic” families and also manufacturer specific content…
Firstly, consolidate your Viewport Types by using Select All Instances – In Current Project and switching them to the Types you want to keep.
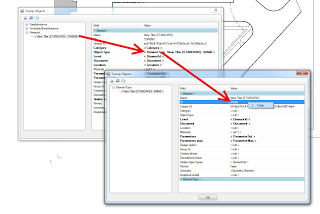
Then, change a Viewport to one you want to delete, and use Snoop Current Selection (RevitLookup). You can drill down to find the ElementID of the Viewport Type Definition:
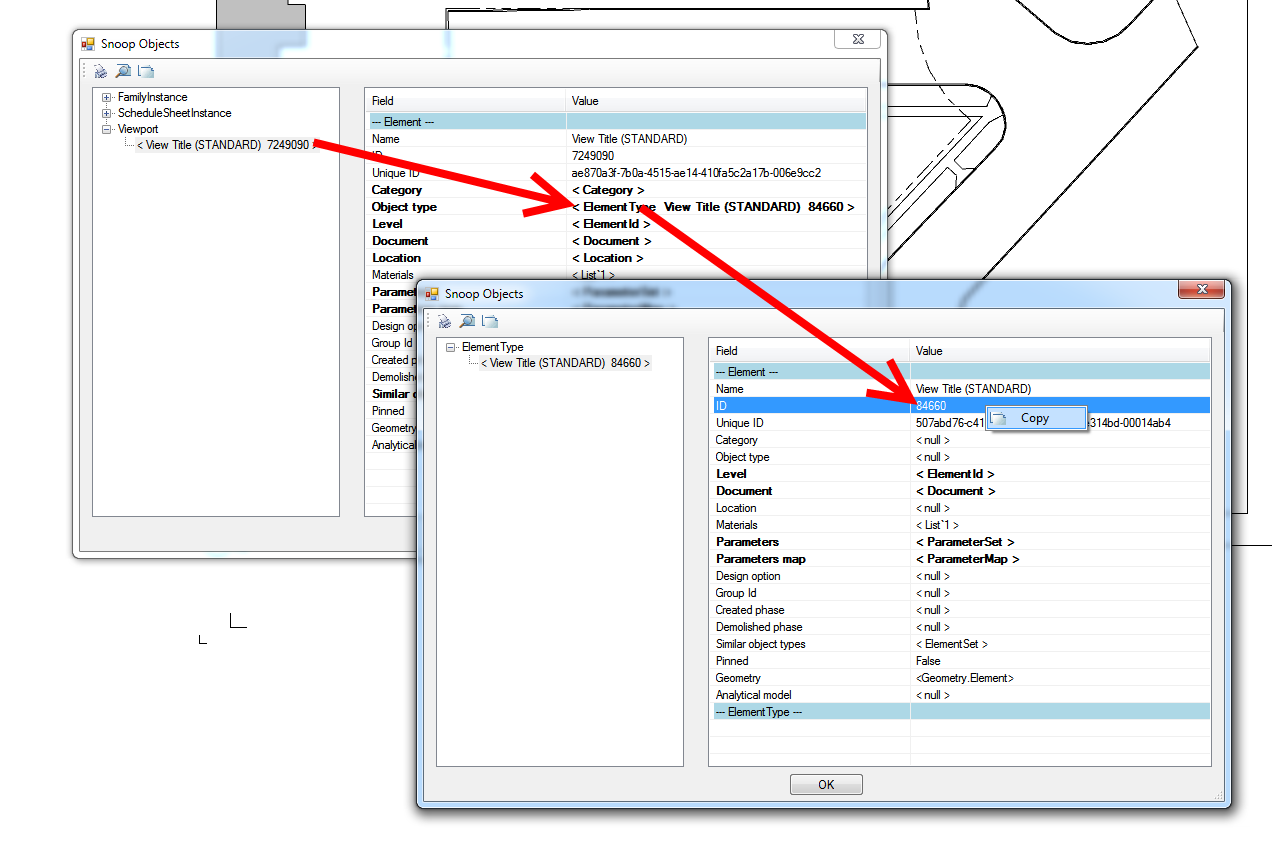
Ok, with this in hand:
A new challenge faced by collaborative design teams – how to work concurrently, yet not do the same thing four times?
Consider these comments from Glenn Jowett:
“If you look at the process of designing a steel framed building there is the potential for at least four steel frame models to exist within one design team, four models that have been built from scratch by different people within that design team.
…
The design team should sit down at the start of a project and map out who owns what elements at what stage of the project
…
The copy monitor tools within Revit are far from perfect, but this seems to be the only option for walls at the moment.
…
In traditional 2D, drawings would be issued and revisions clouded; in the 3D model revisions can’t be clouded and drawing issues between the design teams are becoming less and less frequent.”
via
http://revitst.blogspot.in/2013/08/revit-collaboration.html
Checklist:
Finally, some great ideas of what to discuss at a pre-project BIM meeting from the same post:
“An initial BIM or Revit meeting should take place at the start of every major project, purely from a Revit and collaboration point of view items for discussion should be:
· File format for data exchange
· How often are files exchanged
· Clearly define what the model is to be used for at what stage in the design process
· Who models what and when
· Who owns what and when does element ownership go from one discipline to another
· Level of development (LOD) – what level of model information should I expect to receive at what stage? And does that meet my expectations
· How often should clash detection take place
· Project coordinates and project north position.
It is important that the above items (at least) are discussed before a project really starts to evolve, and the decisions on each item should be documented and set out in a BIM Execution Plan. Collaboration will be much easier to manage if every member of the design team has the same set of core principles to follow from start to finish.”
To the above list, I would add at least the following:
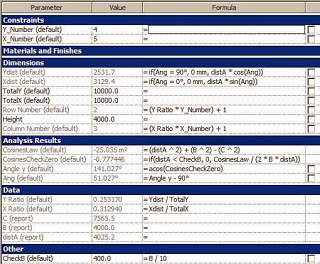
If you ever feel like your Revit day is just too basic and straightforward, you should definitely read this post by the RevitCat. There are some serious formulas in place:
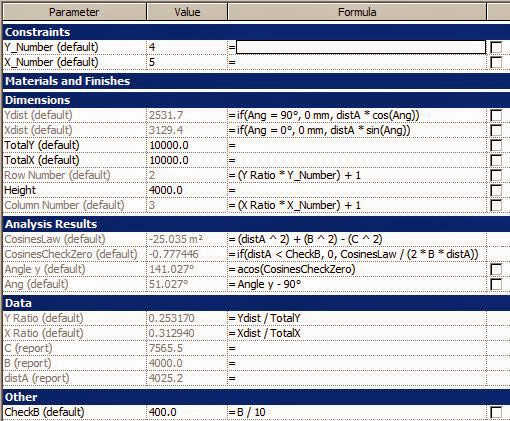
This technique will not work with a curved surface because it all works by calculating the actual distance from the control point to the BL corner of the pyramid and relating that to the overall length of the surface.
Read more:
http://revitcat.blogspot.com.au/2013/10/how-to-schedule-panel-locations-on-flat.html
Let’s say you have exported all families in a Revit project to a bunch of folders by Category, but you want to get them all into one folder so you can drag-drop and load them all into a new project all at once…
Copy the following into a batch file:
@echo off
set source=”E:tempEexport”
set destination=”E:tempEexport2″
::Not sure if this is needed
::It guarantees you have a canonical path (standard form)
for %%F in (%destination%) do set destination=”%%~fF”
for /r %source% %%F in (.) do if “%%~fF” neq %destination% ROBOCOPY “%%F” %destination% *.rfa /COPYALL /R:0
Now, change the text in red to suit your source and destination (my destination folder was empty). Run the batch file and you should have a stack of RFAs all sitting in that folder. Note: results may be a bit unpredictable if you have duplicates of particular files in the source directory tree.
Read more:
file – ROBOCOPY – Copy folders content to a single folder – Stack Overflow
2013:
IFC Exporter 2013 (v2.15.1):
http://apps.exchange.autodesk.com/RVT/Detail/Index?id=appstore.exchange.autodesk.com%3aifcexporterforrevit%3aen
IFC Export Alternate UI for Revit 2013 (v1.13):
http://apps.exchange.autodesk.com/RVT/Detail/Index?id=appstore.exchange.autodesk.com%3arevitifcexportalternateui%3aen
2014:
IFC Exporter 2014 (v3.7.1):
http://apps.exchange.autodesk.com/RVT/Detail/Index?id=appstore.exchange.autodesk.com%3aifcexporterforrevit2014%3aen
IFC Export Alternate UI for Revit 2014 (v2.5):
http://apps.exchange.autodesk.com/RVT/Detail/Index?id=appstore.exchange.autodesk.com%3arevitifcexportalternateui2014%3aen
via email
DisableMPPAutoApply is the revit.ini setting which essentially stops Revit from automatically applying changes from Properties Palette based on cursor movement.
Interesting, Aaron’s tweet below shows that now you can move cursor at will, and a click in the drawing canvas will “Apply” properties changes. Do we need to make a T-shirt for AU?
DisableMPPAutoApply=1
Woah- Undocumented Gem. DisableMPPAutoApply works MUCH better in Revit 2014!! It waits for canvas click but you dont need to click “Apply”
— Aaron Maller (@Twiceroadsfool) November 6, 2013
Enables or disables the ability to save changes to the Properties palette by moving the cursor out of the palette without clicking Apply.
Type = integer
Valid values: 0 = no (default), 1 = yes
From Revit Randoms –
Now this can be used on any category of family, but you will need to make a dummy family that can be loaded into each category, else it will not work.
Read more at:
http://revitrandoms.blogspot.com.au/2013/08/purge-unused-in-families.html
In the post, he also references some journal scripts by Aaron Maller that use the old File Upgrader to Transfer Project Standards from a project to families. The benefits of the old Upgrader are shown at: http://cadalot-revitlearningcurve.blogspot.com.au/2011/06/file-upgrader-for-revit-vs-content.html
Heads-up
Revit Script – Purge Unused in Families http://t.co/AydWpteaUK via @darrylstore
— Ben Malone (@BenPMalone) August 5, 2013
From Philip Chan’s blog:
The concept is simple, I make a Generic family (it can be any category actually) as a solid (in this case, just a simple extrusion), let the family intercept the curtain wall, then use “Cut Geometry” to cut out the curtain panel.
Once I made all the cut in the curtain wall, I have a yes/no parameter to control the visibility of the solid so that I can “turn off” the solid. As a result, it would appear that the curtain wall is cut out by a void. The good news is you can use the same family to make multiple cuts and it will work on the mullions as well.
Read more:
http://phil-osophyinbim.blogspot.co.uk/2013/08/curtain-wall-and-engraving.html