DisableMPPAutoApply is the revit.ini setting which essentially stops Revit from automatically applying changes from Properties Palette based on cursor movement.

Interesting, Aaron’s tweet below shows that now you can move cursor at will, and a click in the drawing canvas will “Apply” properties changes.  Do we need to make a T-shirt for AU?

DisableMPPAutoApply=1

Enables or disables the ability to save changes to the Properties palette by moving the cursor out of the palette without clicking Apply.
Type = integer
Valid values: 0 = no (default), 1 = yes

from
http://help.autodesk.com/cloudhelp/2014/ENU/Revit/files/GUID-30C62836-F3F1-4B78-B1AF-DB4E3FD79FDF.htm

“As an alternative to controlling Revit tools and analysis features using the Options dialog > User Interface tab, you can define the DisciplineOption setting in the Revit.ini file.”

Use this link to access a calculator that provides you with the right value:
http://wikihelp.autodesk.com/Revit/enu/2014/Help/3663-BIM_Mana3663/3689-User_Int3689

Heads-up from Steve at:
Revit OpEd: User Interface Configuration Calculator

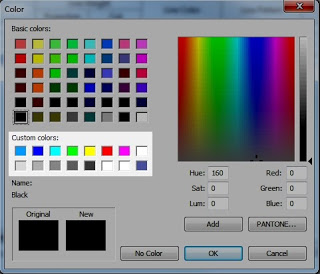
If you have just installed a fresh version of Revit, you may have noticed that you have lost your Custom Colors.  There are 16 ‘slots’ available for Custom Colors in the Revit Color Palette.

To transfer the colors from one installation to another, just copy the [Colors] subsection from the Revit.ini file from the old installation location to the new one.  For example, if you previously had Revit installed on drive Y: in Vista, and you now have a new installation on drive C: with a new OS, do this:

  1. Close Revit.
  2. Open Revit.ini from “Y:Program FilesAutodeskRevit Architecture 2011ProgramRevit.ini
  3. Open Revit.ini from “C:Program FilesAutodeskRevit Architecture 2011ProgramRevit.ini”
  4. Copy the [Colors] section from the older / original Revit.ini to the new, fresh  Revit.ini
  5. Save and close the file.

Here is some other information about the [Colors] section –
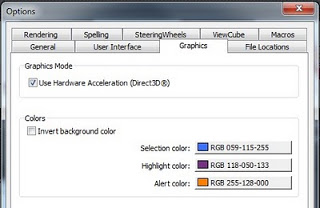
The first three entries in the [Colors] section defines the user interface colors from the Options dialog, Graphics tab:

A default installation will look something like this under [Colors]:
HiliteColor=16741179
PreHiliteColor=8729206
ErrorColor=33023
CustomColor1=e2e2e2
CustomColor2=0000ff
CustomColor3=00ffff
CustomColor4=00ff00
CustomColor5=ffff00
CustomColor6=ff0000
CustomColor7=ff00ff
CustomColor8=ffffff
CustomColor9=ffffff
CustomColor10=ffffff
CustomColor11=ffffff
CustomColor12=ffffff
CustomColor13=ffffff
CustomColor14=ffffff
CustomColor15=ffffff
CustomColor16=ffffff