A great post over at Revitdialog has unlocked this mystery for us.  Just a little addition to that post – I think it is important to tile your windows first, then do the ordering process.  In other words:

  1. View – Tile
  2. Here you have your currently ‘open’ views in Revit – now, use the Revitdialog tip to re-order them (clicking them in reverse order, finishing at the view you want in the top-left)
  3. Then hit View – Tile again.

 To get the right order you have to work backwards, so if you have 5 panes, you start with picking for the 5th position and work backwards – 4, 3, 2, then 1. However, Revit places the panes in ascending order – meaning the views get placed starting at 1 and goes to 5.

Read more and see the handy pictures at:
Solving the Tiling Mystery

This fixed some persistent crashes on my AutoCAD install – here is the link if you haven’t installed it yet.

It needs to be installed AFTER Service Pack 1.

Direct links copied below:

AutoCAD® 2012 Based Products

acad_2012sp1_x32_ribbonfix.zip (zip – 937Kb)
acad_2012sp1_x64_ribbonfix.zip (zip – 1011Kb)
Readme (htm – 45Kb)

AutoCAD® LT 2012

acad_lt_2012sp1_x32_ribbonfix.zip (zip – 937Kb)
acad_lt_2012sp1_x64_ribbonfix.zip (zip – 1012Kb)
Readme (htm – 45Kb)

via
Autodesk – AutoCAD Services & Support – AutoCAD and AutoCAD LT 2012 SP1 Ribbon Hotfix

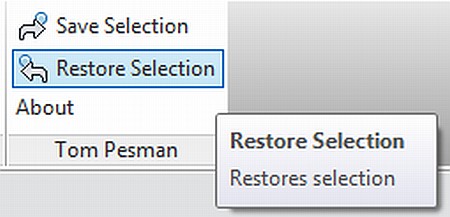
In response to my post yesterday about using Selection IDs to save selections, Tom Pesman of tnux.net has created a free Revit add-in to automate the process.

At this stage, it only allows the you to save and restore one selection set.  However, it is very easy, very fast, and I’m sure some of you will find it useful:

DOWNLOAD PAGE for Revit Save Selection – Tom Pesman

Interestingly, his About box for this add-in states:
This is a very tiny add-in to demonstrate how usefull small add-ins can be. For more information visit my website (tnux.net).

I agree – I wish certain things were built-in to the program, but at times, these little add-ins can quickly and successfully satiate the common needs of users.

Here is Tom’s blog post on the subject:
Save Selection Add-in – Tom Pesman

Thanks Tom!

In this article I will introduce the main features available to users when exporting Revit project in AutoCAD.

via

http://translate.google.com/translate?u=http%3A%2F%2Favisotskiy.blogspot.com%2F2011%2F11%2Frevit-autocad.html&hl=en&langpair=auto|en&tbb=1&ie=UTF-8

Original page:
http://avisotskiy.blogspot.com/2011/11/revit-autocad.html

From http://avisotskiy.blogspot.com

I was going to title this “Even Better Save Selection Workaround for Revit Architecture users”, but that wouldn’t really be accurate.

I am posting about a work method that will allow you to select a group of objects and quickly re-select those same objects.  It will not allow you to use the View Filters like the true Save Selection feature would.

Here’s how:

  1. Select the group of objects
  2. Manage – IDs of Selection
  3. Copy these IDs somewhere (for example, to Notepad or Excel)
  4. When you want to re-select those objects, go:
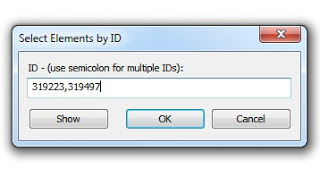
  5. Manage – Select by ID
  6. Paste the text from step 3 (including commas) and click OK
  7. Your ‘set’ has been selected!

Tip – you could make a spreadsheet for each project that contained these ID selection sets.  One column could have a descriptive name for the selection set.

Here is a quick video:

Thanks to http://www.nazdi.cz/2011/11/pitvame-projekt.html for this heads-up (translated as):
If you enter a list of numbers (separated by commas or semicolons), select the corresponding Revit several objects at once. 

I previously posted about Save Selection here:
What Revit Wants: Save Selection Workaround for Revit Architecture users

And here:
What Revit Wants: RAC Users – lets get the Save Selection feature now!

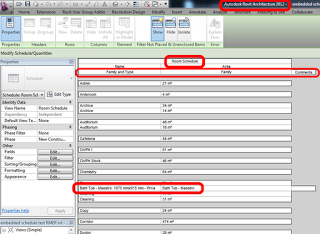
Embedded Schedules allow you to display both Room or Space data AND Data on Components that are living in those Rooms or Spaces.  Quite powerful!  They are technically only allowed in Revit MEP, not in Revit Architecture…

However…

If you using RAC and you want to use an Embedded Schedule:

  1. Open your RAC RVT in Revit MEP (if you are a Suite user, you probably already have it installed, otherwise you can install a Trial)
  2. Add an Embedded Schedule (this feature shows up as an extra tab on the Schedule creation / properties dialog for Rooms and Spaces)
  3. Ensure that you format it correctly, because RAC won’t allow you to make any changes to the ’embedded’ part of the Schedule.
  4. Save, and re-open in RAC.
  5. Your Embedded Schedule is still present in Revit Architecture:

For more information on Embedded Schedules, check out:
Applied Software Blog: Embedded Schedules in Revit MEP

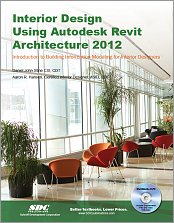
The overall premise of the book is to learn Revit Architecture while developing the interior of a two story law office. The reader is provided an architectural model with established columns, beams, exterior walls, minimal interior walls and roofs in which to work. This allows more emphasis to be placed on interior design rather than primary architectural elements. The chapters chronology generally follows the typical design process.

Download sample chapter (the sample chapter is chapter 4 – Revit Materials):
978-1-58503-664-6-4.pdf (application/pdf Object)

Link to main book webpage

Heads-up via http://bim.sandvik.bz/2011/11/12/ny-revitartikkel-new-book-for-revit-and-interior-design/