I just found a very interesting trick. Have you ever wanted to jump directly to a sheet in Revit, from a section or elevation reference mark? Usually, if you double click a section mark, it will take you to the relevant View, not the Sheet that the View is on.

However, IF the Sheet is open AND the View is ‘activated’ on the Sheet (right click, Activate view), then when you jump to the View from the Section mark, Revit will actually take you to the ‘Activated’ view on the Sheet!

Pretty cool huh?
In February, I responded to the call from the guys at Arch|Tech to submit my best tips.

Well, I am not the ‘official’ winner of the Best Revit Tip, but I did get a mention! Quote:
So, I said there were two winners. Luke Johnson, from Australia pounded me with so many worthwhile tips that I felt compelled to disqualify him from the running just to make things fair to everyone else. So, in lieu of awarding him best tip, we’ll still send him a copy of the book and we’ve added a link to his blog in the book so you can go hit all those tips yourselves.

His blog is named What Revit Wants which, reminds me of a Wham! video, but maybe I’m just dating myself.

From http://www.architecture-tech.com/2010/04/and-real-winner-is.html

And here is a summary of the tips that I sent to them:

tip on Impression workflow that many have read
Direct readers to http://www.revitprofessionals.com/, where I have created a list of Revit bloggers3D views – shaded vs rendered
also https://wrw.is/2009/10/how-to-use-new-keyboard-shortcuts.html
Thanks for the mention guys, and I look forward to checking out the book!

Revit wants you to understand it. It wants to be logical.

Sometimes you need to give Revit a bit of a hand. You may need to take a few simple steps to make Revit more understandable. David Light has some great tips along these lines over at http://autodesk-revit.blogspot.com/2010/02/point-colour-in-revit-2010.html

This is all part of being a smart Revit user – a few simple changes in Object Styles can give your modeling environment a whole heap more clarity.

Once you have modifed the Object Styles to suit your tastes, save these settings to a template file – so you don’t have to make the same changes each time. Be smart!

(whispers) There is a secret way to enable a advanced user feature in Windows 7 and Vista, and it is extremely simple.

Just make a new folder, and give the folder the following name:
GodMode.{ED7BA470-8E54-465E-825C-99712043E01C}

You will find that when you open this folder, it is like a Super Control Panel.

Apparently this does not work in Vista 64 bit, but it does work in 32 bit.

Thanks to PC User magazine and William Archibald for writing this tip in a letter to the magazine.

I had to format and re-install Vista on a laptop over the holiday break. Given that it was an OEM version, and the original disks were not available, I was faced with a bit of a conundrum. How will I restore the activation data without having to contact Microsoft?

Perhaps you have faced a similar problem. Often, OEM installation media is packed with software you don’t need, and it only serves to slow down your PC right from the get-go. However, you can install Vista using standard installation media, and then ‘backup and restore’ the Vista activation data. This way, you are starting with a truly ‘clean’ system. Of course, you will then need to download and install all the necessary drivers for your system.

Before starting the process, I backed up the activation data using the software at the link below. After obtaining some installation media, I installed Vista without providing any product keys (you should be able to do this with any retail Vista media). Then, I restored the activation data. It worked perfectly.

You can download the activation backup and restore utility at http://directedge.us/content/abr-activation-backup-and-restore

You can find a pretty good guide to re-installing a clean system at http://forum.notebookreview.com/showthread.php?t=120228

After trying many free PDF Writers over the years, I have found CutePDF Writer to be the best.

In order to ensure you are producing the best PDF files you can (high quality while still keeping file size relatively small), please follow the steps below (when you have a chance, no hurry 🙂

Install the updated CutePDF Writer from here

Change the setting in the printer properties (Preferences and Printing Defaults) for ‘PostScript Output Option’ to ‘Optimize for Portability’ as a default.

Change the setting in the printer properties (Preferences and Printing Defaults) for ‘TrueType Font’ to ‘Download as Softfont’ as a default.

Navigate to C:Program FilesAcro SoftwareCutePDF Writer and open the file PDFWrite.rsp in Notepad. Change the line FROM
-dPDFSETTINGS=/prepress TO
-dPDFSETTINGS=/printer

(The path is C:Program Files (x86)Acro SoftwareCutePDF Writer for 64 bit machines)

Enjoy producing high quality PDF’s for free everyone!

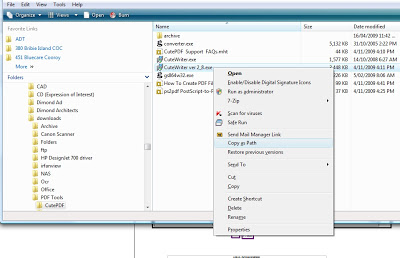
Did you know that in Windows Vista you can quickly copy the file name and path of a file, and put it into the Clipboard as text? Simply:

  1. Select the file in Explorer
  2. Hold ‘Shift’ and right-click
  3. Choose the ‘Copy as Path’ option

You can then use this to ‘paste’ into a hyperlink, for example, in Outlook. I found this at http://www.watchingthenet.com/copy-file-name-and-path-as-text-in-vista.html

Many Revit users will encourage you to convert your AutoCAD details into Revit details.

However, perhaps this isn’t a valid option for you (due to time constraints). You can find some good information on how to successfully link the AutoCAD details into Revit (some links below). In addition to these, I have found the following to be successful:

  1. In the Revit project, set up lineweights for you detail scale levels (1:5, 1:10 or similar) to equate to the lineweights you would use in AutoCAD.
  2. Setup your ‘Import Line Weights’ (Ribbon – Insert tab, Import panel, little ‘arrow’ for settings). Basically, this maps your AutoCAD colours to Revit lineweights.
  3. In the AutoCAD detail, use Multileaders if possible. In our case, this wasn’t an option (as Multileaders simply didn’t give enough graphic control for one of our architects). If you can’t use Multileaders, explode all MTEXT to DTEXT (this fixes problems with the MTEXT not wrapping correctly in Revit. If you need to come back and edit the text in AutoCAD, then use the Express Tool to convert the DTEXT back into MTEXT before editing. Convert all QLEADERS and LEADERS to MLEADERS with blank text boxes. The arrows didn’t work for us using LEADERS, but MLEADERS showed up fine in Revit. I did this manually – I set up a MLEADER style that didn’t have a landing or text, and then traced over the LEADER objects. I then deleted the original leader objects. So I was left with DTEXT and blank MLEADERS – this displays perfectly in Revit.
  4. Set up your detail DWG files such that there is ONE detail per DWG.
  5. Link into AutoCAD drafting views using ‘black and white’ for colours (the Import Line Weights takes care of the lineweight settings).
  6. In each drafting view, if you need greyscale or colour layers to be linked from AutoCAD, use the Revit Visibility/Graphics to override those layers to the original colour. (You could also do this in reverse – link layers with original colour, and override black layers to black…)

These were just a few things that made this process work for me. I encourage you to check out these links:http://forums.augi.com/showpost.php?p=829155&postcount=6Maximum number of linked files?Using AutoCAD details Best Practices