You should all know something about adaptive points by now. I will here describe how I recently used them to solve a modeling problem.
Basically, I need to create a surface that was quite irregular – it did not fall in a way that could be describe in 1 or 2 slopes. I didn’t want to use a shape-edited floor, as I wanted a form that would be smooth – not triangulated. Further to this, I wanted to be able to easily edit this form, and I wanted to be able to be able to derive some intelligence from it (ie. report the slope of the form). What would you do?
Here is how I handled it:
Create an Adaptive Component (generic) family.
Place some points and make them Shape Handle Points (Adaptive)
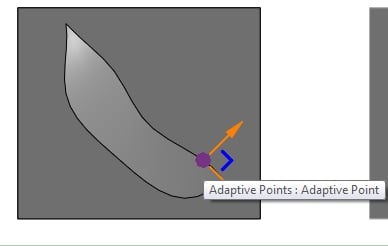
Create two splines based on these adaptive points that meet at two endpoints (see image below).
In the Project, create an in-place Mass family.
Create an Instance of this Adaptive Component inside the in-place Mass.
Finish the in-place Mass.
Create a new Wall based on the face (surface) from the Adaptive Component family.
You are done!
The fun part is editing – here is how you do it:
Select the in-place Mass (use the Project Browser if you can’t pick any actual Mass geometry), and edit-in-place.
Hold your mouse over one of the points and ‘Tab’ until you can select the actual adaptive point (see image below).
Once selected, you can pull this point around.
Adjust the points to suit, and then Finish Mass.
Pick the Wall that you applied to the face (surface), and then ‘Update-to-Face’.
If you wish to add further details or even ‘trim’ the Wall, just create another in-place family of Category walls and go for your life (you can use Cut Extrusions etc to trim the face-applied wall to a form that suits you).
I’m sure that this isn’t the only way of attacking this problem, and I’m sure that it may not be ‘recommended’ in every case. But I hope you enjoyed this tutorial. Here are the Adaptive Component family and the Project for you to download and look at:
Mozilla Thunderbird – just goes from strength to strength. I have used it to connect to our Exchange database at work.
GRemote – this utility allows you to control a PC using a Windows Mobile device as an emulated mouse. Can connect either using WiFi or Bluetooth. Useful for Media Centre and Presentations.
After trying many free PDF Writers over the years, I have found CutePDF Writer to be the best.
In order to ensure you are producing the best PDF files you can (high quality while still keeping file size relatively small), please follow the steps below (when you have a chance, no hurry 🙂
Change the setting in the printer properties (Preferences and Printing Defaults) for ‘PostScript Output Option’ to ‘Optimize for Portability’ as a default.
Change the setting in the printer properties (Preferences and Printing Defaults) for ‘TrueType Font’ to ‘Download as Softfont’ as a default.
Navigate to C:Program FilesAcro SoftwareCutePDF Writer and open the file PDFWrite.rsp in Notepad. Change the line FROM -dPDFSETTINGS=/prepress TO -dPDFSETTINGS=/printer
(The path is C:Program Files (x86)Acro SoftwareCutePDF Writer for 64 bit machines)
Enjoy producing high quality PDF’s for free everyone!
Keynotes are a powerful tool that Revit wants you to use. They are often overlooked and under-utilised. If you want to increase your productivity and add more intelligence to your model while annotating, have a serious look at Keynotes.