Around 5 years back (where did that time go?), I posted about a free right-click Explorer extension that gives you some useful information on Revit files at a glance. CTC continues to update and provide that extension for free as part of its “BIM Project Suite”. All you need to do is:
install CTC BIM Project Suite
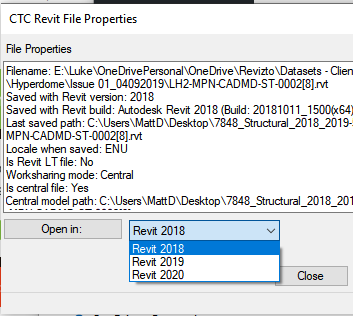
right-click on any Revit file to view its version and properties
This works for family RFA files and RTE files as well, and will give you an option to open in the actual file Revit version, or in any newer version you have installed.
Download: You can get the latest version of CTC BIM Project Suite on the App Store at this link.
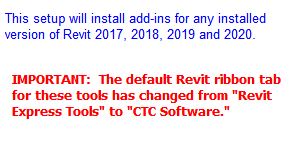
The plugin ribbon will be installed in Revit versions 2017, 2018, 2019 and 2020.
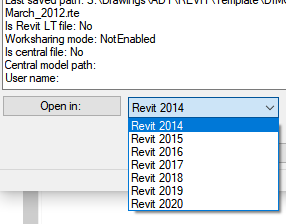
Note: Seems like the “Open In” function will offer you any versions of Revit installed on your system, that are same as or newer than the file itself:
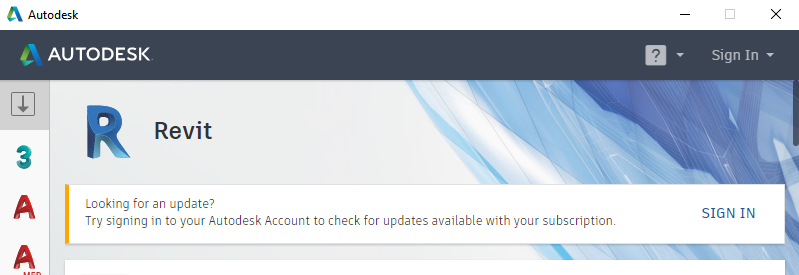
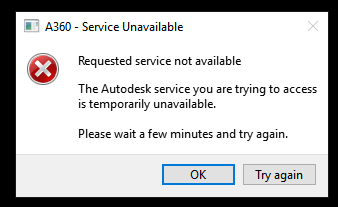
Logout from Autodesk services prior to starting Desktop Connector. You can do this easily with the sign out option at top-right of Autodesk Desktop App.
Through Task Manager – Details, attempt to “End Task” on these. Probably AdskLicensingService.exe won’t close.
Then try to start Autodesk Desktop Connector again from the Start Menu.
You can monitor starting of Desktop Connector in the tray.
API
Enhanced the Revit API Help with the addition of several new code snippets.
Analytical Model – Other
Added the Autodesk Analytical Modeling 2020 Dynamo package to help structural engineers have better control and automate the creation of analytical models in Revit, by creating a complete and consistent analytical model with parameterization, definition of logical assumptions, priorities, and customizable scripting.
Content
Added 104 MEP families for Japan.
Updated the DACH library by adding the path of travel tag in the templates and samples, improving the material setting in the templates, and adding wood construction in the samples.
Dynamo for Revit
Integrated Dynamo Revit 2.2.1 into Revit 2020.1 release, including multiple user enhancement, API changes, and bug fixes.
Energy – Analytical Model
Replaced the 3D Energy Model view that is automatically generated when creating the Energy Analytical Model, with a view called Analytical Spaces that displays only analytical spaces with the model categories set as underlay.
Foundation
Added 4 parameter tooltips for wall foundations: Eccentricity, Length, Width, and Foundation Thickness.
Graphics – Sun and Shadow
Improved the accuracy of shadows.
Improved stability when adjusting the sun position or date, in cases where the sun does not rise or set at far north or south locations.
Import/Export Other
Added support for importing Sketchup 2019 files.
Link Topography
Added the ability to link topography published to BIM 360 European server.
MEP Analytical Systems
Added the ability to represent HVAC systems analytically and assign them to the analytical spaces created with the energy analytical model for use in a downstream systems analysis.
MEP Electrical Circuits
Improved the Move To behavior to support swap the existing circuits.
MEP Electrical Wiring
Improved the default homerun length behavior during auto-wiring.
MEP HVAC Zones
Added the ability to run local energy analyses locally, including system sizing and annual simulation, using an installation of Energy Plus.
Reinforcement – Constraints
Improved the performance when editing rebar constraints in hosts with complex geometry or containing a large number of bars.
Reinforcement – Rebar
Added the ability to adjust rebar constraints faster and more intuitively, enabling easier modifications of bars.
Added the ability to constrain any shape-driven rebar sets in the model and preserve reinforcement layouts when making changes.
Route Analysis
Enhanced the performance of Path of Travel lines by storing internal calculation information for a view so the information can be reused without needing to regenerate the data.
Improved the Route Analysis Path of Travel tool to allow you to view, schedule, and tag the room name and number associated with the startpoints (From Room) and endpoints (To Room) of paths in the model.
Improved the Route Analysis Path of Travel tool to allow users to drag or use the Move key to adjust the location of the start and endpoint of a path line.
Improved the Route Analysis Path of Travel tool to allow users to indicate which elements are considered obstacles, making it easier to troubleshoot a failing path and better understand obstacle settings.
Added a Dynamo node that takes an array of start/end points and creates multiple Path of Travel lines simultaneously for fast and efficient route analysis calculations.
Schedules
Added the ability to set the rows to display in contrasting colors to make it easier to follow them across the schedule when working in wide schedules.
Wall
Improved the Attaching Wall to Floor and Attaching Wall to Roof dialogs by setting No as the default for automatic attachment, and setting it to remember the user’s selection.
API
Improved the usability of the API when creating or opening internal types for documents.
Updated the SDK sample which could cause instability in Revit 2018 & 2019.
Fixed an issue in which the RadialArray.Create() API was not able to create a correct radial array on a vertical workplane.
Fixed an issue that prevented rebar couplers to be placed between free form bars from the API.
Corrected the RevitAddInUtility.dll file which was incorrectly reporting a version of 0.0.0.0.
Fixed an API issue so that Reference Planes, created via the API, can be drawn and displayed in drafting views.
Analytical Model – Other
Fixed an issue that caused API method AnalyticalModel.ManuallyAdjust to throw InternalException for beams and braces.
Analytical Model – Surfaces
Added the prefix “Analytical Surface” to the name of new materials that have been added for analytical surfaces and spaces when upgrading from Revit 2019 and previous versions.
Fixed an issue that caused the wrong properties to appear in the Properties palette for an analytical surface for a curtain panel.
Annotation – Dimensions
Improved stability when upgrading a file which contains incorrect dimensions.
Improved stability when creating a spot elevation on a roof.
Fixed an issue with dimensions on references of element cut edges from a linked file that could not be displayed in host file.
Improved stability when copying or deleting a dimension.
Improved stability when moving a spot elevation.
Improved stability when editing a dimension.
Assembly
Improved stability when changing the naming category of assemblies before editing the type.
Ceiling
Improved stability when using Auto Ceiling to sketch a ceiling with a modified room bounding.
Cloud Model (Non-workshared)
Added a warning dialog when saving a non-workshared cloud model and removed the incorrect dialog when opening a non-workshared cloud model in the Revit viewer mode.
Fixed an issue that non-workshared cloud models would fail to open if an empty save is applied to the model after restore.
Removed the Worksets tab in the RVT Link Display Settings dialog for non-workshared cloud models.
Cloud Project Upgrade
Fix a bug in Revit which caused upgrade failure when using the automated Revit Cloud Model upgrade tool.
Content
Updated the voltage and distribution system settings in the electrical and system templates.
Dynamo for Revit
Fixed 16 problematic Dynamo Revit nodes which have no elements or SelectedIndex is invalid, such as “Wall Location” and “ScheduleType”.
Improved stability when leaving Dynamo open with a pending change.
Removed GetAllFamilyInstances and GetAllWalls from RevitSystemTestBase.
Fixed the Dynamo Revit node “FaceAnalysisDisplay.ByViewFacePointsAndValues” so that it could be correctly used.
Energy – Analytical Model
Fixed an issue that prevented internal load density parameters from being populated in an Analytical Spaces schedule.
Fixed an issue that could cause the thermal properties for doors, windows, and curtain panels to not export correctly when using detailed elements and overriding the object’s thermal properties with user defined values.
Fixed an issue that prevented the updating of thermal properties when changing the Define Thermal Properties by parameter to Schematic Type in door, window, and curtain panel types.
Fixed an issue that prevented the “Define Thermal Properties by” parameter in a new window, door, or curtain panel type from being set properly when the family is loaded back into the model.
Fixed an issue that could cause the thermal properties of an analytical surface to not display properly in the Properties palette.
Fixed an issue that could cause the Analytical Construction parameter in window, door, and curtain panel types to be empty after upgrading the model.
Fixed an issue the caused the thermal properties for a curtain panel door’s analytical surface to report as Not Computed.
Energy – Simulation
Improved stability when generating an energy analysis for Insight while the active view in Revit is a non-geometric view (schedule, report, etc.).
Fabrication – MEP
Fixed an issue that could cause the Change Service feature to fail when used on the same selection multiple times.
Fixed an issue when cancelling out of a Change Service action that could lead to the user interface being left in a bad state.
Fixed an issue that resulted in missing journal data when double clicking to add and remove services from MEP Fabrication Settings.
Improved the Change Service/Size feature to better support back to back fitting scenarios.
Fixed an issue with model updates that were causing disconnects when using the reload configuration feature.
The quantity state is now properly set allowing quantities in print reports for fabrication parts to be properly quantified.
Fixed an issue with a sporadic warning message that was being displayed when cancelling a reload configuration action.
Fixed an issue that caused modeled parts to either disconnect or vanish after reloading a configuration.
Fixed an issue that caused internally lined parts to fail to place when using autofill features.
Fixed an issue that resulted in poor stability when using the Optimize Lengths feature on services containing couplings configured with invalid materials.
Fixed an issue that resulted in poor stability when editing the type properties for taps when self-dimensions are displayed.
Family Constraints
Fixed an issue causing reference lines to fail on rotation for angles between 180 and 360.
File Corruption
Improved Revit stability when working on a workshared model that contains an element in an invalid workset.
File Open/Save Internals
Improved Revit stability when opening a corrupt model from Revit Home.
Added a warning message when uploading a cloud model in Revit viewer mode.
Fixed the issue when OpenAndActivateDocument API open the file path with non-lowercase extension.
Graphics – Cloud Render
Corrected the glazing material transmissive color in cloud rendering.
Graphics – Image Import/Export
Improved stability when loading a PDF with a very large physical sheet size.
Improved stability in the Manage Images dialog for PDF files with a very large width to height ratio.
Fixed an issue with ImageType instances created through the API that made certain placement options of ImageInstances unavailable.
Graphics – Rendering
Improved stability when rendering with wood textures.
Graphics – Sun and Shadow
Fixed an issue where Sun Path and Shadows did not work at far north or south locations.
Groups
Fixed an issue where modifying a space would interact with group instances in the model causing the ‘Changes to groups are allowed only in group edit mode’ error.
Help
Fixed an issue with launching CHM help files using the Revit ContextualHelp API.
Link Topography
Fixed an issue where incorrect topography geometry was created when linking a Civil 3D published topography which had large coordinates.
Linked RVT Files
Fixed an issue where rooms and spaces could lose or no longer detect a linked model boundary after reload latest when using Revit Cloud Worksharing.
MEP Analytical Systems
Fixed an issue that could cause part of an exterior wall to not be included in the gbXML export.
MEP Duct/Pipe Display
Fixed an issue that could cause a single-line pipe drop to not display when it is hidden by another element if there is a transition in the vertical pipe.
Fixed an issue that caused single line ducts to display as broken over a drop symbol.
Fixed an issue that caused a gap to display between a pipe and p-trap while using single-line display.
MEP Duct/Pipe Pressure Loss Calculations
Fixed an issue that caused poor performance when adding a new pipe segment in a large network.
MEP Electrical Circuits
Fixed an issue that caused an electrical fixture to be added to 2 circuits and then could not be removed.
Improved stability when selecting a panel from the recent panel list with the Enable Feed Through Lug error dialog open.
Fixed an issue that could cause Revit to hang when creating a circuit in a model in which the maximum wire size defined in the wire type is smaller than the smallest size in wire material table.
MEP Electrical Other
Fixed an issue in which a model can’t be upgraded to Revit 2020 if a specific conduit fitting exists in the model.
MEP HVAC Zones
Improved performance of zone display in canvas.
MEP Insulation lining
Fixed an issue that pipes in group get disconnected after copy/paste or create similar in a specific model.
MEP Pipe
Fixed an issue that could cause duct and pipe rise symbols to not display when they extend to the level above and are hidden on that level.
Materials
Improved stability when working with the Materials Browser dialog.
Fixed the Visible Transmittance value of glazing materials calculated incorrectly in the Material Browser.
Fixed an issue that added materials used by analytical spaces and surfaces when upgrading a family.
Part Elements
Corrected an issue that would allow excluded parts to be merged with parts.
Corrected an issue that occurred when copying walls containing multiple parts hosting area reinforcement.
Corrected an issue related to a part cover not being updated around newly added voids.
Added shortcut keys for the Modify Parts tools in the ribbon.
Corrected an issue related to copying the reinforcement hosted in parts from multi-layered walls when copying the original wall.
Precast – Reinforcement
Corrected an issue that occurred when copying walls with parts that host rebar.
Precast – Segmentation
Corrected an issue in which side lifters were not created when an opening occupied a large portion of the wall height.
Print
Fixed as issue where nested generic annotations in a legend component shift location when printed with vector processing.
Reinforcement – Constraints
Fixed an issue where the concrete cover would reset when editing a model-in-place concrete element.
Reinforcement – Fabrics
Improved stability when creating bent fabric sheet through the API.
Reinforcement – Path & Area
Fixed an issue that occurred when placing an area fabric reinforcement on parts from multi-layered walls that contain voids.
Reinforcement – Rebar
Improved the behavior of rebar to not follow a stirrup corner when already placed at the corner of another stirrup.
Improved the behavior when rebar is hosted in parts and is copied along with the wall host.
Fixed an issue where an incompatibility between the hooks specified by the rebar type and shape would prevent the placement of rebar in the model.
Fixed an issue where certain dimensions of a rebar coupler did not allow zero spacing between the connected bar ends.
Fixed an issue where toggle visibility would work only for one rebar in a selection of multiple bars.
Improved the behavior when directly editing the individual segment lengths of rebar.
Revit Cloud Worksharing
Improved stability while editing a spline in a model that was hosted on BIM 360.
Revit Home
Fixed the terminology inconsistency issue by replacing “Recent Files Page at Startup” with “Enable Recent Files List at Home”.
Improved Revit Home so that clicking Refresh button will check the customer entitlement.
Improved the behavior when displaying BIM 360 account information.
Removed an unnecessary error message that would appear when double clicking on a model from recent files page.
Improved the message in the Publish to Cloud dialog.
Fixed an issue where the project list still points to a 2019 project after the project has been upgraded to 2020.
Route Analysis
Fixed Path of Travel tags so that they automatically update their units when the Project Units are changed (and the labels in the tag are set to use project settings).
Fixed an issue causing floor slab edges to incorrectly block a Path of Travel line.
Fixed an issue causing file corruption when a warning is issued for a failed update to a Path of Travel line.
Fixed an issue that caused linework applied to wall openings to incorrectly block Path of Travel routes.
Fixed an issue to ensure split face boundary lines do not block the Path of Travel analysis.
Fixed an issue so that Path of Travel lines correctly display in plan views when the Path of Travel line is associated with a level below 0.
Improved stability when placing a Path of Travel line in a new session of Revit when the previous session had enabled Tag On Placement for Path of Travel lines.
Fixed an issue that caused Revit to be unresponsive when creating a Path of Travel in large models when the Reveal Obstacles command was added to the Quick Access Tool Bar.
Schedules
Improved the stability when open a model with a schedule view as the default view.
Steel Connections Propagation
Fixed an issue in which the Propagate Connection command didn’t work on certain languages (Chinese, Japanese, etc.).
Steel Fabrication Beam
Fixed an issue related to fabrication beam geometry disappearing after the model was reopened.
Corrected the calculation of weight and exact weight for steel beams with fabrication.
Steel Fabrication Elements
Fixed an issue in which the Hole Tolerance value was reset to the default value after the Bolt Pattern was modified.
Steel Modifiers
Improved the stability while placing steel modifiers inside the group.
Structural Connections – Detailed Connections
Fixed an issue that restricted the access to the edit connection type dialog when the Korean language is used for Revit.
Fixed an issue that caused the user cases created in Code Check forces dialog to not be kept.
Improved stability when tagging an anchor missing from the AstorBase.mdf.
Structural Connections – Platform
Fixed an update issue of the structural steel connections part of a linked model, if the linked file has more than one instance in the model.
Fixed an issue that caused a BIM 360 worksharing user file to become corrupt after simultaneous synchronization by 2 users bringing in steel changes.
Fixed an issue that prevented the values of project parameters and shared parameters from being changed when these parameters belonged to sub-elements of steel connections, steel plate/beam modifiers, or hole patterns created on steel plates/beams.
Fixed an issue where steel beams with fabrication data lost their section on copy/paste in a new model, visible after closing and reopening Revit.
User Interface
Fixed an issue where some edit controls in 3rd party Docked Views would not work properly with all input.
Improved the stability when open a project file.
Fixed an issue with tooltips for the Revit Home/Close/Minimize/Maximize buttons, which caused them to display using an incorrect font.
View – Dependent
Improved stability when using the copy or copy to clipboard command on a dependent view.
View – Other
Improved stability in API View.BoundingBox[].
View – Save/Insert
Improved stability that resulted from incorrectly allowing the File> Save As> Library> View command to be active in Revit’s view-only mode.
View Templates
Improved the performance of wall editing when a model contains many multi-category schedules.
Worksharing
Fixed an issue that caused upgrade to fail for models with steel connections.
Fixed the issue that worksets Opened status is changed unexpectedly when editing Manage Worksets in Manage Links dialogue.
Fixed an issue in the Sync With Central dialog when saving changes to a cloud model that links a foreign file.
Fix a bug in Revit that upgrade might fail when using the Revit cloud model upgrade tool.
Improve upgrade success rate when using the automated Revit cloud model upgrade tool.
Improved stability when copying or deleting a dimension.
Fixed an issue which caused upgrade failure when using the automated Revit Cloud Model upgrade tool.
Fixed an issue that resulted in duplicate global unique identifier (GUID) values when copying or mirroring parts.
The quantity state is now properly set allowing quantities in print reports for fabrication parts to be properly quantified.
Fixed an issue with a sporadic warning message that was being displayed when cancelling a reload configuration action.
Fixed an issue that caused modeled parts to either disconnect or vanish after reloading a configuration.
Improved Revit stability when working on a workshared model that contains an element in an invalid workset.
Fixed the issue when OpenAndActivateDocument API open the file path with non-lowercase extension.
Improved stability when working offline with file-based worksharing.
Corrected the glazing material transmissive color in cloud rendering.
Fixed an issue where modifying a space would interact with group instances in the model causing the ‘Changes to groups are allowed only in group edit mode’ error.
Fixed an issue where incorrect topography geometry was created when linking a Civil 3D published topography which had large coordinates.
Fixed an issue where rooms and spaces could lose or no longer detect a linked model boundary after reload latest when using Revit Cloud Worksharing.
Fixed the Visible Transmittance value of glazing materials calculated incorrectly in the Material Browser.
Fixed an issue that could cause a single-line pipe drop to not display when it is hidden by another element if there is a transition in the vertical pipe.
Fixed an issue that could cause extended lines to appear inside single line pipe rise and drop symbols when printing.
Fixed an issue that caused a single line pipe drop to not display a gap.
Improved performance of zone display in canvas.
Fixed an issue that could cause duct and pipe rise symbols to not display when they extend to the level above and are hidden on that level.
Fixed an issue where Background Room Color Fill with a non-solid fill pattern would incorrectly overlap cut walls when printing in vector mode.
Fixed an issue that caused a long delay when clicking the File Menu in the recent file list.
Fixed an issue that prevented particular worksharing cloud models containing steel connections from opening in Revit.
Fixed an issue with tooltips for the Revit Home/Close/Minimize/Maximize buttons, which caused them to display using an incorrect font.
Improved the stability when opening a project file.
Improved stability when using the copy or copy to clipboard command on a dependent view.
Improved stability in the API View.BoundingBox[].
Improve upgrade success rate when using the automated Revit cloud model upgrade tool.
Improved stability of Sync with Central when elements are included in background processes.
Fixed an issue where upgrade might fail when using the Revit cloud model upgrade tool.
Fixed the issue that worksets Opened status is changed unexpectedly when editing Manage Worksets in Manage Links dialogue.
Changing and updating Shared Coordinates in Revit can be quite a challenge. At Virtual Built Technology we often create a Revit Control File to manage and transfer project datums, shared coordinates and other compliance items for the project team.
This video describes the techniques and challenges involved in updating and instituting shared coordinates on a Revit project. It also includes the steps involved in adopting other Revit modelling standards and requirements into your file.
Here are some of the tips included in the video:
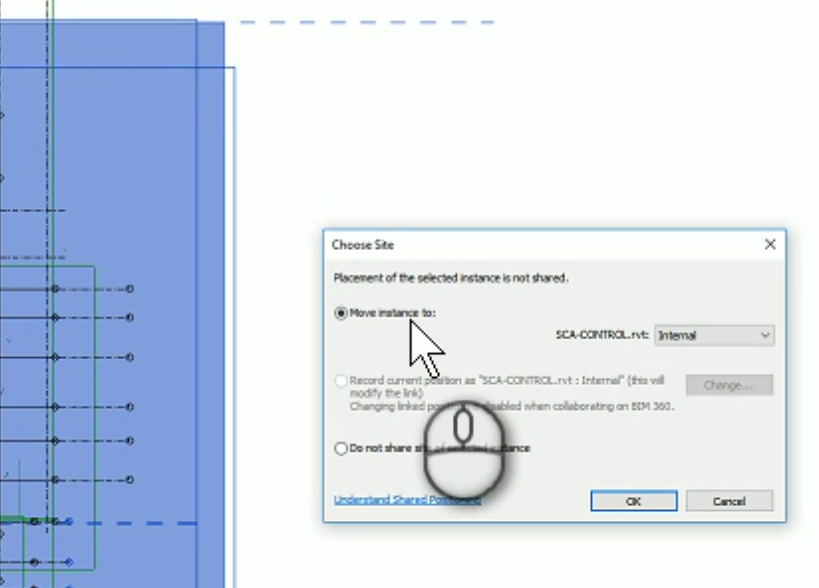
how to un-share coordinates for linked models
how to acquire new coordinates
checking that coordinates are correct for linked models
using Transfer Project Standards – Project Info as a method of fixing coordinates
other model compliance steps including: updating base point settings, transferring Phase Settings, loading a Start View for the project
copying locator elements
copying scope boxes
using Dynamo to automatically generate the required worksets for compliance
I love Box. It is an incredibly robust file sharing tool and it has rarely let me down even though we have used it extensively on many large BIM and VDC projects. Recently, Box has been pushing people away from Box Sync and into Box Drive. I was syncing over 1 tb of data across many thousands of project files, so I could see the advantage of a more ‘on demand’ system. Box Sync actually struggles to scan through the entire folder structure – so much so that it sometimes never quite catches up in a 24 hour period. On the other hand, Box Drive uses a 25 gb transparent cache, and you can still mark certain folders to keep them offline. Another key difference is that Box Drive will always show you all of your files and folders, and it will download them on-demand (unless set to keep offline). This means that there is no web-based control for ‘Sync Folder’ or similar, the setting is basically on the client device.
A mini-install will run, and then you will be prompted to login
After you login, you will be prompted to uninstall Box Sync. You will have to make sure any files in Box Sync are closed.
I received this annoying warning a few times:
As it kept failing, I did have to restart my computer. The uninstall picked up automatically after the restart. Even after a long time ‘restoring disk space’ did not complete…
My workaround was to:
– boot into Safe Mode
– rename the existing Box Sync folder to “Box Sync.old”
– upon reboot, the Box Sync uninstall script thinks that it got the job done, even though I helped it along
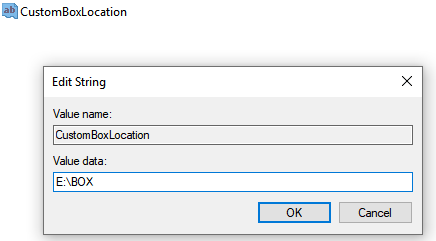
Following this step, I wanted to move the Box Drive to the same absolute folder location I had previous, which was E:\BOX\Box Sync\contentfolders .By default it was pointing to a user location, that is C:\Users\lukes\Box\ .There are some notes here on how to do change the Box Drive folder location.
Restart Box Drive after setting the CustomBoxLocation Registry key shown below:
changing the location of Box Drive
Unfortunately, this did not have the desired effect. It resulted in a folder structure like: E:\BOX\Box Sync\Box\contentfoldersAnnoying! So you can’t actually rename the \Box\ piece of that folder structure…
My next plan to work around this limitation was:
– put Box in a different folder, and
– make a symlink to the new folder.New location in Registry:
Finally, I made the symbolic link like this:
mklink /d "E:\BOX\Box Sync" E:\BOX\Box
Job done!
Now, I can use all of my legacy Box Sync links with Box Drive, and they will all correctly redirect to the new Box Drive location.
Obviously, you have to go through now and ‘Mark Offline’ any folders that I want to keep permanently syncing to that device.
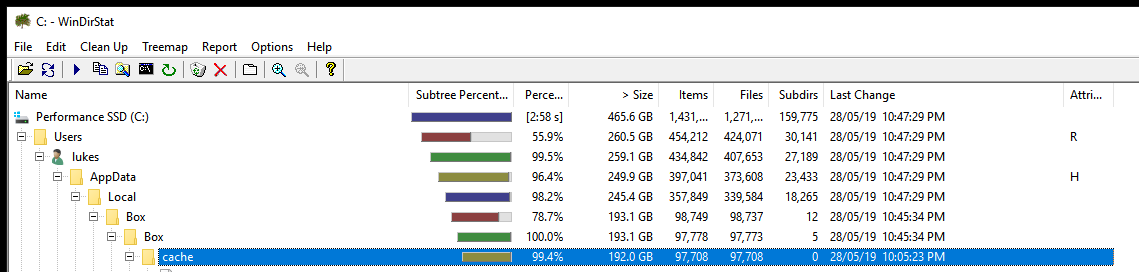
Update: Changing the Box Drive Cache Folder location
I discovered the Box Drive cache was using heaps of hard drive space
windirstat
So I decided to move that cache folder using yet another symbolic link… Here’s how:
As software and standards mature and even become archaic, they inevitably attract baggage along the way. Years of technical debt amassed by well-intentioned developers and product managers will be paid for by us and our children.
This is particularly evident when we start talking about the Id of Revit elements, and the IFC GUID syntax. As most of you are aware, Revit carries a number of different identifying attributes for each and every element. Here is a basic list:
Element Id – the numerical form of a Revit Id, you can interact directly with this using the Select By Id command in Revit
UniqueId – “A stable unique identifier for an element within the document.” This is not a correctly formed UUID, but rather a concatenation of a standard UUID for the Revit EpisodeId (session based), along with the Revit element Id. From Jeremy’s post: similar to the standard GUID format, but has 8 additional characters at the end. These 8 additional hexadecimal characters are large enough to store 4 bytes or a 32 bit number, which is exactly the size of a Revit element id.
DwfGuid (Export Guid) – this is a correctly formed UUID in .NET / standard format
IfcGuid – identical to DwfGuid, but encoded differently according to IFC rules created in the mid-90s. At the time, it was deemed worthwhile to ‘compress’ the IFC Guid to the shorter form we still have to deal with today.
It would be nice if Revit and IFC shared a single common unique identifying syntax, but unfortunately this is not the case.
The above Ids do actually bear some predictable relationship to each other. The UniqueId is formed by Revit joining the EpisodeId and the encoded Element Id, the Dwf or Export Guid is created by an algorithm that has a number of conditional rules, and the Dwf Guid can be converted to the backwards-compatible IfcGuid format through a different algorithm, originally created in C. Those algorithms can be sourced in various places (see links in Further Reading below).
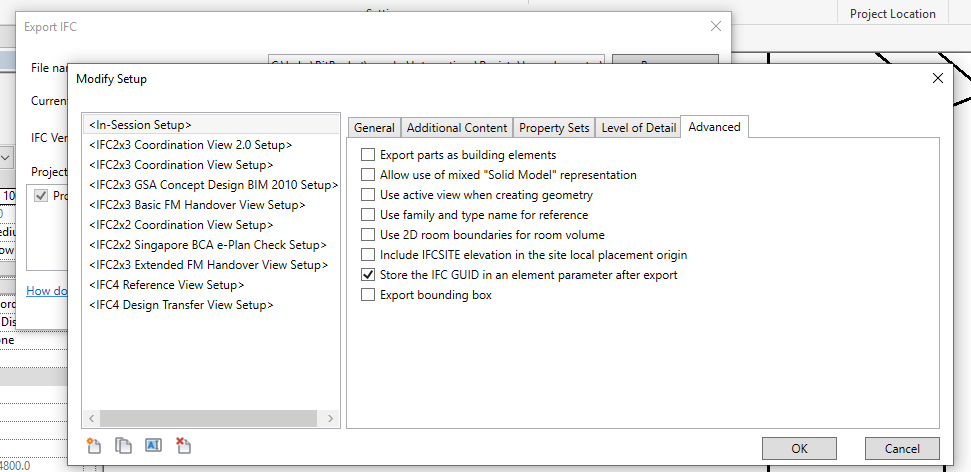
Also, some of these get exposed in different ways – if you create Element-bound BCF files, they will typically show the IFC Guid syntax. Further, if you export an IFC file from Revit and tick the option on the Exporter, it will write the IfcGuid to a parameter on the element.
You can query the Element Id directly in Revit (Modify ribbon, Inquiry panel, IDs of Selection):
However, for the purpose of this post, let’s assume you are using Dynamo with IronPython, and you want to query all 4 Ids from an element.
We at least need to import the Revit API and the Revit IFC API:
clr.AddReference("RevitAPI")
import Autodesk
from Autodesk.Revit.DB import *
clr.AddReference('RevitAPIIFC')
from Autodesk.Revit.DB.IFC import *
Following this, we can use the various Dynamo and Python commands to access the Ids:
elementIds, uniqueIds, DwfGuids, IfcGuids, successlist = [], [], [], [], []
for i in e:
    try:
        elementIds.append(i.Id)
        uniqueIds.append(i.UniqueId)
        DwfGuids.append(ExportUtils.GetExportId(doc, ElementId(i.Id)))
        IfcGuids.append(ExporterIFCUtils.CreateSubElementGUID (UnwrapElement(i),0))
        successlist.append("Success")
    except:
        successlist.append("Failure")
OUT = elementIds, uniqueIds, DwfGuids, IfcGuids, successlist
Notice the commands and properties used:
Element Id – query the Element.Id member
Unique Id – query the Element.UniqueId member
Dwf or Export Guid – use the ExportUtils.GetExportId method
IfcGuid – use the ExporterIFCUtils.CreateSubElementGUID method (index 0 refers to the main element itself)
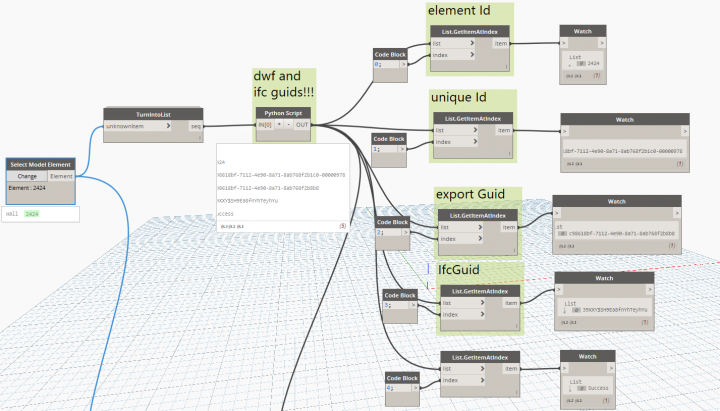
From here, I create a Dynamo node that eats Revit elements and gives us back these Id values:
before node created
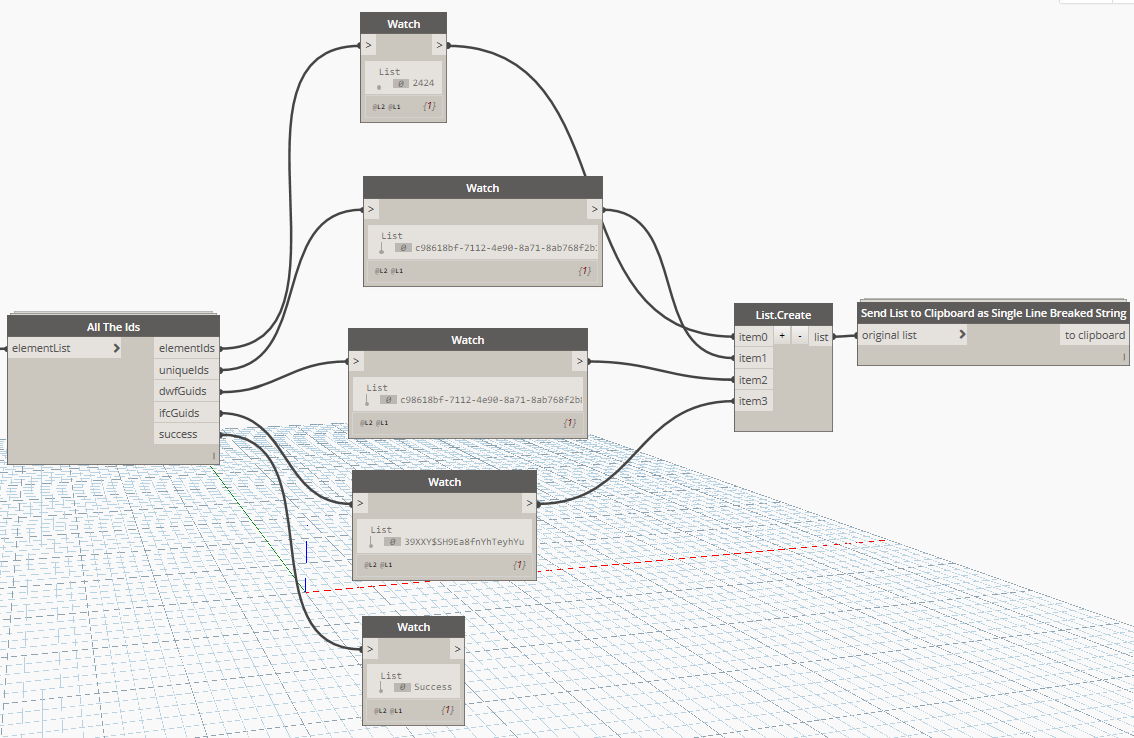
After “All The Ids” node created
This node will be published in the Bakery package on the package manager, and to Github.
Further, our VirtualBuiltApp platform has been developed to store and query multiple Ids for a single element.
Example output from the Dynamo / Python (initial test showed the Dwf Guid is still a .NET object, that probably should get converted to a string for consistency).
[2424]
['c98618bf-7112-4e90-8a71-8ab768f2b1c0-00000978']
[<System.Guid object at 0x0000000000000071 [c98618bf-7112-4e90-8a71-8ab768f2b8b8]>]
['39XXY$SH9Ea8fnYhTeyhYu']
I added str() to the Python:
Final test showing the 4 different Id values for a single object:
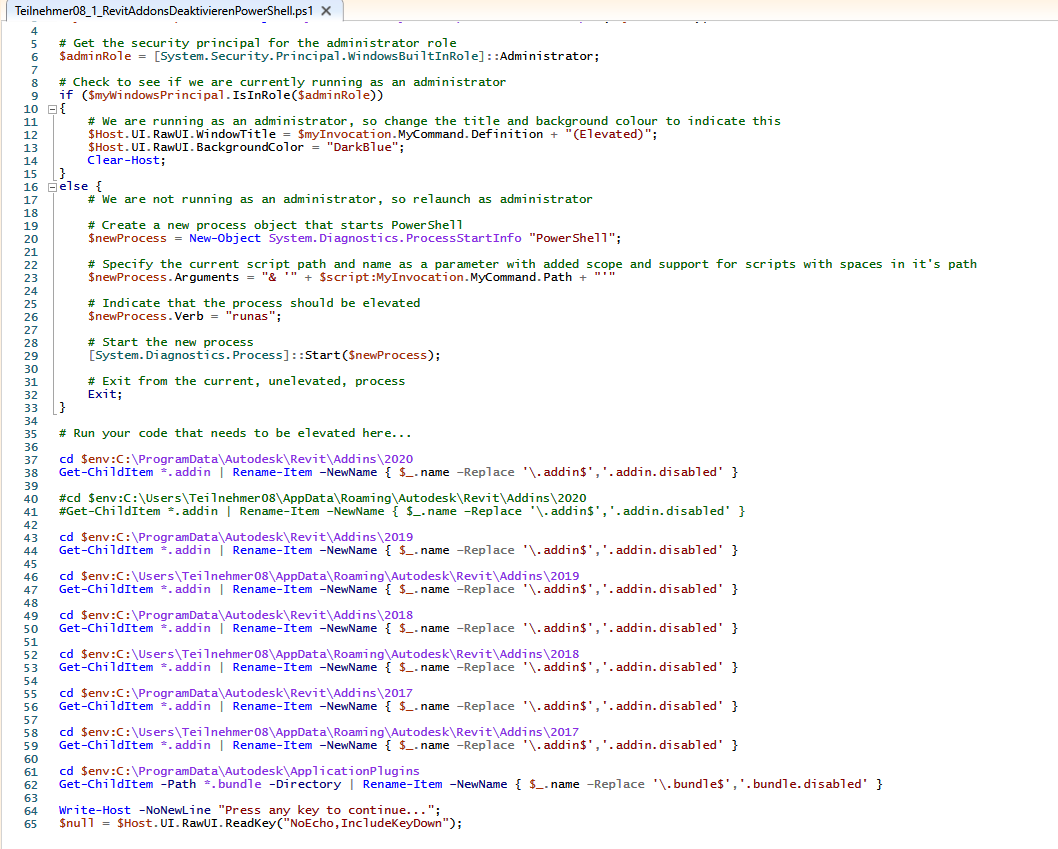
I love it when people take something I hacked together and make it even better! A while ago I posted a script to disable all Revit addins, and recently Thomas Vogt sent me some much improved versions.
Deactivate with Teilnehmer08_1_RevitAddonsDeaktivierenPowerShell.ps1
Activate with Teilnehmer08_2_RevitAddonsAktivierenPowerShell.ps1
You can download a ZIP file containing the Powershell scripts here:
Disclaimers (use at your own risk etc) and notes on how to use the scripts are as per previous post.
Here is the note from Thomas:
Hi Luke, I have used your script from https://wrw.is/script-to-disable-all-revit-addins/ and I have adjusted it a bit. I have local users without admin rights (training center computers), so I go to the users computer, open the file with rightclick > Powershell and the Admin login is shown. I got also some problems with the allusersprofile and the appdata path variable, because as soon as I login as admin, the appdata path is not anymore the user path. Thus I have changed it to the path itself. The last 2 lines help to see the errors.
Thanks for your script, it helped me a lot! My scripts are attached if you want to use it on your blog =)
Thanks to Thomas Vogt for sharing his work on this!
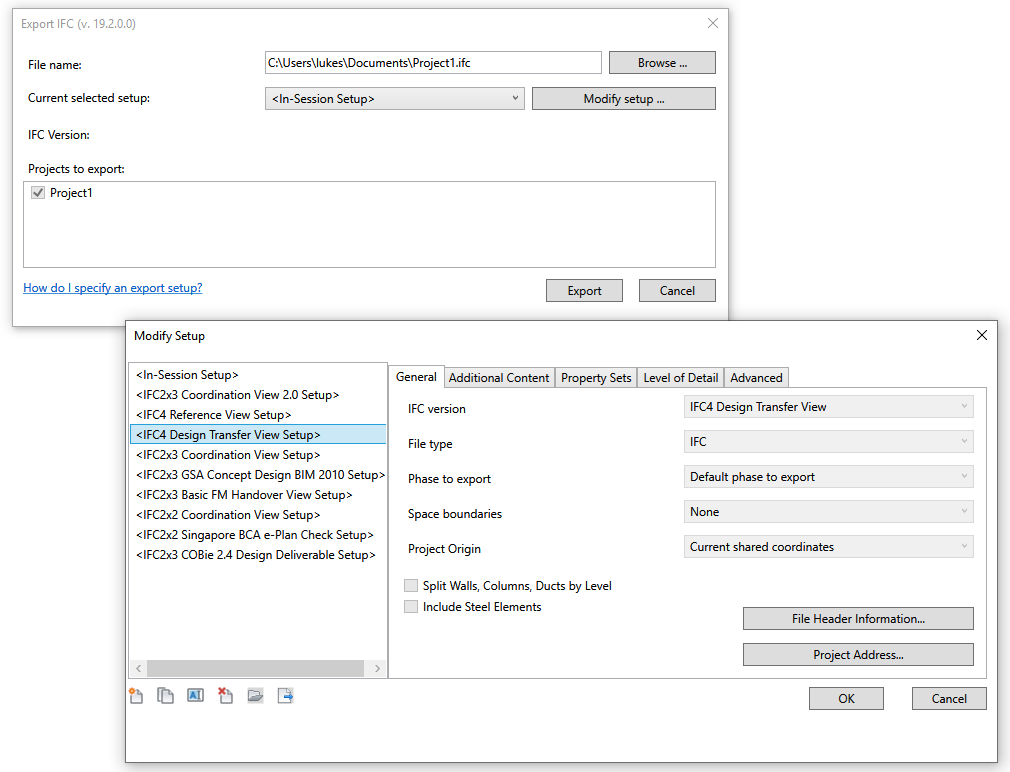
Its good to see that IFC for Revit development is continuing… This post shows how you can download and install the new version, along with detail on what has been updated in this version.
Look at the top of the dialog box, it should say “Export IFC (v.19.2.0.0)
Here is a list of fixes from the Release Notes:
General:
• This is generally a bug fix release with some new IFC functionality.
New Export Functionality:
• IFC Exporter now supports IFC Spatial Container assignment override using IfcSpatialContainer parameter. Valid values are: “IFCSITE”, “IFCBUILDING”, or name of the Building Storey
• Improved detection of Door operation type using the 2D swing symbol (arc). The improved version detects range of angles (not limited to 90, 180 or 360 degrees only)
• Added support for IfcCivilElement
• Replace IfcRelConnectsPortToElement with IfcRelNests for IFC4 export as recommended in IFC4 specifications, allowing non-IfcDIstributionElement to participates in the connectivity
• Added support for RampFlight and Run from generic models or family representing more complex Ramp for export to IfcRamp and IfcRampFlight
• Added various property Calculators
• Improve performance when exporting a large mesh
• Enable IFC Property Templates
• Allow multiple Property Template mapping from txt
• Projection improvement
• Enable site and project property creation
• Utilize Site GlobalId method
• Add multilanguage support files for German language (DE)
• Provide a complete list of all Shared Parameters used by Revit on export including ALL properties defined in IFC PropertySet Definition for both Instances and Types. The lists are included in the installer and will be placed in the install folder: IFC Shared Parameters-RevitIFCBuiltIn_ALL.txt (for the Instance parameters) and IFC Shared Parameters-RevitIFCBuiltIn-Type_ALL.txt (for the Type parameters).
• Improve consistency for setting the object direct attributes, support IfcObjectType[Type] special parameter to drive instance ObjectType parameter from the Type, update the shared parameter definition files (now for [Type] parameters we will also maintain the GUID as long as it remains)
• Incremental work towards IFC4RV 1.2 MVD
Export Bug Fixes:
• Consistent ExportAs entity and its PredefinedTypes
• Export fails when there is no associated Plan View to a level
• Additional fix for error getting 2D data when there is no Level associated to the FamilyInstance
• Various fixes related to missing geometry and export failures
• Fixed performance issue in IFC2x3 export due to error in creating types
• Fixed issue with slanted Pile
• Fixed issue related to element that is split into parts
• Improvement in handling level of Part Override
• Some improvements on classification (issue #31)
• Improve voiding of IfcMappedItem representation (issue #9)
• Fixed issue on Composite curve tolerance (issue #5)
• Fixed issue where element is still exported even though it is set to not-exported in the mapping table
• Bugfix for incorrect cylindrical hollow core Beam export in IFC4RV
• Fixed for issue #51
• Bugfix based on Pull request #52 for MEP connector, and a few clean-ups
• Fixed minor issue to ensure generic element exporter will generate consistent GUID for the instance
• Fixed issue when OverrideElementContainment is used but the Site does not have site geometry (from Topography surface)
• Add support of OverrideElementContainment also for SpatialElement (Room/Space/Area). This enables export to place IfcSpace directly to IfcSite for example, which is useful for outdoor spaces
• Refactored the handling of valid entity and type and fixed a few defects related to it (Github issue #68)
• Fixed issue with Stair Landing that is offset far away from the supposed location
• Fixed issue with missing geometry when assigning IfcExportAs to the Spatial Element (Issue #23) However, in IFC4RV or DTV, there is a fixed list of valid entities that will be enforced, entity such as IfcExternalSpatialElement will be exported as IfcBuildingElementProxy.
• Fixed performance issue when there is a large triangulated geometry for export to IFC4RV
• Fixed issue of exception raised during export when “Export schedules as property sets” option is selected, and the model contains ViewSchedule from the template
• Update Source/IFCExporterUIOverride/IFCExporterUIWindow.xaml.cs (issue #59)
• IFCBooleanOperator.Union don’t work! (issue #32)
• Fixed issue in exporting IfcBuildingElementProxy that assigns an invalid enumeration for CompositionType in Ifc2x3 export
• Fixed issue related to opening that cuts through multiple walls (note that this is not yet 100%. In some cases, due to the extended body of the opening (that is defined in the native code) there may be more cut than it should for a few cases
• Fixed issue with changing GUID of Window or Door when it is in the context of the opening that cuts multiple walls (issue “IFC Guid on family” in SourceForge)
• Fixed IfcWindowLiningProperties, IfcWindowPanelProperties GUID issue
• Improve handling for multiple meshes in a tessellated geometry that causes missing some surface body.
• Fixed issues of UserDefined propertysets that fails to recognize the Pset assigned to a Type. Also improve the handling for Conditional Pset (by PredefinedType)
• Fixed regression issue #70 missing toprail for IfcRailing on export
• Fixed issue with “runaway” flex duct with “Keep Tessellated Geometry as Triangulation” option selected (issue #58)
• Fixed regression issue (issue #96) IfcZone ObjectType not exported
• Fixed issue of Naming override/default value, and issue of Qto_ properties are not exported
• Fixed issue on a wrong enumeration for the SweptArea (it was set to .CURVE., should be .AREA.)
• Fixed for orphaned entities and wrong footprint information due to incorrect projection direction for IFC4RV requirements. IFC4RV Beam (Arch) is now without error in the automated test
• 1st fixed for issue related to runaway parts in “export only elements visible in view” (there are still situations that may cause a wrong rotation, but the test case reported in issue #86 so far looks good)
Import Bug Fixes:
• Improve voiding of IfcMappedItem representation (#9)