Konrad and Mostapha are working on something, and the functionality does not look shrimpy at all. Check it out:
“Mantis Shrimp is a Dynamo (Revit) and Grasshopper (Rhino) interoperability project that allows you to read Rhino’s native *.3dm file type as well as export geometry from Grasshopper. It is written in Python in form of a user objects (on Grasshopper side for exporting) and custom Python nodes (on Dynamo side for importing). It’s an OPEN SOURCE project with all of the source code available on GitHub. At the moment it’s a collaboration project between myself and Mostapha Sadeghipour.
I decided to make this project an open source for multitude of reasons but most importantly because it was written on top of Dynamo (an open source project) using OpenNurbs (an open source project) and inspired by Rhynamo (an open source project to be in December 2014), and finally I was helped along the way by Mostapha who’s almost never written anything that he didn’t like to share. I think i got the “bug” – not Ladybug – for sharing from him.
Most of you would be aware of keyboardshortcuts.xml in Revit. However, did you know about RoamerCommands.xml? This file lives in the Layout folder under you Navisworks install, and it can be edited to modify keyboard shortcuts in Navisworks.
Note: This process is very risky, so this file should be backed up before editing it. During experimentation, I had a lot of crashes and often had to restore this file to fix the issues.
Backup RoamerCommands.xml (rename the backup or copy it somewhere, like this)
Edit it in a text editor like Notepad++ or Sublime Text
Look for something you want to change / add
Modify the file
Make sure there are no duplicate entries, like this
Save it
Restart Navisworks
If Navis crashes on opening, restore the old file from Step 1 and start again
If it doesn’t crash, see if your keyboard shortcut works
I was able to change the keyboard shortcut for File Open as shown below:
Video showing that my modified RoamerCommands.xml worked:
File location on my system: “C:Program FilesAutodeskNavisworks Manage 2015LayoutRoamerCommands.xml”
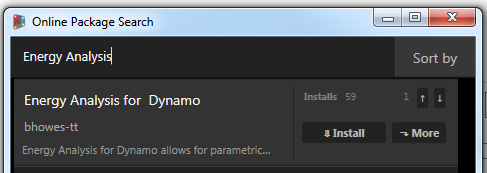
Quote: Finally, a few links, details and instructions for those of you who want to get rolling with the tools. The nodes are available in Dynamo’s package manager, using a recent daily build of Dynamo. We expect an official release with this functionality by the end of October, but in the meantime you can use a daily build to use the tools. … To install the package, search for the name in the Dynamo package manager – Dynamo > Packages > Search for a package > ‘Energy Analysis for Dynamo’ – and install the package. Once the package is installed, you’ll likely want to check out our sample files in the package’s ‘extra’ folder, and watch our first round of tutorial videos (1,2). … We should also note that some analytical information (constructions, schedules, etc.) can only be analyzed using Dynamo on top of Vasari. The source code is available on Github under an Apache v2 license – it is open for anyone to use and modify.
Full credit goes to Adam Sheather for all his hard work on this. Basically, it is a Dynamo package that can talk to Navisworks. I think he has started something pretty special here…
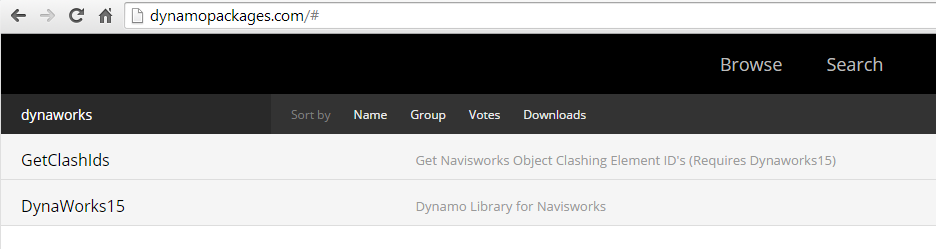
or to use Dynamo package manager: Open Dynamo from the start menu, Packages, Search for a Package, wait to synchronize package list, then click to install DynaWorks
Install GetClashIDs too if you want
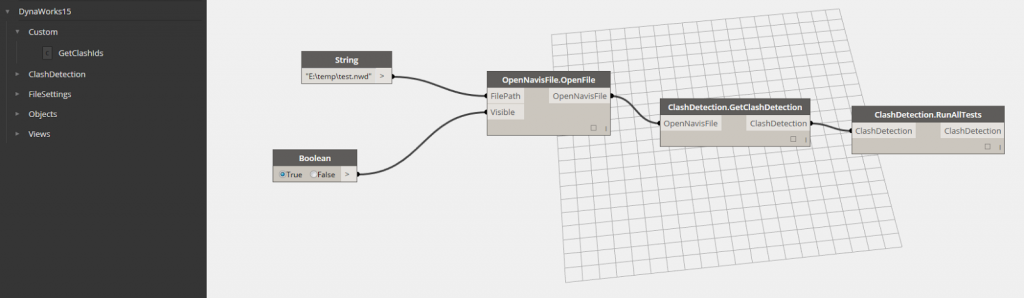
Mine installed itself to this location: C:UsersLuke JohnsonAppDataRoamingDynamo�.7packagesDynaWorks15bin
To get my install to work, I had to copy missing XML files from step 2, and then used Import Library and chose DynaWorks15.dll from the path above to ‘refresh’ the install and display the extra nodes (you might not have this problem)
Open it in Dynamo, point it at one of your Navisworks files by modifying the String property,
Click Run in Dynamo, and it will automatically open the file and run all the Clash Tests.
The above steps should get you up and running… but there is so much more capability here that it deserves more than one post. As Adam mentions in his post, you can use DynaWorks to run Navisworks in hidden mode. I’m looking forward to seeing how others use this … particularly in getting Navisworks to communicate with Revit more effectively.
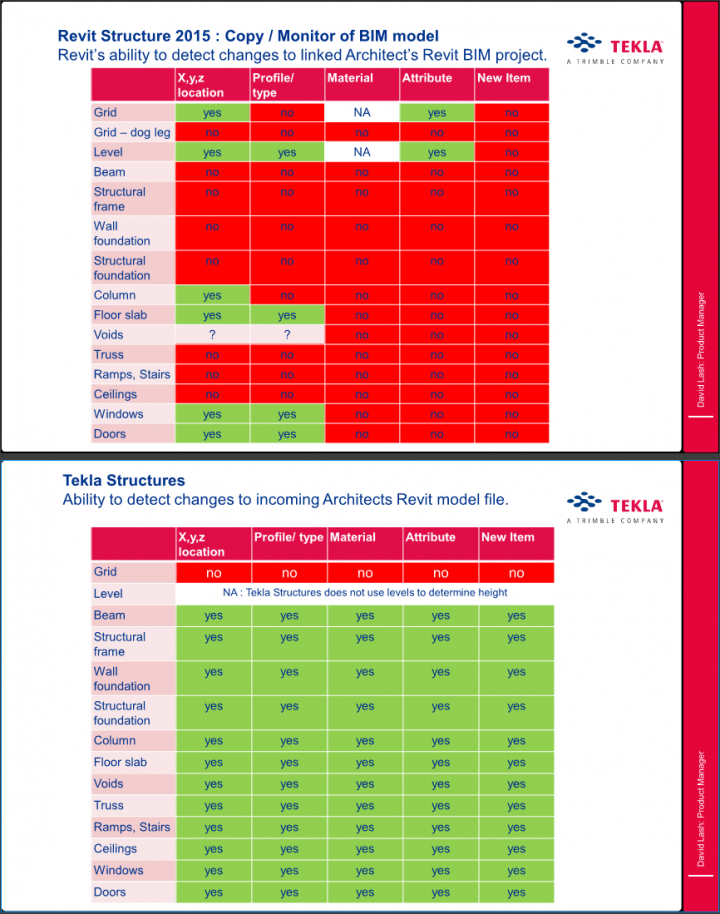
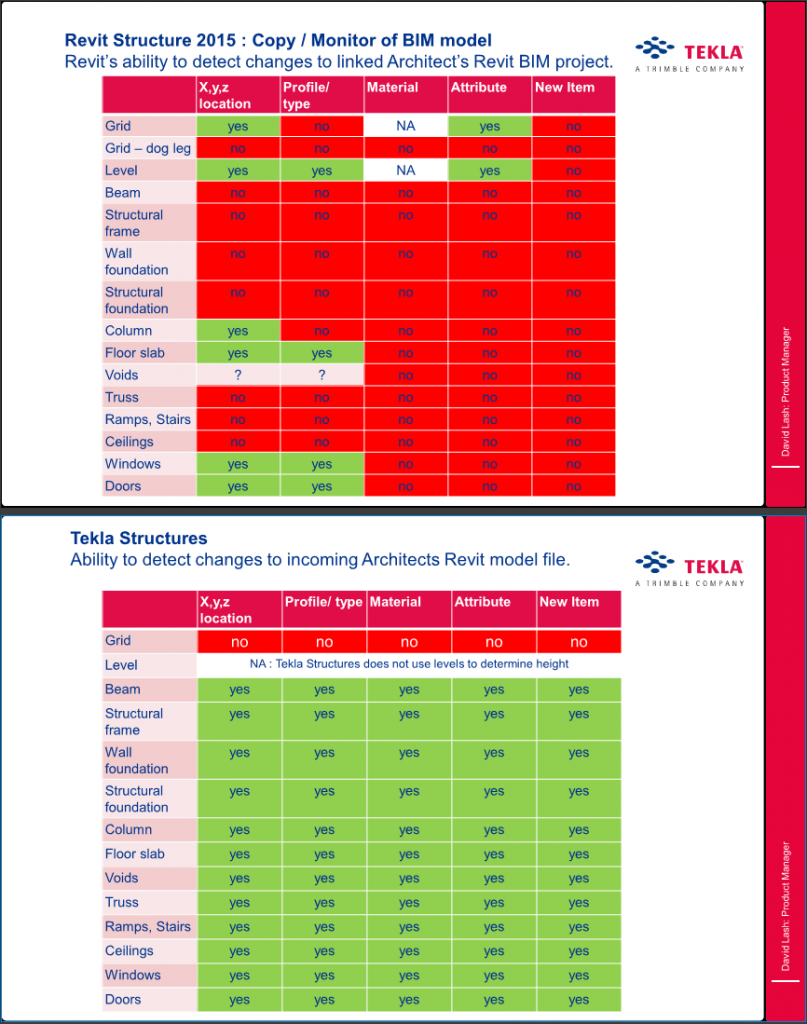
A document was recently released that essentially describes differences in the way that Tekla and RST respond to changes in a linked architectural model. This document doesn’t really take into account the other benefits of working in a completely Revit environment – not having to convert to and from IFC, tagging through links, scheduling, bidirectionality, and so on (I don’t feel a need to keep listing reasons 🙂
Interesting post by troywright on AUGI, in relation to setting up segregated links as room bounding in your Revit MEP file: We have this issue frequently, as with major projects we will receive different models for architectural fitout, shell and core and facades etc.
The solution we have (in your example) is to; – Link the structural model into architectural as an overlay, set to room bounding – In your MEP model link in the structural model and the architectural model.
That’s it. Essentially it is an extra step, but it means that the architectural model knows it is bound by the structural model, even though it is only an overlay! I think someone else mentioned this method earlier but with worksets. I can’t see a point in doing this as the nested structural model is an overlay, so it’s irrelevant.
Another issue you may have is that your spaces act up when an architectural model has floor finishes set to room bounding that are higher than the level they are on. To fix this just change all of your levels to have a calculation height above that of the floor finish.
Its possible you are already using one or more of these… This list comes from Revit Modelling India:
Aconex Mobile
As Aconex Mobile app is used for iPads, you can capture photos, audio and videos on project site and access and manage existing project document. It also helps to review the images and drawings as well as view and edit project information offline. Therefore, you are able to sync with the platform, when a connection is available.
BIMx
BIMx is a free construction app and with this we can turn gadgets into 3D communication as well as presentation tools for the architectural designs.
SmartBidNet
This iPhone construction app makes you able to create and track the bidding procedure with your subcontractors. The accessible info that this app offers make it easier and timelier to bid projects.
Wheatland EMT Calc
Wheatland EMT Calc, which helps contractors and engineers, is available for Androids and iPads. For example, with this app, they can canculate the amount they can save on twenty feet of conduit
iBlueprint
iBlueprint is highly useful for real estate agents and contractors, as it has an access to blueprints on job sites. Users can create as well as export custom floor plans with this iPod Touch, iPhone and iPad app.
Architect’s Formulator
Architect;s Formulator with over 200 formulas for plumbing, carpentry and electrical calculations goes for $9.99. Besides the excavation and concrete formulas for calculating the bricks and concrete required for a job, this app also have formulas for steel design, parking areas and even swimming pools.
Green Pro
Green Pro helps engineers, contractors, owners and architects access and follow up leadership in Energy & Design credits for major renovations and new construction projects. With this app, users can access credit requirements and also can find out when a particular requirement has been met.
Procore
This free construction app makes the users able to create and control punch-list items, access contacts and log time card entries and share and store project pictures. In short, It can make the construction management very easy.
iQuick Contract Maker
This app, which costs $2.99, makes the users able to create and email contracts to customers from iPads, iPhones, or the iPod Touch. With this, the users can also customize contracts for a particular industry or trade.
PlanGrid
PlanGrid is a free app and it allows the users to put all their project plans, specs and photos on their iPad. Moreover, cloud-founded annotations that instantaneously sync with colleagues is also allowed with this.
Ustream Broadcaster
Even though Ustream Broad caster is not a necessary app, it can help the construction industry in many ways. For example, It allows users stream alive from their device, while they are on a job site or looking at properties for future development.
Carpenter’s Helper
As the name indicates, this free app helps the users calculate the stair length, roof pitch and rafter lengths etc.
JobTrac
With this app, you can set up email alert, track jobs, get the advanced bidding news and vies from all over the state.
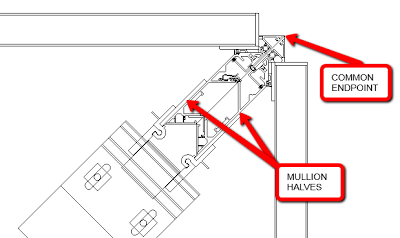
Revit Wants you to use a good, clean, consistent technique when setting up Curtain Wall mullions for high quality detailing. Here is one way to set these up for nice corner joins – the advantage is that the curtain wall can be properly ‘joined’, you do not need to Disallow Joins and hack the glazing position:
When finished, and the endpoints share a common location, the corner looks like the figure below.
Why is this preferable to assigning a single mullion to one curtain wall and leaving the adjacent curtain wall without a mullion? That would require that the edge handle of the CW without the mullion to be manually aligned to the edge of the mullion where it crosses the panel’s path; a feature that should be automatic in Revit. Changes to the mullion profile won’t necessarily be reflected in the open-ended CW and is an opening for errors. via Jon McFarland at CurtainwallBIM: Mullion Halves