Over the next few weeks, you are going to be flooded with information about the new versions of Revit. Rather than posting extremely detailed and exhaust-ive (-ing) blog posts, I thought I would give you some very concise information about some New Features in Revit 2011. Starting with:

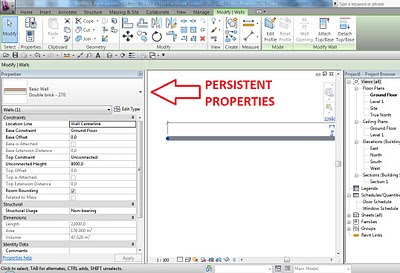
The Persistent Properties Palette


Finally we can now choose to show a Persistent Properties Palette! Some features of this item:

  • When nothing is selected, this Palette shows the Properties of the current view, which allows for quick and easy editing of View related items (View Range etc)
  • When you choose to insert a component (Door, Window etc), you use this palette to ‘choose’ which family and type you wish to insert.
  • When you select an item, the properties for that item are displayed and can be modified.
  • If there is a thumbnail version of an item available, this palette will display the thumbnail.

Stay tuned for more Revit 2011 Secrets, and bring on April 8th!

I recently stumbled across the fix for an issue that has annoyed me for ages.

The problem we had was that Revit would always crash when tearing off any ribbon panel. This issue affected two of our high end Vista 64 bit Workstations. I had tried many things to fix the issue, all to no avail. So, are you ready for the solution?

Both of these workstations were running a pre-release version of Service Pack 2 for Vista. The Windows desktop had the following text imprinted on it – Build 6002 – Evaluation Version. I determined that this note referred to a Release Candidate of Service Pack 2, and not to the actual licensing of Vista itself. The fix is as follows:

  1. Uninstall Service Pack 2. (Go to Control Panel – Programs and Features. Then click ‘View Installed Updates’. The update is labeled as Service Pack for Microsoft Windows (KB948465). Once this was uninstalled, I could now tear off the ribbon panels successfully, with no crashes.
  2. To put Service Pack 2 on, you can use a couple of methods. After removing SP2, I allowed Windows Update to install updates. However, this did not reinstate SP2 onto my system.
  3. I then downloaded the Service Pack 2 package for 64 bit, and installed it. Finally, I was back at SP2, and my ribbon panels would still tear off without any crashing!

Please note that this process will probably take a couple of hours. However, I am very happy that I can now tear off the Workplane ribbon panel – it is very handy to have that panel always visible.I guess I better contact Autodesk now and notify them of the fix…this Service Request has been open since 23 June 2009!

You can now download a ‘Customer Questions and Answers’ document from Autodesk, relating to the Autodesk Software Download process.

It is available at this link, but you will need to login to Subscription to access it. If you don’t have Subscription or can’t be bothered logging in, you can access the same document at this link.

So, why is Autodesk making software download the default delivery method? According to the document:

“By making new product releases available for download, Autodesk is making it possible
for Subscription customers to immediately begin using the most current version of the
software as soon as it is released.
And, making software download the default upgrade delivery method reduces the
environmental impact of producing and shipping materials worldwide. If all Autodesk
Subscription customers downloaded their software instead of ordering a boxed shipment
with physical media and packaging, together we would reduce carbon emissions by
almost 80 percent, or the CO2 equivalent of driving 1,670,733 miles (2,688,784
kilometers). That’s like driving a mid-size car around the world 67 times.”

And what if your Subscription runs out?
“19. Will I be able to access software downloads on Subscription Center after my
Subscription contract expires?
There is a grace period of 30 days after your contract(s) expires, during which time you
can access the download pages and the Request DVD/CD link.”
If you are a Autodesk Subscription customer, you should login to the subscription site and check out the new product download page.

You can now download the current release as well as the previous release of the software from the subscription site.

“To download the current release of your Autodesk software, select the product title below. To download previous releases of your software, select the Previous Release tab and then choose a product title.”

You can also view a log of how many times each item has been downloaded.

So now you know HOW you will be able to get 2011 – the next question is – WHEN?

I hope that you found my previous post on batch printing with automatic naming helpful.

But what if you want to add a prefix or a suffix to all PDFs in a set? Some firms like to add the current revision or issue date as a suffix to each individual sheet. This can be accomplished easily with the freeware program Advanced Renamer. It is available in both portable and installable versions.

Here is a few simple steps to add a suffix to all PDFs in a specified directory:

  1. Install and run Advanced Renamer.
  2. Click Add – Directory. Select Directory and click OK.
  3. Click Add method – Add (this will obviously ‘add’ something to the filename of resulting files.)

  4. Set the options for the Add method: Type the text you would like to add, select index 1, ‘backwards’ and Apply to Name. This will add the specified text to the end of all filenames in the directory.

  5. Click ‘Start Batch’ and you are done.

You can experiment with other ‘methods’ to do some more advanced renaming tasks.

After reading The Revit Clinic post about Plan Regions Wall Cleanups, I was reminded of a similar problem I had with Plan Regions and Wall Hatching. I had a problem where the hatching would disappear from a particular wall. I had figured out that it was related to the Plan Regions, because if I deleted the Regions, the hatching would show.

The fix posted by Ryan Duell today actually fixed my problem as well. After I set each Plan Region’s Cut Plane to match the host view Cut Plane – the hatching showed correctly! Before and after images are below.

Adjusted Plan Region Cut Plane to match host view Cut Plane: