This happened to me recently on a very big workshared project.  Turning off the Crop of the view made the links reappear, but when I zoomed in, they disappeared again!

The solution?  Turn off the Far Clipping for the view in question.  This made the Linked Import reappear and act in a predictable manner.  Most of the views I’m working with already have Display Model set to ‘Do not display’, so it doesn’t cause graphical problems for me to turn off the Far Clip.

This is why upgrading large projects to the next version of Revit is scary to me.  I thought waiting to Web Update 2 would be safe – but it still wasn’t!

Now I need to go through lots of views that have Linked DWGs and check if they are ‘broken’ and need the Far Clip to be turned off…

UPDATE
Some more information:

  1. The views in question seem to Print Preview and Print correctly, suggesting this is some sort of graphical problem?
  2. The Linked CAD Import is selectable, but not visible.  Once selected, it is shown highlighted like any other element.
  3. Not all views are affected, only certain ones (most affected seem to the Linked Imports living in Detail Views and Sections).  Drafting Views appear to be immune.
  4. If no one else has this problem, I may have to look into my hardware configuration.
  5. If a file ALREADY had No Clip set, the Import may STILL not display.  Toggled the view to ‘Clip with Line’ and then back to ‘No Clip’ – and the Import reappeared!
  6. New Revit session has no effect
  7. New Local from Central has no effect
  8. Synchronise has no effect
  9. Reloading the affected Import has no effect

See video below (to prove that what I’m saying is true)

“Autodesk sees joining forces with Gehry Technologies’ consultancy services as a powerful way to help AEC firms transition to a BIM process,” said Jay Bhatt, senior vice president, Architecture, Engineering and Construction Solutions, Autodesk. “Our business relationship is designed to take advantage of our strengths as world leaders and will add additional momentum to the adoption of BIM as a process throughout the AEC industry, and the use of Autodesk’s comprehensive end-to-end portfolio of BIM solutions.”

Under the terms of the business relationship, Autodesk will provide Gehry Technologies’ consulting division with extensive support and training in using Autodesk BIM solutions, including the Autodesk Building Design Suite, the Revit family of products, Autodesk Navisworks, AutoCAD Civil 3D and Autodesk Vault Collaboration AEC. As a part of a comprehensive agreement, Autodesk has made an equity investment in Gehry Technologies.
 

via
Gehry Technologies – Autodesk and Gehry Technologies Working Together

Image from Gehry Technologies

Story via
Adventures in the World of BIM

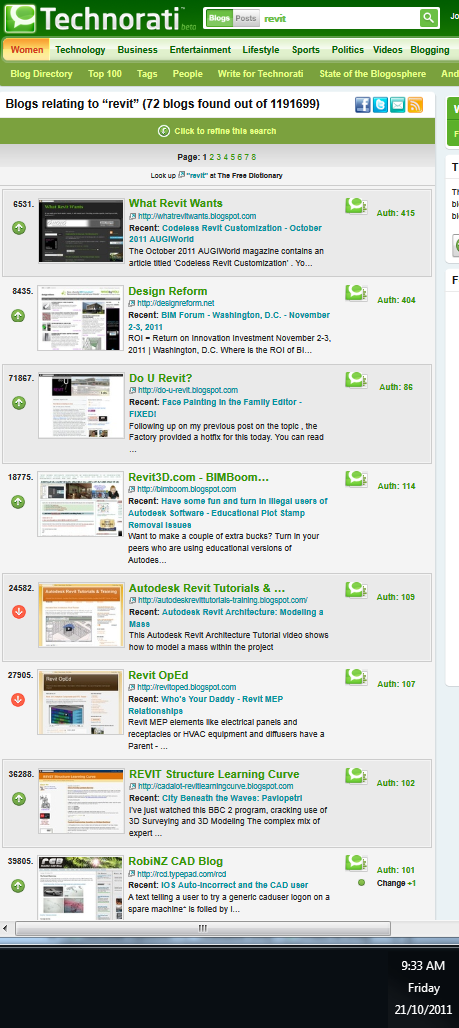
Today is the 21 October 2011, exactly 3 years after I started publishing this blog.  I want to thank you all for following me and for offering some great comments over the past few years.  I thought you may be interested in some statistics for What Revit Wants:

Blogger page views all time: 293,141

Statcounter page views: 297,551

Feedburner subscribers: 739

Twitter followers (@lukeyjohnson): 118

Facebook likes: 54

Blogger followers: 30

LinkedIn followers: 245

Technorati authority: 415

Here is a link to my first blog post, 21 October 2008 (along with a partial quote):
What Revit Wants: If you are interested in BIM, Revit or IT, you’ve come to the right place!
“I am a keen Revit user from Australia, and I would love to share the things I have learned.


As you know, Revit can be quite quirky and temperamental. However, if you really give Revit what it wants, it will reward you by operating in a predictable, productive manner.

This blog will give you specific, brief tips on how you can give Revit what it wants…”

You will notice that in the above-mentioned post, I give credit to the major blogs that helped me to get to know Revit – Revit OpEd (Steve Stafford) and BimBoom (Greg Arkin).

So, if you want to stay on the cutting edge and be more productive, then follow one of the leading Revit blogs worldwide:
What Revit Wants

Whether you are just starting out or you are a Revit veteran, you will find something helpful on this blog.  And tell your Revit friends about it!

Some objects in Revit are very difficult to mask over.  However, sometimes you just really need that quick method of masking something to save yourself hours of work.

Here is how you do it:

  1. Go to the Sheet view
  2. Make some text
  3. Set the text Type to Opaque and make the color just one very small step above pure white (253-253-253), otherwise Revit will make your ‘white’ look like ‘black’
  4. Draw some full stops (periods) to fill in the text box
  5. Put it on top of what you want to mask

In the video below, I show how this method works to mask a Color Fill Legend.

There is another method that is slightly more involved – you can put a shared Generic Annotation family with a Masking Region into a Drafting View and put that on the sheet.  Check out this link, where I reposted this method from The Revit Clinic.

The October 2011 AUGIWorld magazine contains an article titled ‘Codeless Revit Customization’.  You might think that it is about customizing the UI and Option settings.  However, it is actually a how-to guide on developing your own Template, including workflows for incorporating General Notes and adding typical CAD details.

The author, Ibrahim Hakki, also gives some tips on presenting your model to a Client and setting up Sheets in your Template to speed up documentation.

He also makes plenty of references to Star Trek, and some to Star Wars (which do your prefer?).  Spock and Kirk both get a mention.

Direct Link to article – http://issuu.com/augi/docs/aw201110hr/35

Download links for AUGIWorld October 2011:
Low Resolution PDF (5.3mb)
High Resolution PDF (50.3mb)

Issues | AUGI

The review process for the NATSPEC National BIM Guide has been completed and it is now available for use.
Learn more about the project or download the NATSPEC National BIM Guide document set v1.0. [390 KB]
The associated NATSPEC BIM Object/Element Matrix can be downloaded separately here. [4 MB]

NATSPEC is a specification framework that is widely used here in Australia.  I received an email from Mark Cronin today that alerted me to the significant number of BIM related resources they have developed or facilited.

The main portal link is:
NATSPEC BIM Portal

On the projects page you can find links to a number of other resources, such as:
NATSPEC BIM Scheduling project
Start date: 2010 Status: Complete
NATSPEC undertook this project as an initial response to subscribers’ requests to develop a standardised Australian practice for the exchange of digital building information. The goal of the project is to recommend a consistent, systematic approach to allocating properties to BIM objects to facilitate the generation of useful schedules.
View pages about the project
or download the project report.

Further information on BIM scheduling can be found at the Resources page

buildingSMART BIM survey
Start date: 2010 Status: Complete
NATSPEC hosted a survey on current patterns of use of BIM in Australia as part of the economic study commissioned by the Australian Government’s Built Environment Industry Innovation Council (BEIIC) to examine the potential for BIM to improve the productivity of the building sector. (See BEIIC BIM Economic study.)
See a summary of the survey results in Chapter 5 of the BEIIC study report
. Click on link at bottom of page to download

Thanks again to Mark Cronin for the heads-up on this one!

Revit does not allow rooms to become smaller than certain dimensions – it simply switches to Not Enclosed when one dimension goes below about 276 mm (when using room separation lines on a rectangular room).  However, this dimension may be slightly different depending on the surrounding wall thicknesses.

The following videos demonstrate the limitation:

There is a forum thread at
2011 Minimum room size? – AUGI

On the forum, Dimitri Harvalias makes the following observations.
When using room separation lines the minimum size seems to be limited to about 1sf. When using walls it appears to have some relationship to the wall thickness used.
See the attached image.
If walls are 150 wide then the minimum dimension of the room is 150. If some of the walls are 300 and some are 150 then it bottoms out about 85mm. If all the surrounding walls are 300 then I can get it down to virtually nothing.


An interesting packaged arrived on my desk on the 5 September 2011.  It contained a copy of the book Introducing Revit Architecture 2012.  Right from the outset, it can be seen that this book is targeted at new or beginner Revit users:
This book is for the new user who is looking to understand the fundamentals of Revit Architecture…

However, most advanced users would still agree that they learn something new every day.  This book does cover some advanced topics as well.

In the Introduction (page xviii) it is stated that the book assumes you know little or nothing about Revit Architecture.

It is nicely set out, with step-by-step guides and lots of screenshots.  It also has a nice glossy color insert, with some example projects.  At 682+ pages, it is a good size for a reference or even for some lunch-room reading.  It might be a good idea to obtain one for your practice, particularly if you have some staff who are just beginning to delve into Revit.

Starting on page 642, there is a Tips and Tricks section that includes some very useful information, including how to prepare CAD files for import in an intelligent and controlled manner.

To find out more, or to purchase, go to:
Main Sybex page : Introducing Autodesk Revit Architecture 2012 – Book Information – Sybex

As mentioned before, the download resources for this book are located at this link.

Quote:
This book does a nice job of providing lots of good information for the architectural designer in a practical method.
From
http://aectechtalk.wordpress.com/2011/09/10/revit-architecture-2012-book-review/

If you are interested in a book for more advanced users, check out this link.
Become a True Master of Revit
(Mastering Revit Architecture now comes in a 2012 version)

Pink lines
Pink lines
Whatcha gunna do
Whatcha gunna do
When they won’t form a closed loop?

Con-straints
Con-straints
Whatcha gunna do
Whatcha gunna do
When they ask to be removed?

Pro-jects
Pro-jects
Whatcha gunna do
Whatcha gunna do
When they become really huge?

Ren-drings
Ren-drings
Whatcha gunna do
Whatcha gunna do
When they take a week to do?
 
Up-grade
Up-grade
Whatcha gunna do
Whatcha gunna do
When your project has 50 RVT links?
 
Im-ports
Im-ports
Whatcha gunna do
Whatcha gunna do
When zooming in makes them jump around on you?

Rev-it
Rev-it

Whatcha gunna do
Whatcha gunna do
When you’ve just read a silly blog post without useful content?

Here’s what – post your own verses as comments, for everyone to enjoy.

A well known limitation of current Revit versions is that you cannot easily transfer a Legend View between projects.

However, you can do the following with Legend Views:

  1. Save to Project as Image (just right-click on the Legend View in the Project Browser – you will probably have to open or activate the view before this command will ungray itself)
  2. Export the View as an Image
  3. Export the View as a DWG

If you are going to export the view as an Image, I recommend a minimum DPI setting of 150.  You can then import this image to another file.  If you Save to Project as Image, you can just copy-paste the image between open projects, or use the Save to New File command on the actual Rendering view itself.  Obviously, you need to manually update this image whenever the Legend changes.

If you Export as a DWG, you could then Link that DWG into other projects.  When you want to globally update the Legend View, you could re-export the Legend from the original RVT project and over-write the Legend DWG you exported and linked earlier.  You would probably have to tweak the visibility settings a bit to make this Legend-export-link method to work effectively.

Hope some of these ideas are useful to you!