The company that pioneered this awesome technology has been purchased by a currently unknown party – mysterious stuff!
via
From Sweden: Next-gen, NSA-like 3D Maps That’ll Knock Your Socks Off – Bright Side Of News*
What Revit Wants

The company that pioneered this awesome technology has been purchased by a currently unknown party – mysterious stuff!
via
From Sweden: Next-gen, NSA-like 3D Maps That’ll Knock Your Socks Off – Bright Side Of News*
When users complain, moan, whinge about #revit, they need to find a mirror & look in it, cos more often than not, its u the user not #revit
via David Light
Twitter / @davewlight: When users complain, moan, …
As I have stated many times before, if you want to be a successful Revit user you must make an effort to understand What Revit Wants.
Here are some quotes from my previous posts about What Revit Wants:
With what Attitude do you use Revit?
Instead of getting frustrated and angry, and instead of uttering unrepeatable phrases directed at ‘Autodesk’, just try and understand WHY.
It is a little bit like meeting someone you don’t know for the first time. You may choose to judge them from first impressions. Or you may try to understand them, and why they act the way they do. If you come to understand them, you may be able to have a rewarding relationship with that person.
Excuses used to avoid Revit adoption
Revit wants its users to be passionate about good design, technology, co-ordination and quality documentation.
Sadly, many people are looking for excuses to avoid Revit adoption. When I say ‘sadly’ – it is sad…
for them.
‘It’s a way of thinking’
One of my fellow staff members was recently doing some work in AutoCAD (after using Revit), and he said something quite profound:
“It’s a way of thinking, isn’t it”
And it really is. Using Revit properly is not a matter of ‘why can’t Revit do xxx’, its a matter of ‘why does Revit do xxx this way?’ And there is usually a very good reason.
Assertive BIM
let’s say 3 people like 3 different colours. Mr Aggressive says ‘Red is the best colour and you are all idiots if you don’t agree with me!’ Mr Passive loves Yellow, but he meekly nods. Mr Assertive says, ‘I respect the fact that you like Red. However, I personally like the colour Green.’
Mr Assertive does not need others to change – he just shows respect and wants to be respected. His beliefs are not dependent on forcing others to change.
When it comes to BIM, the ‘aggressive’ stance is often taken (AutoCAD is rubbish!) However, perhaps a more successful tactic would be to truly Listen, Acknowledge, and then firmly express why You believe in BIM.
What inspires you?
It really excites me to see some lines on a page become an intelligent, precise, beautiful building model, that can be easily viewed, navigated and altered. The full benefits and amazing uses of this technology are not yet fully explored. I am deeply interested in BIM and where it is heading. I aim to keep in touch with the many facets of building modeling that I encounter here at Dimond Architects.

My main video card is a Nvidia Quadro FX 580. However, I wanted to run more than two monitors. So I borrowed a old GeForce 7300 LE and installed it into one of the other PCI-E slots on my Gigabyte EX58-UD4 motherboard.
This is NOT an SLI rig. But I can run it in a ‘hybrid mode’ where I’m essentially getting access to 4 monitors. I try to make sure that I always run my main Revit instance on the monitor that is plugged into the ‘good’ FX 580 video card.
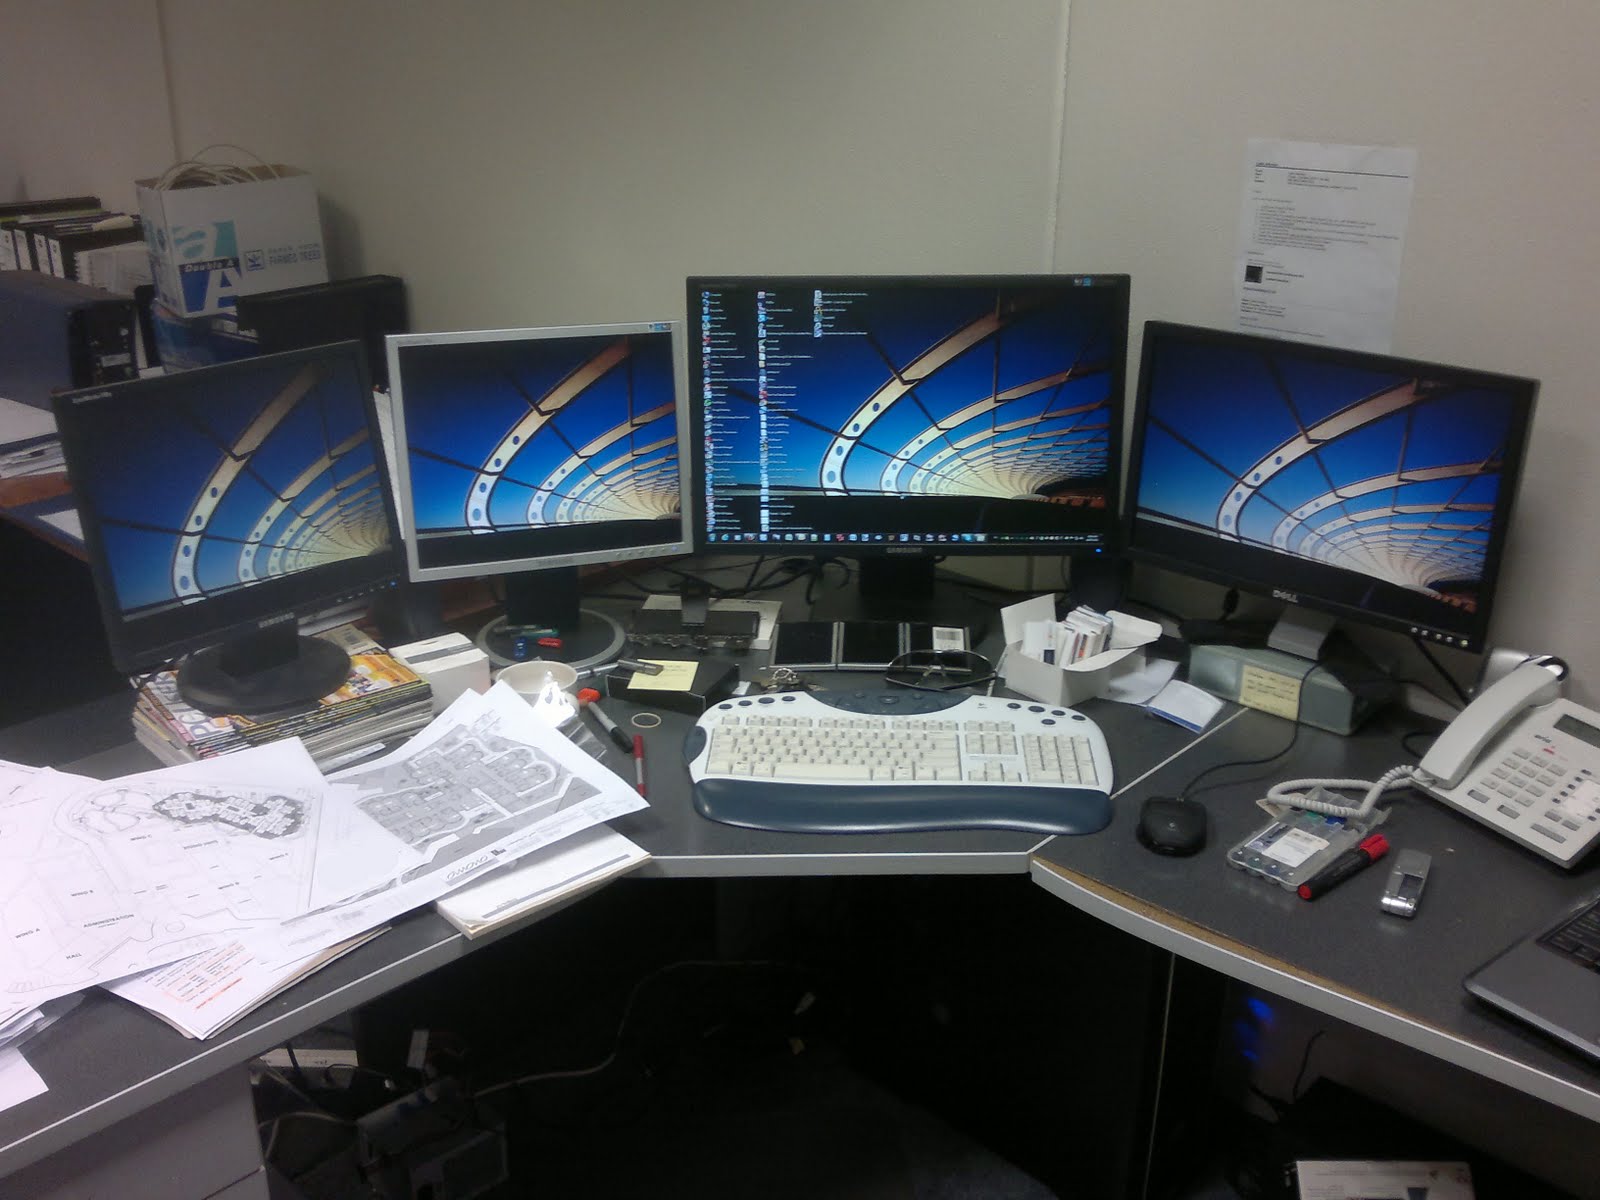
The main lesson here is that you need to install GeForce drivers to make this all happen properly. The Quadro drivers do not seem to work very well in this hybrid setup.
I am running 275.33 drivers, which you can download from here:
GeForce 275.33 Driver
This GeForce driver also includes cool stuff like overclocking options in the Nvidia Control Panel.
Game developer David Braben has developed a $25 PC, in a USB stick with a HDMI port on one end and a USB port on the other. The hardware inside is a 700MHz ARM11 processor with 128MB of RAM, together with 1080p graphics output and Linux operation.
This solution would put a slightly different spin on ‘mobile and affordable Revit-ing’ 🙂 It sure would take some coaxing to get Revit to run on this hardware though!

When in Edit Mode for a given Detail Group, the Spot Dimension tools are grayed out.
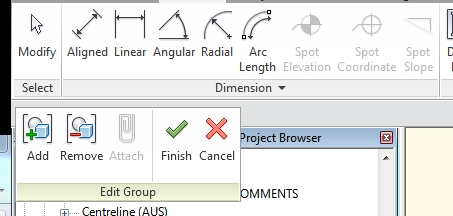
However, if you place the Spot Dimension OUTSIDE the Detail Group, and then ‘Add’ it to the Group – Revit is quite happy. You can even place a Spot Coordinate in a Detail Group (in Plan View), copy the Group instance, and then drag the copied Group around with the Spot Coordinate continuously updating!
Here is a quick step-by-step:
This works for Spot Coordinates in Plan View Detail Groups, and it works for Spot Elevations and Spot Slopes in Section / Elevation Detail Groups…
Do you know much about Autodesk Vault? Watch this quick video to see how powerful it can be in searching through your Revit family library:
Autodesk Revit and Autodesk Vault Collaboration AEC – YouTube
A few links to help you:
Here are some links to the current updates for Vault 2011 and Vault 2012:
Autodesk® Vault 2012
Autoloader Compatibility Update
Vault 2012 Client Update for AutoCAD 2010
AutoCAD Civil 3D 2011 – Autodesk Vault 2012 (Server) Support Patch
Vault 2012 Client Update for AutoCAD 2011
Copy Design Hotfix
API Log In Hotfix
Check In Performance Hotfix
Custom Numbering Scheme Hotfix
Multi Issue Hotfix
Vault 2012 Documentation
Civil 3D Object Based Security Removal – Server
Autodesk® Vault 2011
Migrated Inventor 2010 Content Center Libraries, for use with:
AutoCAD Civil 3D, Vault Add-In Hotfix
Security/Property Hotfix
Multi Issue Hotfix
Multi Issue Hotfix
Autoloader Hotfix
Multi Issue Update
Move File Hotfix
MSG File Property Extraction
Hotfix – To Get Untranslated Software Strings Translated (Vault)
Autodesk Vault 2011 Update 2
Office 2010 Vault Add-in
Hotfix – “show all version” checkbox unavailable in explorer (simplified chinese only)
Hotfix – Civil 3D MAPIINSERT
Hotfix – Multi Issue Hotfix
Hotfix – Title Block Property Hotfix
Vault 2011 Client Update for AutoCAD 2010
Hotfix – Localization Check Out Hotfix
Autodesk Vault 2011 Update 1
Hotfix – CIP Hotfix

Do you have some awesome in-place families that you would like to convert to normal Component families, so that you can load them into other projects?
Here’s how:
I’m sure there are limitation to this method, but I think it is very cool.
Here is a quick video:

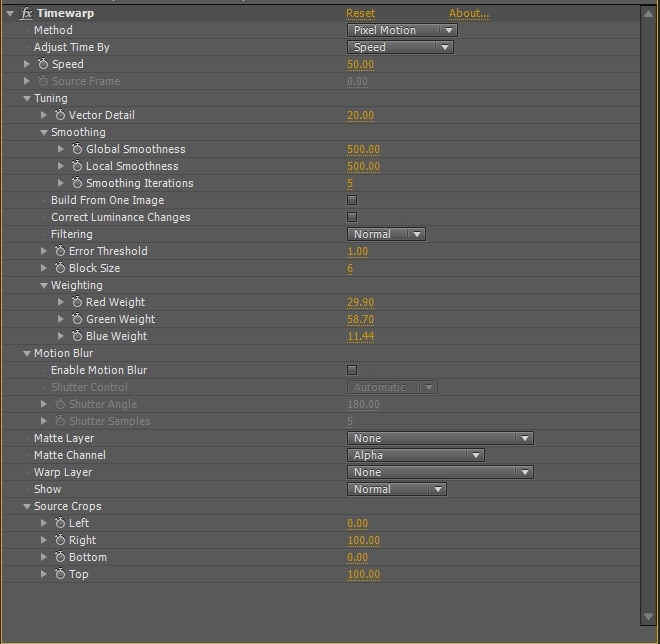
Are you sick of waiting ages for a Revit walkthrough to render? Using this technique, you can cut your walkthrough rendering time in half! Essentially, we make half the frames we need in Revit, and then use some post-processing software to interpolate extra frames. Here is how:
I have found this technique to be effective on a very large, 1800 frame walkthrough. You could further tweak some settings in the Timewarp effect to get better results. You could even try slowing the walkthrough down further – although I anticipate that the output will degrade quite quickly once you go lower than 50% Timewarp speed.
Here is a video that describes the process:
Here are a few associated posts:
Distributed Parallel Rendering in Revit
Thinking of buying a new USB Flash drive? Head over to this site:
UsbFlashSpeed.com
You can also download a utility to benchmark any flash drives that you own:
download link
If you try to open Revit 2012 and it stalls at the splash screen, you can try ending the process WSCommCntr3.exe by accessing it in the Task Manager and clicking ‘End Process’.
The video below shows the issue:
I think that the problem is definitely related to the WSCommCntr. This is the Autodesk Infocenter, and it should be located at:
C:Program FilesCommon FilesAutodesk SharedWSCommCntr3lib
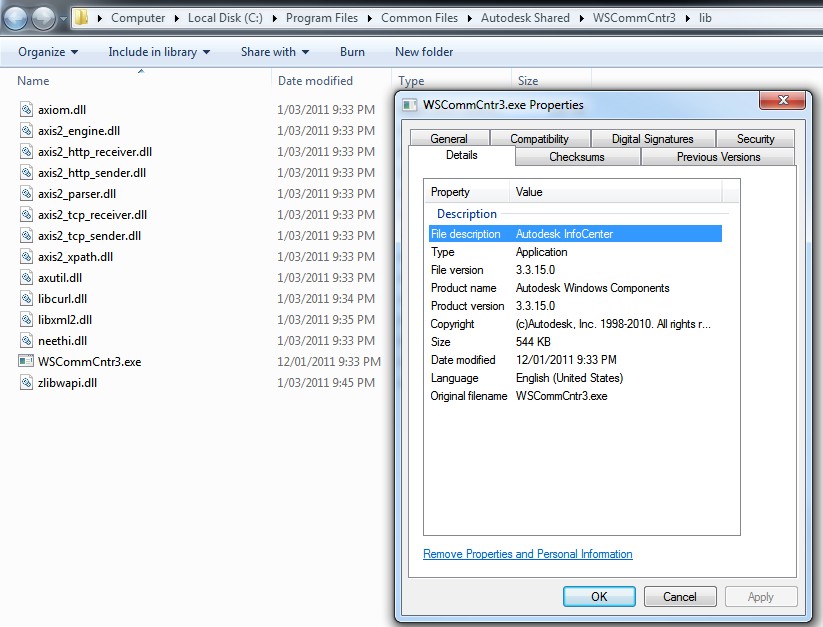
As I state in the title, stopping the offending process is only a temporary solution. There may be some issue that you need to correct. For instance, my Task Manager also showed WSCommCntr2.exe and I essentially also had to stop this process to get the Autodesk Infocenter to behave.
Feel free to comment if you would like your experience with the Autodesk Infocenter.
I have previously had other issues with Revit stalling at the splash screen:
SECSplashWnd error – Revit 2010 stalls on loading