Thinking of buying a new USB Flash drive? Head over to this site:
UsbFlashSpeed.com
You can also download a utility to benchmark any flash drives that you own:
download link
What Revit Wants + Black Grid AI
AI Empowered Project Management
Thinking of buying a new USB Flash drive? Head over to this site:
UsbFlashSpeed.com
You can also download a utility to benchmark any flash drives that you own:
download link
You have received one of the Autodesk Suites, installed it, and you want to use the USB key for some other purpose.

It is not immediately obvious that this is possible. There is some very decent write protection in play here – you can’t delete the partitions in Windows or Linux, you can’t format in Safe Mode, you can’t even use low level format tools or the HP USB Format tool.
You have to go deeper. Continue at your own risk… (below the bars)
NOTE: When reading the Comments, you may have to press “load more” at the very end of the page to see the most recent ones.
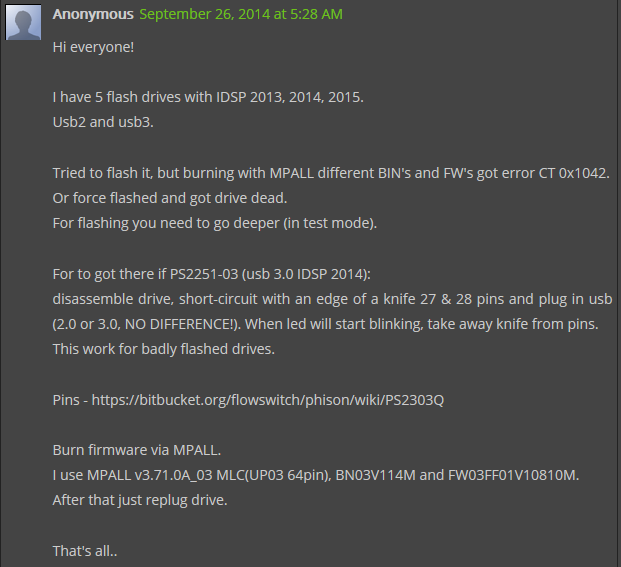
EDIT 12
Recent anonymous comment refers to a pin mod that may save bricked drives, screenshot included here:
Some things you shouldn’t do:
EDIT 10 – 2014 drives
Solved by Mike in the comments. He also provides a link to download the proper version, at:
https://docs.google.com/file/d/0BwZ-eoAYLKKAMnpnQi1hbnpVSUk/edit?usp=sharing
Mike’s steps:
I used Phison MPALL v3.63.00.. not the 3.63.0C or the 3.63.0c-DL17
Plug into a usb3.0 port.. this is critical. YOU MUST USE USB3
Copy the contents between the ===== to a new file named 2014_2251-03.ini
===========================================
[PenDriveMP]
IC Type=PS2251-03
[Parameter Mark]
Parameter Type=F1_MP_21
[Customize Info]
USB VID=0x0930
USB PID=0x1400
String Product Name=USB DISK 3.0
String Manufacturer Name=TOSHIBA
Inquiry Version=PMAP
Use30Fixture=1
IDBlkLibrary_Version=1.2.16.0
[Configuration]
Reset Serial Number=0
[TestItemOption]
Do Preformat Test=1
[Extra]
Mode=3
[Misc]
Volume Label=USB DISK
Burner Erase All=1
Wafer Erase All=1
set1667=0x00
[Advance]
FC1=0xFF
FC2=0x01
CheckLegacy=1
[Firmware]
ISP=0
===========================================
Open MPALL_F1_0702_V363_00.exe
Click Update
Click Setting, select “Advanced Setting” then press OK
Click the load button and select the 2014_2251-03.ini file you created earlier.
Click Save, press OK
close the settings window
Click Start…
EDIT 9 – 3 step process for 2013
This may seem a bit long winded, but I think it might be a good way for 2013 media kit:
You can try this process in MPALL (step 1 above):
Recieved Brand New USB’s For Autodesk Design Suite 2013 Premium
IC version 2251-67
This is how i reformatted them
Download MPALL_F1_9000_v363_00 and MPALL_F1_9000_v363_0C
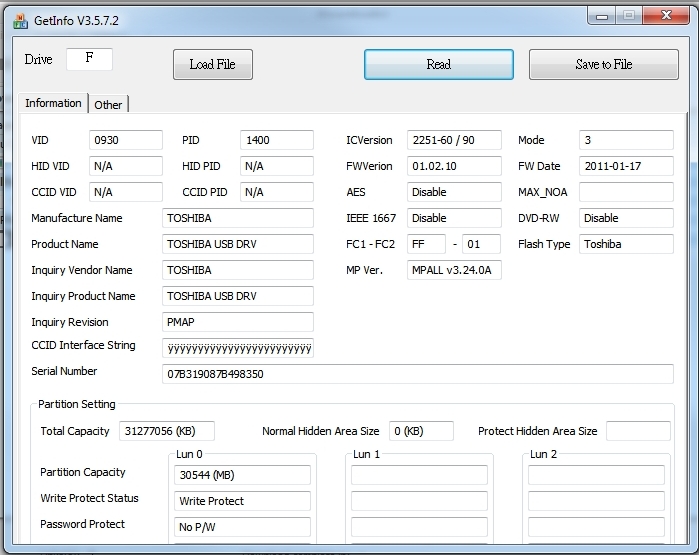
Run Getinfo
open MPALL_F1_9000_v363_00
Click Update
In Advanced settings
set Controller to PS2251-67 and FC1-FC2 to 01
In Firmware tick ‘Do ISP’ ‘Erase Code Block’ and ‘Auto ISP’
In Partition Seeting Tab
Set Number of Partition to 1
Save and Press Start
This will Fail
Close MPALL_F1_9000_v363_00
run getinfo in MPALL_F1_9000_v363_0C folder
and open MPALL_F1_9000_v363_0C
Update again
go into advanced settings
set Controller to PS2251-62 and FC1-FC2 to 01
Untick all boxes in firmware
In Flash Settings Tab Check
Auto Detect
Preformat
Erase Flash
In Partition Setting Tab
set ‘No of Partitions to 1’
save and press start
EDIT 7 – For PS2251-67 (From Ryan Ruta in the Comments)
I found a solution for the latest drive that I received with the PS2251-67 Controller.
1. Download the file from this link… http://www.silicon-power.com/UFD_Recover_Tool/UFD_Recover_Tool.rar and extract it to your drive.
2. Plug in your USB drive.
3. Run the format tool from the download.
4. Unplug your USB drive and plug it back in.
5. Format the drive using the Windows format tool (or other tool of your choice) as NTFS.
EDIT – 5 From the comments, for DaneElec zMate USB 32 GB:
Inside my USB Drive (also named DaneElec zMate USB 32 GB) I found a controller SM3254Q AE, produced by SMI. I used smi_mptool_v2.03.34_v7_j1118_3254ae and now it works.
The software I downloaded from site: http://tagievara.narod.ru/pages/programs/flash/smi.html
Direct URL: http://depositfiles.com/files/acu0018d9
1. Run sm32Xtest.exe.
2. Press “Scan USB” button.
3. Press “Start” button.
After few minutes the device is ready to use.
EDIT 6 – for Autodesk Product Design Suite Ultimate 2013
The installation USB flash memory (key, dongle) used for distribution of Autodesk Design Suites is a read-only device and cannot be overwritten or formatted with standard methods.
If you want to “misuse” this USB memory to store your data you can “hack” it with internal reformatting, make it a standard R/W device.
E.g. Autodesk Product Design Suite Ultimate 2013 uses the USB key of the type “DaneElec zMate Aero” (blue) – see Dane-Elec – with the controller SM3254Q AE.
To overwrite this USB key you can use the utility SMI ReFixInfo. This tool can be downloaded here (file MI_ReFixInfo_1_0_0_1.7z).
Start the downloaded EXE and click “Reset Write Protect”, W.P select Un-Write Protect. Then click Start.
Be warned! Make sure you have a backup copy of your original installation files. This procedure may lead to a damage of your USB key and is completely unsupported.
(by P.Hrazdil)
via CAD Forum – How to re-format the Autodesk instalation USB key?
I dismantled a spare USB key that we had received for Building Design Suite Premium. This wasn’t such an easy thing to do…but hopefully you won’t have to, now that I have done it for you!
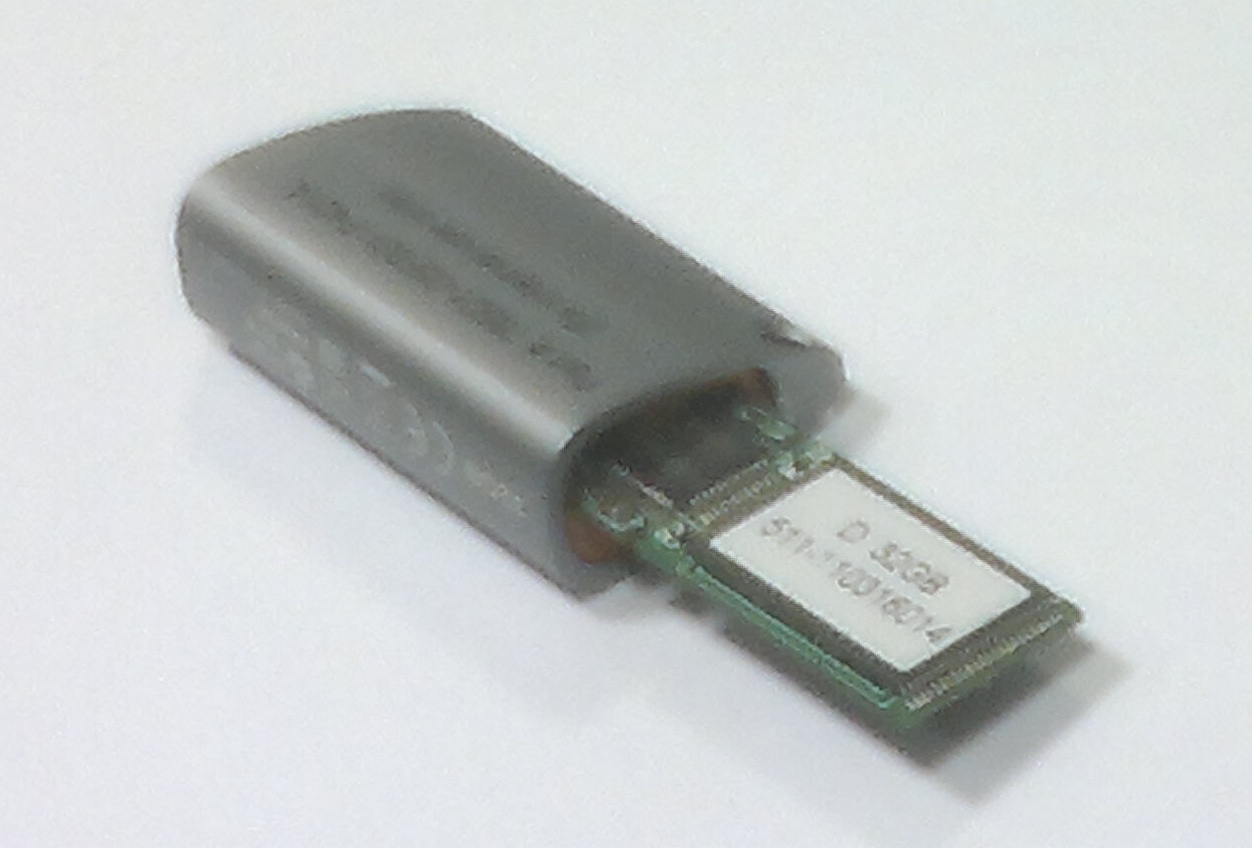
I already knew that it was ostensibly a Toshiba flash drive, code PA3708, 32 gb (have a look on the case of yours, see if it is the same).
However, what I really needed to know was the IC, or controller chip brand / make / model. Dismantling the key told me it was a:
PHISON 2251-60-5
Ok, from here I found this page, which led me to download the Phison MPALL utility bundle. You will need to download it too:
Phison_MPALL_v3.20.0B
Read on below the bars…
Also, if you’re looking for a flash drive or an external drive, try looking here with coupons
EDIT-1 You may be able to find updated versions of MPALL via Google Search. I am unsure what the copyright / usage license situation is with this program (deleted some links).
EDIT-4 You may want to try Formatter first – Craig at iRevit has hosted the Formatter.zip and tested it (May 2012)
From here, it was a bit of trial and error. This is how you do it:
EDIT: For the 16 gb USB, try using -60 controller setting.
Note – the settings are saved in the MP.INI file. Here is what my MP.INI file looked like:
[PenDriveMP]
IC Type=PS2251-90
[Parameter Mark]
Parameter Type=F1_MP_21
[Customize Info]
USB VID=0x13FE
USB PID=0x3D00
String Product Name=USB DISK 2.0
Inquiry Version=PMAP
[Configuration]
Reset Serial Number=0
[TestItemOption]
Do Preformat Test=1
[Extra]
Mode=3
[Misc]
Volume Label=USB DISK
Burner Erase All=1
Wafer Erase All=1
set1667=0x00
[Advance]
Tick=0
FC1=0xFF
FC2=0x01
[Firmware]
ISP=0
You can check and see if yours looks similar, or even load these settings and try them.
PLEASE NOTE THAT THIS PROCEDURE MAY COMPLETELY BRICK OR DESTROY YOUR USB DRIVE. Make sure you have a backup of the software if you are going to attempt this.
So, how did you go? Do you feel pretty good about yourself? Really, that USB key would eventually become redundant, so we are making an environmentally wise choice by recycling it, aren’t we?