I am currently installing Building Design Suite Premium 2012 from the shiny USB stick we received yesterday.  There are just two quick tips that I wanted to share with you:

  1. If your packaging does not have a Serial Number printed on it, you will need to log in to Subscription Center, go to Contract Administration and then click Coverage Report.  From here you should be able to find your Serial Number.
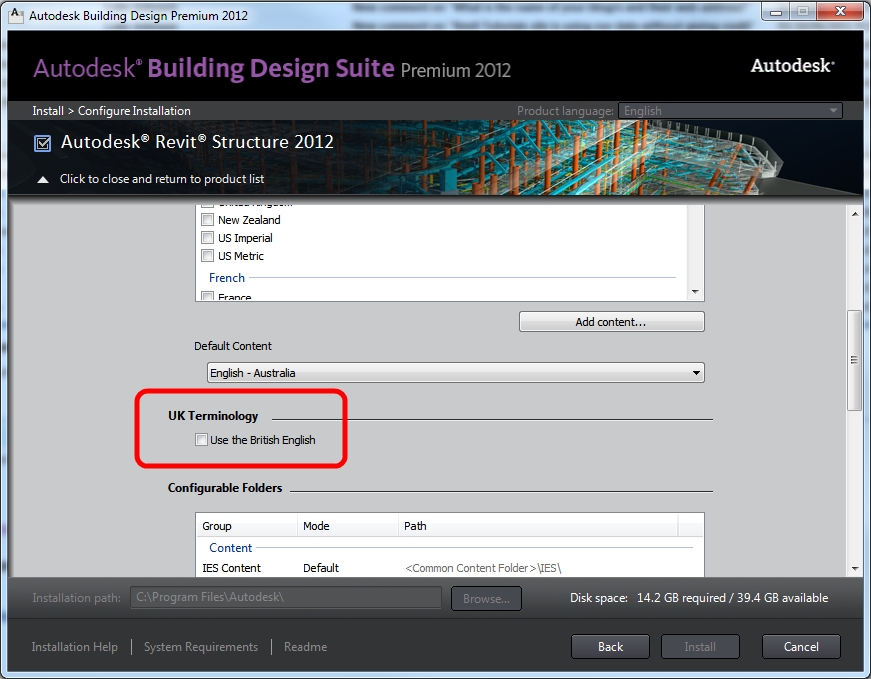
  2. If you want to use the ‘UK Terminology’ in Revit Structure (as previously posted about on various blogs), there is an option in the installation – see image below:

My installation took about 50 mins – and I installed every product.  Enjoy!

      Two tips that I found of particular value:

      “…click on Graded Surface… If you don’t do this first step, you will not get Cut and Fill counts when you create Building Pads.”

      and

      “Be sure that first you select the Topography, then click on the Building Pad Button on the Massing & Site Tab. Otherwise, the Pad will be created, but sometimes (I haven’t figured out why and how this happens) the Cut and Fill will not be reported on the Topography Schedule.”

      Read the whole post:
      CAD addict: Revit: Using Building Pads Properly – Part II

      I previously posted about a minor error in the Options dialog box (link at end of post).

      After starting a case with Autodesk on this subject, I received a reply that included this statement:

      “The development teams have confirmed this issue and have fixed this in the latest service pack which will be out soon.

      So there you have it…more breaking news from What Revit Wants 🙂

      What Revit Wants: Search results for broken link

      @davewlight David Light

      Wow, didn’t catch this, but don’t put #vasari exe in program folders or program data.

      jadamthomas J. Adam Thomas

      @davewlight what happened?

      @davewlight David Light

      RT @jadamthomas @davewlight what happened? I have been getting data corruption & install says not 2 do

      jadamthomas J. Adam Thomas

      @davewlight oh wow! Well thanks for the heads up

      In previous versions of Revit, a common workaround to generate some ‘depth’ in elevation views was to use transparent mass planes.  This created an effect like this:

      Here is what was actually happening behind the scenes:

      However, something has been changed in Revit 2012.  This no longer works properly.  In fact, you CAN open up a 2011 file that has the effect in 2012 – and the effect will remain.  However, if you purge the file, it simply disappears!  See example video of this ‘Disappearing Act’ and file download link below:

      Example file download link

      The only way I have been able to retrospectively ‘add’ the effect to 2012 is:

      1. Open a 2011 file that has the effect.
      2. Rename any relevant masses or materials in the 2012 file so that you can cleanly ‘paste’ the 2011 mass.
      3. Copy one of the mass planes from the 2011 file and paste it into the 2012 file.
      4. This ‘might’ work for you…
      5. You can’t EVER purge this file in 2012, or the effect will break.

      If you want to follow the discussions on this issue, here are some forum links:
      http://forums.augi.com/showpost.php?p=1130343&postcount=41

      http://revitforum.org/showthread.php/1958-2012-Kills-the-Elevation-Mass-Transparency-Workaround

      Let me know if you have any comments or workarounds for this.