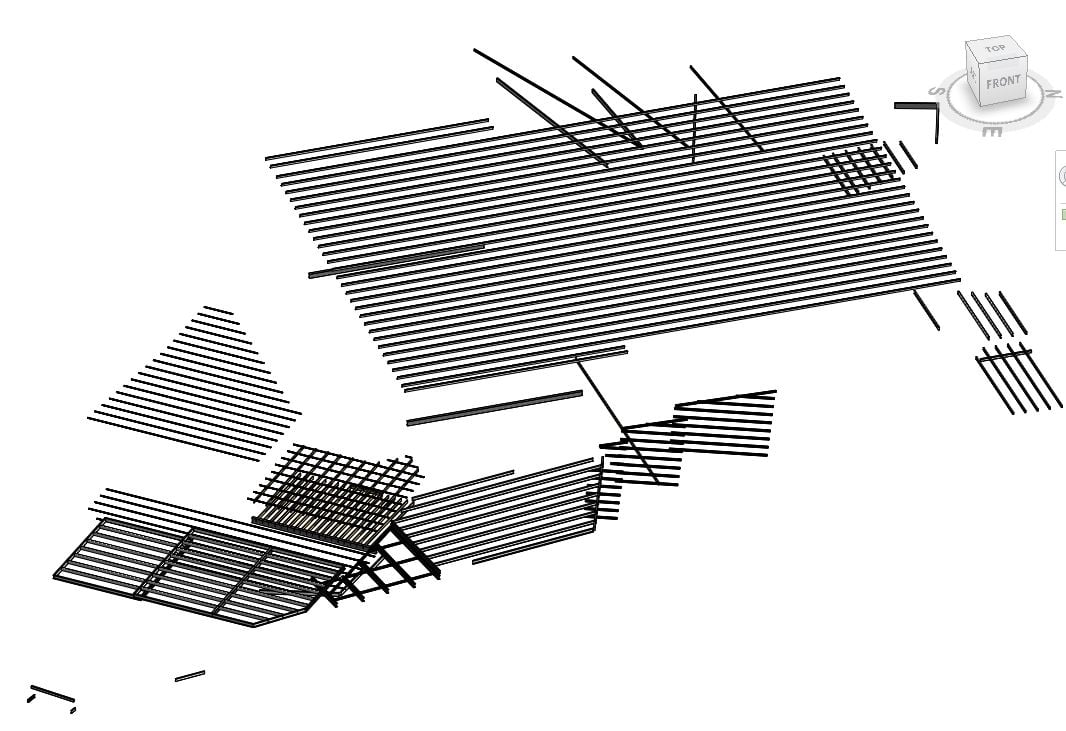
Okay, xxx means “insert your desired roof type here”. One of the best and easiest ways to find find the answer you are looking for is by downloading this file on Roof Forms from the Revit 2011 Content Distribution Center.
From here, you should be able to figure out the ‘best practice’ when it comes to creating the various different roof forms.

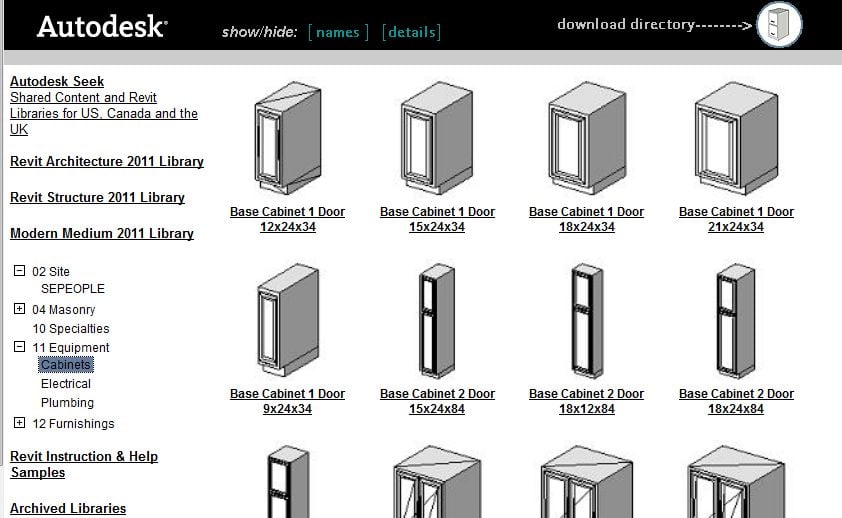
Strangely, Autodesk Seek ‘knows’ about this file, but you can’t download it from there – yet.

I read the following on the Revit 2011 help today:
Ketiv’s Modern Medium Library has been converted into Revit Architecture families and made available on the Web

Okay, I didn’t really know what Ketiv’s library was, but I found it! To access this library:

  1. Go to the Revit 2011 Content Distribution page.
  2. On the left, you can click on the ‘Modern Medium 2011’ library.
  3. There are a number of subcategories to browse and choose from.


Enjoy your access to this free content 🙂

I recently spent some time troubleshooting a netbook that was unceremoniously ‘dropped’, and I thought I would share the things that I found most helpful.

Basically, there was physical damage to many of the sectors on the hard disk, meaning that the system did not boot and had some serious issues.

After booting using a USB drive into a diagnostic version of ‘mini’ XP, I was able to run a program called HDTune. An Error Scan using the ‘quick’ option showed the area of the drive that was affected.

I then basically resized the partitions on the disk so that the ‘bad’ parts of the drive were in the unallocated space – hopefully meaning that it won’t cause any future problems.

I backed some of the necessary data, then formatted and I will now reinstall XP. Hopefully all is well!

PS – Try not to drop electronic devices.

This guide is for beginners who want to view the Revit database in 2011. I have previously posted about rvtmgddbg. This has been replaced in 2011 by RevitLookup. This is an API tool that allows you to view (‘Snoop’) the elements in the Revit database.

How do you set it up? Its quite simple really:

  1. Download this file (thanks to The Building Coder).
  2. Unzip the file to the C: drive (such that you have paths C:RevitLookupCS etc)
  3. Double click on the file “C:RevitLookupCSRevitLookup.csproj”, this will open in Visual Studio tools for Applications.
  4. Click on Build – Build RevitLookup (this creates the RevitLookup.dll file)

  5. Now, open the file “C:RevitLookupCSRevitLookup.addin” in Notepad.
  6. Replace this-
    RevitLookup.dll

    with this-
    C:RevitLookupCSbinDebugRevitLookup.dll

  7. Save the file.
  8. Now, copy the RevitLookup.addin file you just saved to the following location (depending on your OS):

    For Vista
    C:ProgramDataAutodeskREVITAddins2011

    For XP
    C:Documents and SettingsAll UsersApplication DataAutodeskRevitAddins2011

  9. That’s it! You should now see the Revit Lookup menu on your Add-Ins ribbon:


One of the simplest ways to use this tool is to select an Object, then use the ‘Snoop Current Selection’ option. Enjoy!

Structural Beam Systems are a very quick way to make your Architectural model more intelligent. Depending on your workflow and your consultants, it may be up to you to ensure that structural elements are not interfering with your beautiful architecture.
Here is a few tips for using Structural Beam Systems:

  • Structure usually holds up the roof – it is situated underneath a roof. In keeping with What Revit Wants – set the Workplane for the Beam system to the Underside of the Roof! Then, when the roof pitch changes, the Beam system will update. And you don’t have to mess around trying to match angles etc between the Beam system and the roof. Thanks AUGI.
  • Work in 3D – this way you can see what is happening and see what Revit is doing.
  • Use Fixed Distance / Centre justified and tweak the distance to ‘fill up’ the roof – this way you can get around the fact that Beam systems do not create an ‘edge’ beam by default.
  • Have a look at the ‘International’ Revit content if you can’t find the structural families you need.
  • If you are struggling to get a beam to the edge of the system, offset the system lines outwards by 50 or 100 mm.
  • Keep in mind that an ‘Automatic’ Beam System needs a perimeter of structural beams to work nicely.
  • If you need to, hack into and modify the Structural Beam Systems to suit your needs. For instance, you may not need the ‘Coarse’ heavy lines – just delete them out of the family and make the 3D extrusion visible in all modes (Coarse, Medium, Fine).
  • Play with Object Styles to make the Structural Beams look nice in your Architectural documents.

I just found a very interesting trick. Have you ever wanted to jump directly to a sheet in Revit, from a section or elevation reference mark? Usually, if you double click a section mark, it will take you to the relevant View, not the Sheet that the View is on.

However, IF the Sheet is open AND the View is ‘activated’ on the Sheet (right click, Activate view), then when you jump to the View from the Section mark, Revit will actually take you to the ‘Activated’ view on the Sheet!

Pretty cool huh?

A new feature in Revit 2011 allows you to ‘lock’ or ‘unlock’ parameterised dimensions in the Family Editor.

In practice, this allows you to instantly flex a family without having to open the Type Properties dialog box.

‘Flexing’ means to test the relationships and parameters in a family by adjusting the dimensions within that family. If something breaks, you know that you have a problem. You should always flex families within the family environment, before unleashing them on a project.

If you are having problems related to the Ribbon or the dockable palettes in 2010, you should start by resetting the user interface:

You would like to reset the Autodesk® Revit® Architecture 2011 user interface (i.e. the Ribbon, Quick Access Toolbar, and Project Browser) back to the out-of-the-box version and remove any customization that has been applied.
Download and run the following script on your computer:

autodesk_revit_architecture_ui_reset_2011.vbs (vbs – 6Kb)

More instructions here

A sure-fire way to become more productive when using Revit is to utilise the Project Browser effectively. It can allow you to quickly find and navigate your project, instead of laboriously searching for views or families.

In Revit 2011, you can use the persistent Properties Palette to quickly sort the Project Browser views.

  1. Click on top-level of Browser (Views…)
  2. Click on Properties Palette and choose option.


This method also works when sorting Sheets in the Project Browser.

The above post assumes that you know how to create new sort groups for the Project Browser. If you don’t, have a look at this page.