A recent post on Ideate Solutions reminded me of a handy Revit Extension that you may not be aware of:
Shared/Project Parameters

Download Revit Extensions for Autodesk Revit 2015:

Multiple Languages (exe – 224406Kb)

Quote:
It’s called “Shared/Project Parameters” from the pull-down, but when it’s launched it will open a dialog that says “Shared Parameter Converter”.

This image shows that I am asking the tool to read all of the .RFA files found within my “11 Specialty Equip” folder and that I am going to read particular parameters from my Shared Parameter file and push them into these families. The modified families will then be copied into a new folder called “Updated Specialty Equip” and the results of this work will be included in my “!test” folder as a log file.

The Shared Parameters Converter Dialog From
Revit Extensions (2014/2015)

Original post:
Ideate Solutions: Batch Adding Shared Parameters to Revit Families

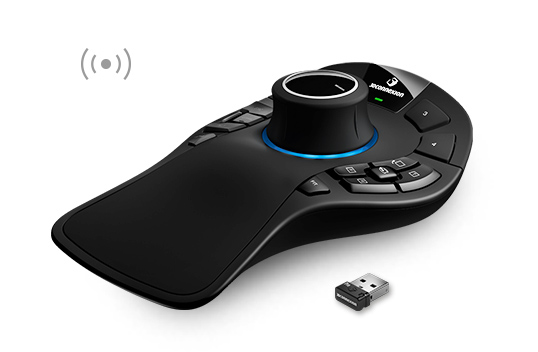
P { margin-bottom: 0.21cm; }A:link { }It is my pleasure to announce the winners of the 3Dconnexion SpaceMouse Pro Wireless competition that I launched a month back. After hundreds of entries, the following two names were selected at random, and they will each receive a SpaceMouse Pro Wireless prize pack, thanks to 3Dconnexion:

Barrie Sharp

Justin Harwell
Here are their competition entries… (it is quite interesting to hear both sides of the 3D mouse debate):
P { margin-bottom: 0.21cm; }A:link { }
Why I like my 3D Mouse
Barrie Sharp, from Tully De’Ath (Engineering Consultancy) in the UK
(Twitter @barriesharp, Blog http://revitbuzz.blogspot.co.uk), who said:
“I work with dual screens in Revit and tile a 3D view with 2D views. My 3D mouse allows me to intuitively manipulate my design to craft my model. I also use a pen tablet and don’t have use of a mouse wheel. My 3D mouse seamlessly puts those controls back into my other hand but with enhanced functionality. Pan and zoom feels as natural as driving my car. Just love it!”
Why I Haven’t Purchased a 3D Mouse (yet)
Justin Harwell, from the US, (website http://www.whitesign.com/) who said:
“I currently do not have a spacemouse for only one reason, I simply do not have the funds, yet. The company is a rapidly growing company with new hires coming in every week, and national contracts that keep the coming constantly growing. Since the company started using cad software we have re-engineered the way outdoor marketing is built, products which use to not be profitable to make but were apart of a package are now a very profitable item. Problems are now seen before built, and the various features of layout and design in CAD reduce large labor hours in construction.  With a SpaceMouse I would be able to cut time designing  and as the company grows it would be very easy with a SpaceMouse to prove why we would be needing to purchase another for the additional CAD  users, after the team finds the value in the design. In the long term view it would end up benefiting both my company and yours.”
Barrie adds:
“I am very excited to have won and will be able to give my old space explorer to my brother.  I am trying to convince my whole office it’s the way to go.  I perhaps forgot to add, I love being able to pan and zoom in Revit whilst the error dialog is up!”
Finally, I would like to thank you all for supporting What Revit Wants and for entering this competition. I’m sure your valuable feedback will assist 3Dconnexion in making these products even more useful for the AEC community.

Download at:
http://www.autodesk.com/revitsundial

Autodesk tweeted across their Twitter ecosystem that you can “See what we are working on…” with this Sundial Release. I don’t think it is a leap of logic to assume that you are actually seeing a preview of features that will be included in Revit 2016. The final feature set will not be set in stone yet, but it gives you a fair idea on where most of the big improvements will be.

Additionally, I’ve been thinking about this equation:

Revit Sundial (cloud hosted, latest release) + Revit Skyscraper (Revit Server for distributed teams)
=
The answer to cloud collaboration on Revit for distributed geographic teams?

A few things that Revit Sundial has that Revit 2015 doesn’t (shortlist):

  • Reveal Constraints mode
  • Load into Project and Close button in Family Editor (see video below)
  • Search the Type Selector 
  • Select Background Colour
  • Linking Revit model or a CAD file, the default positioning is now Auto – Origin to Origin (via this)
  • PDF Export enhancements, Hyperlinks will work in printed PDF sets (via this tweet)
  • Disallow multiple wall joins at once
  • more things… comment if you find them

Here is the long list of Revit Sundial New Features (lets call it Revit 2016 open beta in the cloud?):
Architectural Enhancements

  • Solon Integration: Personalize the building performance analysis experience in Revit by defining a dashboard with charts and results that are important to you. The central web-based Solon management environment allows you to create charts and configure dashboards for all of your company Revit users from a central collaboration environment in Green Building Studio.
  • Energy analysis: To better support the analysis of large models, several methods have been implemented to reduce memory usage.
  • Wall joins: To simplify the control of wall joins in a plan view, you can now select multiple intersected wall joins with a single click, and choose to allow or disallow joins on all the selected walls with a single click. If you choose to allow joins, you can then specify a Display option (Clean Join, Don’t Clean Join, Use View Setting). See Specify Wall Join Cleanup Options.
  • IFC references and phases: Use existing geometry in a linked IFC model as references for dimensions, alignment, snapping, and hosting of some face-based families in the Revit model. When you link an IFC file, its elements are assigned to a default phase. Before using IFC Import, Link, or Export, go to Autodesk Exchange Apps for Autodesk Revit and download the latest edition of IFC for Autodesk® Revit® to take advantage of up-to-date improvements.
  • Shaft openings: To streamline the creation of a shaft opening, the Base Constraint value now defaults to the level of the current activated plan view. (See Cut a Shaft Opening.) The instance properties have also been reordered to be consistent with families with similar properties: Base Constraint, Base Offset, Top Constraint, Unconnected Height, and Top Offset.
  • Adaptive point orientation: To improve clarity, the adaptive point instance parameter Orientation is now Orients to, and the selectable orientations have been renamed. No functionality has changed, only the names. See Adaptive Point Orientation.
  • Site design: Performance enhancements result in improved edit and regeneration times for complex toposurfaces, subregions, and building pads.
  • Perspective views: Certain modeling capabilities are now available in perspective views: (See Work in a Perspective View.)
    • Editing tools: Move, Align, Pin, Unpin.
    • Reset Target tool: Restores the position of the camera target to the center of the field of view.
    • Toggle between the perspective and parallel representations of the 3D view.
  • Reference other view: To search the list of available views for reference, enter keywords to locate the desired view. This feature is available when you are creating views for callouts, sections, elevations, and details, and you select the Reference Other View option (or modify a reference view). Also note that the Reference Other View option now displays on the Reference panel of the ribbon instead of the Options Bar. See Reference a Drafting View and Search.
  • Reveal constraints: To see all dimension constraints and alignment constraints in a view, use the Reveal Constraints mode, available on the View Control Bar. See Reveal Constraints.
  • View updates: Performance enhancements result in faster updates to views that contain multiple instances of families.
  • Revit links: Further enhancements result in improved performance for cases where Revit link instances are loaded but not visible in the view (such as when they are outside the crop region).
  • PDF Export enhancements:
    • Share your designs as electronic PDF files with automatically linked views and sheets. Each view tag in the PDF file is a hyperlink. Click a hyperlink to jump to that view or sheet in the PDF file. See About Printing to PDF.
    • Avoid lengthy or unintended print jobs. If you choose to print multiple views and sheets to individual PDF files, you cannot cancel the print job once it starts. A new message warns you of this issue and allows you to cancel the print job before it starts. Instead, consider printing the views and sheets to a single PDF file. See Troubleshooting: Printing Views and Sheets.
  • Schedules: To easily add a data row to a schedule, use the Insert Data Row tool, which is available directly on the Rows panel instead of within the Insert drop-down. The new position of this tool makes it easier to add a data row to a room schedule, area schedule, key schedule, space schedule, or sheet list. See About Modifying Schedules.
  • Select host for tags: To specify the host element for a tag, select the tag and use the Select Host tool. See Select the Host for a Tag.
  • Annotate stair treads and risers: To streamline the process of adding number annotations to treads or risers in a component stair run, specify default properties before placing the annotation. These default property values persist for tread/riser annotations added to the model. See Number Stair Treads and Risers.
  • Thin lines: To improve consistency between Revit sessions, when you use the Thin Lines tool, the setting is stored in the Revit.ini file. When you launch Revit, the stored Thin Lines setting is used as the default. See Graphics Settings in Revit.ini.
  • Export Models with Lines that Coincide: When exporting a Revit model to a CAD format, you can decide whether to maintain model lines that coincide with other lines in the same space. See About Exporting Models with Lines that Coincide.

Structural Enhancements

MEP Enhancements
  • Sequence for power circuits: To specify the sequence in which power circuits are created, use the Electrical Settings dialog. See Electrical Settings.
  • Most recently used panel circuiting: When you create a circuit, Autodesk® Revit® automatically connects to the most recently used panel for the current session. In addition, you can now search the Panel drop-down list. See Select a Panel or Transformer for the Power Circuit.
  • Move circuits: To move a circuit directly to a target slot without disrupting other circuits, use the Move To tool. See Move circuits on panel schedules.
  • ASHRAE table information: To identify the table that is applicable for the current condition, the ASHRAE Table Settings dialog displays the graphical representations associated with the duct fitting tables. This enhancement is helpful when you specify Coefficient from ASHRAE Table as the loss method for duct fittings. See Specify a Pressure Loss Method for Fittings and Accessories for Duct and Pipe.

Multi-Disciplinary Enhancements
  • Search: To quickly find the content you need, use the new search feature in the Type Selector or in drop-down lists. Click the Type Selector or a value field in the Properties palette or a dialog table, and enter keywords to search for. See Search.
  • File upgrades: To help you understand the consequences of file upgrades, new dialogs indicate the release of a file and the release to which it will be upgraded. In many cases, you have the opportunity to cancel the upgrade before it completes. See About Opening Models that Require an Upgrade.
  • Edit/load a family: To close the family automatically after it is loaded into a project, use the Load into Project and Close tool in the Family Editor. See Load the Current Family into a Project.
  • Properties palette: Keep your context in the Properties palette when you scroll, select a property, and then click outside the palette. This behavior can be helpful, for example, if you are selecting different family instances in the model to compare their properties.
  • Pin/Unpin icons: To determine whether an element has a relationship with a host system, select the element to see its Pin/Unpin tool icon. A different set of pin/unpin images (
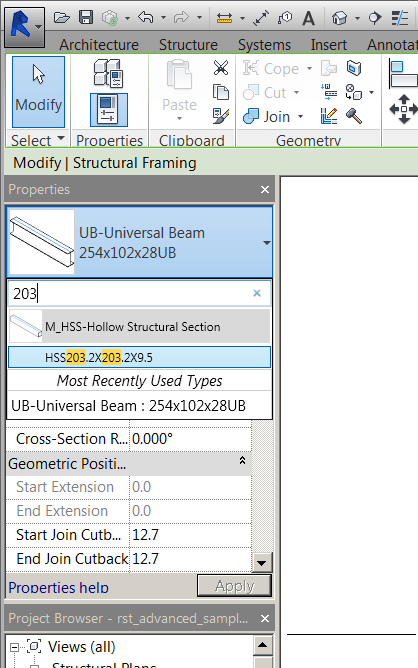
) is used in the drawing area to indicate a relationship with a host, such as a curtain wall panel or a beam in a beam system. The behavior of the pin has not changed (clicking it still allows you to override the properties for the element), but the subtle difference (small link in the image) adds a visual indicator that this pin is different than the standard pin that locks an element in position. The Pin/Unpin tool icons on the ribbon have not changed. See
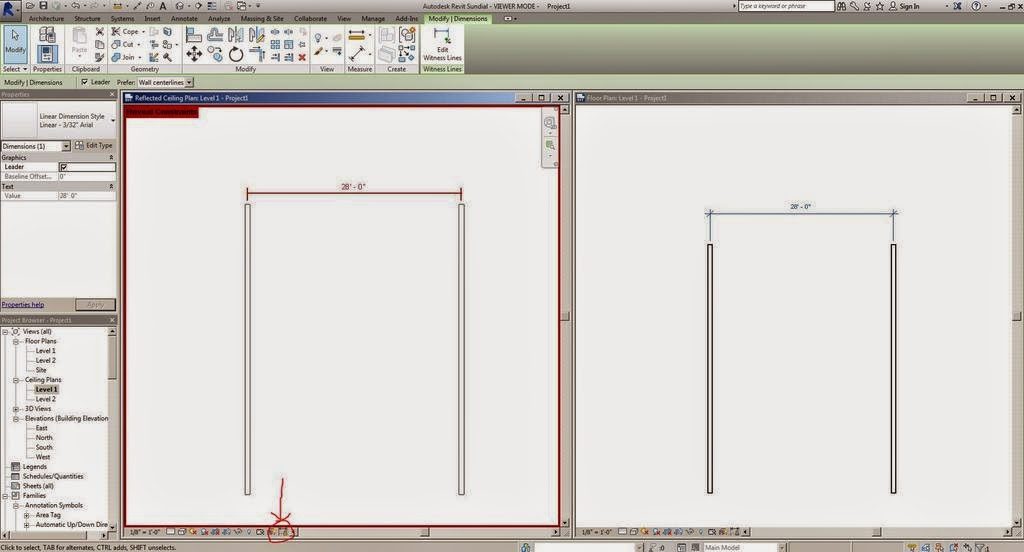
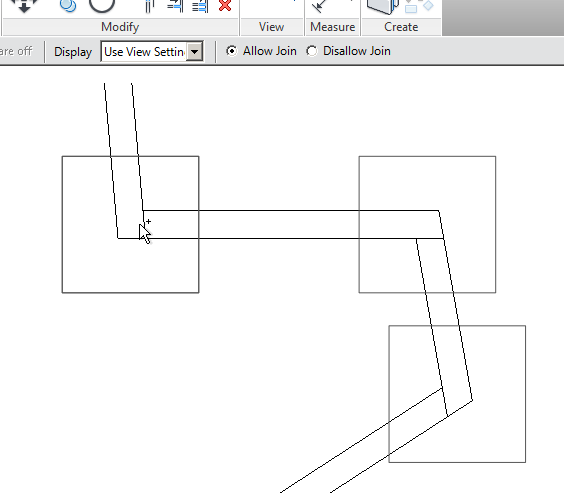
 Unpin Elements.
  • Import/link position: To streamline the process of inserting a Revit model or a CAD file, the default positioning is now Auto – Origin to Origin. If you change the default, the option you select for Positioning becomes the default for the current Revit session. The software remembers one default option for Revit models and another default option for CAD files. See Import and Link Options.
  • Revit link in a closed workset: To understand why a Revit link is not visible in model views, check its status in the Manage Links dialog. The status In Closed Workset now displays for a Revit link that is in a closed workset. See Manage Links Dialog.

Configuration Changes

In the Revit.ini file, the following settings are new or changed in this release:

  • Colors section: The new BackgroundColor setting replaces the InvertBackground setting in the Graphics section.
  • Graphics section: The ThinLinesEnabled setting is now supported. The InvertBackground setting has been deprecated and is no longer supported.

via
New in Revit 2015 Subscription Advantage

Reveal constraints mode:

Search the Type Selector (via this tweet):

Select background colour (via this tweet):

Disallow multiple wall joins at once (via this tweet):

NDA?

Loading screen:

Video showing the Reveal Constraints mode and general use of Revit Sundial:

Read more:
http://insidethefactory.typepad.com/my_weblog/2014/08/revitalizing-inside-the-factory.html

Heads-up:
@Steve_Stafford and
https://twitter.com/kirklyncox/status/497111614705762304

The focus of Autodesk Navisworks 2015 Service Pack 3 is the resolution of Revit interoperability issues. Service Pack 3 does resolve issues identified in other parts of the product, we recommend you refer to the supporting documentation for the detail.

Download Navisworks 2015 SP3

Autodesk_Navisworks_2015_Service_Pack_3_Multilingual_Freedom_64bit.msp (msp – 202.29Mb)
Autodesk_Navisworks_2015_Service_Pack_3_Multilingual_Manage_64bit.msp (msp – 269.44Mb)
Autodesk_Navisworks_2015_Service_Pack_3_Multilingual_Simulate_64bit.msp (msp – 269.45Mb)

Readme
Navisworks 2015 Features (English)
Navisworks 2015 Installation (English)

via
http://knowledge.autodesk.com/support/navisworks-products/downloads/caas/downloads/content/autodesk-navisworks-2015-service-pack-3.html

EDIT: Subtle change – dragged window selections and markup are now filled blue in colour

Remember to update your exporter if necessary:
2015: NavisworksExporters2015.exe

In one recent post, Paul Crickard describes how you can use a URL field in a Revit schedule to:

  • open documents or images
  • open a video
  • open a map or facility plan to a specific geographical location
  • retrieve data from an external database

These points are along similar lines to my post about launching scripts and programs directly from Revit. The same principles apply to families with a URL parameter.

From Architecture and Planning:
Changing HTTP to FILE makes it a local file browser. I created a room in Revit and added a parameter of type URL. The URL added is:

file:///c:/Users/Paul/Desktop/efpGIS/Config/Splash.png

This URL links to a picture on my desktop. If I click the link in Revit, I get the image on the right. The computer knows to launch the appropriate program to open the file. A link to a AVI file opens my Divx Player.

Read the whole post:
URL Tricks in a Revit Schedule | Architecture and Planning

One of the most popular addins for Revit to date is the simple section box tool by Coins. But what about doing the same thing in 2D? Paolo has put together a macro (and shared the code) that crops a Plan view around a selection of elements. Nice job!

From Punto Revit:

I’ve been asked by a  reader if it is possible via Revit API to crop a plan view around a selection of objects, if there are no scope boxes associated it can be done in a fairly easy way.

You can find the code here

Original post:
http://puntorevit.blogspot.com/2014/07/crop-view-by-selection-macro.html

Konrad Sobon has been spending a bit of time with Dynamo lately, and he is even using it to finetune documentation in Revit – like getting tags to be placed in a more logical position on a glazed system.
From archi-lab:
Revit’s Tag All tool but with extra control over where the tag actually gets placed…
 tags generated through standard method of Annotate>Tag All are overlapping randomly not only with each other but also with panel edges. That’s not very good looking plan. Here’s an image of what you can do in seconds with my new node:

01

Original post:
http://archi-lab.net/?p=149

Simon Moreau has put together and shared some API code that allows him to track the time taken to open and work with Revit models. I can see this would be a good way to identify “problem” Revit central files that were taking a long time for users to sync. Once the problem models are identified, they could be fixed, and people might be happy 🙂

From bim42:
It is now possible to quickly create very precise graph displaying opening time of different model, compare them and show their evolution along time


from
http://bim42.com/2014/07/revit-tracking/