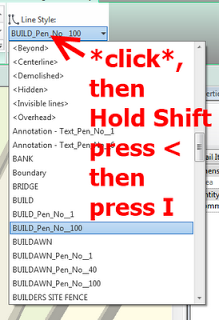
Sometimes you may have to deal with a very long list of Line Styles in Revit.  Unfortunately, there is no ‘Recently Used’ list in Line Styles!  The keyboard can be used to scroll in the Line Style selector by pressing the first character of the Line Style name.  However, to select , you have to:

  1. Click in the Line Style selector
  2. Hold down Shift, and press < and then I
  3. Press Enter

If you actually want to do it completely on the keyboard:

  1. Start a straight line command
  2. Hit Alt
  3. Then M
  4. Then LS
  5. Hold down Shift, and press < and then I
  6. Press Enter

In case you haven’t realised yet – pressing Alt once reveals a level of keyboard shortcuts, then after you type one of those options – another level is revealed.  It appears that some of these are not actually accessible using the Keyboard Shortcuts dialog…

Is the future of BIM to become IBM?

BIM is not just about creating more detailed and accurate models; it can bring about a lot more intelligence into the design process, where it is not necessary to painstakingly model every single detail of the building, but where the application needs only high-level ideas and can then rely on inference to model most of the building details by itself. Admittedly, no BIM application currently offers this capability,  …

via
Revit Architecture 2013: AECbytes Product Review

Doug Bowers posted a very informative how-to recently about Autodesk Material Libraries.  He shows you how to create a material library, add materials to it, and then share it with other users.

A couple of points I found particularly interesting:

  • Depending on the security permissions on the library file or folder containing the file, users may be able to add additional materials to the company standard or only be able to utilize materials contained in the library.
  • Materials placed in the company folder are no longer linked to the original material and may be modified, resulting in a different definition of the material in the company library than the material in the folder from which it was originally copied.

Read more at:
Sharing Autodesk Materials Throughout An Organization | Applying Technology to Architecture

Along similar lines, check out:
Upgrading Revit 2012 Material Libraries in Revit 2013
and 
Materials in Revit 2013 – the saga continues


Download RevitAddinWizard/RevitAddinCoder/RevitAddinWidget 

More API wizards at http://spiderinnet.typepad.com/blog/2011/05/revit-addin-wizardscoders-and-revit-api-widgets.html

via
RevitAddinWizard Build 0.9.2.1 Been Rolled Out – RevitAddinWizard & More

Read about similar at:
http://thebuildingcoder.typepad.com/blog/2012/04/add-in-wizard-for-revit-2013.html

EDIT via MLD in the comments:
In a 3D view;
1 Ensure Section box covers all elements by,Unchecking then rechecking ‘Section Box’
2 Select some objects and the section box
3 Temporary isolate elements
4 Uncheck then recheck ‘Section Box’ again
5 Reset Temporary Hide/Isolate

Another way – is the COINS Auto-Section Box add-in available on Autodesk Exchange.  Install the add-in, restart Revit, select a few objects then click the button.  It will create a section box around those objects in the selected 3D view – very easy!

Download at:
Autodesk Exchange Apps

A third way – is through a nice tip posted by Trey at Wikihelp.  Here are the basic steps:

  1. In a plan or elevation view, create a Callout (View tab > Create panel > Callout).
  2. Open a default 3D view.
  3. Right-click on the View Cube.
  4. Select Orient to View > Floor Plans, and choose the Callout view you just made. Your 3D view will automatically have a Section Box that matches the Crop Region of the Callout!

via
Small 3D View – WikiHelp

I have spent hours trying to figure out how to take actual camera locations from 123D (Photofly) and get them into Revit as ‘real’ cameras (3D views).  I thought it would be cool to be able to use a real-life camera location in Revit, because then you would already have the existing scenery as a background image (because 123D Catch would have used it in processing the model).  This was partly in response to this comment.

Its easy to export an FBX from 123D Catch, and open that in 3ds Max – you get cameras, yay.  You can use FBXIMPORT in AutoCAD and you get the named views (cameras), yay.

However, I have not been able to find an equivalent process for Revit.  At this point, I have to admit defeat.

My big idea was to convert the FBX into IFC with view information in the schema, and then open that IFC in Revit.  Sadly, I kept coming up against problems.  AutoCAD Architecture can import FBX and then export IFC, but the 3D views do not seem to come through.

One possible workaround would to compose your presentation in Showcase – you can export from Revit to Showcase, and you can also export an FBX from 123D and bring that into Showcase too.  But I want a purely Revit way.

If you have any thoughts on how to make this happen, PLEASE comment 🙂

Here is a list of links and notes that you may find useful.  There are some really cool resources on IFC available now – read on below:

NOTES on FBX and IFC
Autodesk sign in is required on 123D Catch to actually activate the Export feature to allow exporting of FBX.

Explanation of the export formats available from 123D (formerly Photofly):

Menu Command Format Contents
saveas .3dp The 3D photo scene contains cameras, reference points, 3D mesh, reference lines, and distance measures. This is the native format for Project Photofly.
export .dwg The drawing contains reference points and reference lines.
.fbx The Autodesk FBX asset exchange file contains the 3D cameras, the photo textured 3D mesh, reference points, reference lines, and reference labels.
.rzi The ImageModeler file is a subset of the 3dp file based on what was selected at the time the photo scene was exported.
.obj The OBJect file contains the photo textured 3D mesh.
.ipm The Inventor Publisher Mobile file contains the photo textured 3D mesh and can be viewed with the free Inventor Publisher Viewer available in the Apple iTunes App Store.
.las The binary LASer file contains the 3D point cloud that was automatically extracted from the pixels of the source photographs. The LAS file format version is 1.2.

via
http://labs.blogs.com/its_alive_in_the_lab/2011/09/viewing-ipm-files-generated-by-project-photofly.html

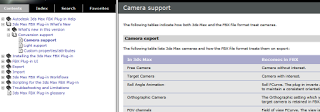
Camera Support – 3ds max and FBX

http://download.autodesk.com/us/fbx/20112/3dsmax/files/WS1a9193826455f5ff6026605b1181237e94650be.htm

AutoCAD Architecture IFC export information
http://exchange.autodesk.com/autocadarchitecture/enu/online-help/browse#WS73099cc142f4875510b13df10ec0b2c48a-7a62.htm

3D views can be export FROM Revit TO AutoCAD Architecture
http://wikihelp.autodesk.com/Revit/enu/2013/Help/00001-Revit_He0/1468-Document1468/2171-Print_Ex2171/2172-Export2172/2245-Structur2245/2251-Exportin2251

List of IFC softwares, tools and viewers
http://www.buildingsmart-tech.org/implementation/get-started/ifc-toolboxes/ifc-toolboxes-summary

IFC schema information for views (plans, sections, 3d views etc)
Context
http://www.buildingsmart-tech.org/ifc/IFC2x4/rc2/html/schema/ifcrepresentationresource/lexical/ifcgeometricrepresentationcontext.htm
Subcontext
http://www.buildingsmart-tech.org/ifc/IFC2x4/rc2/html/schema/ifcrepresentationresource/lexical/ifcgeometricrepresentationsubcontext.htm

DDSViewer – can view DWG and IFC

  • also a very easy way to open DWG and save as PDF!

http://www.dds-cad.net/132x2x0.xhtml
To get a free version of the DDS Viewer, visit the ftp server and download DDSViewer.exe
IfcWebViewer – online web viewer for IFC using WebGL
http://code.google.com/p/ifcwebserver/wiki/IfcWebViewer


Exporting cameras as .3ds files using Flame
http://wikihelp.autodesk.com/Flame_Premium/enu/2013/Help/01_Flame_Premium_–_Flame/2037-3D_Compo2037/2267-Action%3A_2267/2274-Importin2274/2276-3ds_Max_2276

Vectorworks and 3ds
http://www.scribd.com/doc/34074946/128/Importing-and-Exporting-in-3ds-Format

Showcase can import views from FBX files
http://download.autodesk.com/global/docs/showcase2013/en_us/index.html?url=files/Help_ImportSettings.htm,topicNumber=d30e2896

IFC to OBJ:
IfcOpenShell

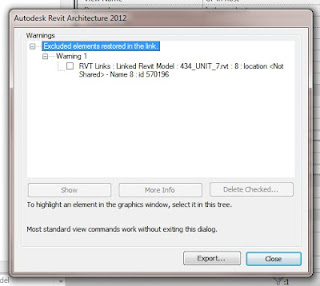
Interesting message when linking a Group to a new RVT file… basically, if you have a Model Group in your project that has Excluded Elements (either deliberately or due to some unavoidable issue) and you then Link that Group, the excluded elements will be restored in the Link.

Excluded elements are also restored for Attached Detail Groups if you choose to link them as views, but you won’t get the nice little message.

This could be one way of recovering the excluded data without having to create a new instance or use the ‘Restore All Excluded’ command on an existing instance…

Do you need to clean up your Revit files for transmission?
It is a common task to remove as much from a model as possible prior to sharing it with your consultants for the purpose of linking into their model or sometimes you want to lighten up a model that was sent to you for the same purpose. Delete Sheets, Views. and Revit Links does just what it says. You can select which of the three options you chose using the provided check-boxes.
This tool should only be used on models detached from central as it can be quite destructive.

Download at:
Delete Sheets, Views, and Revit Links | case apps

Nice post by Ben Malone over at BIMopedia.  He shows you how to install, activate, and use the free Tools4Revit family browser.  I like the fact that I can add my single local network-located Families folder and it will go ahead and index the families for me…

My PC has been busy upgrading and indexing over 5000 files to add to the Browser, so it will be interesting to see how well it performs.  I have had to do some minor babysitting to clear some warnings / dialogs and let the process continue…

Read more at:
BIMopedia Online – Benjamin Malone