Are you sick of waiting ages for a Revit walkthrough to render?  Using this technique, you can cut your walkthrough rendering time in half!  Essentially, we make half the frames we need in Revit, and then use some post-processing software to interpolate extra frames.  Here is how:

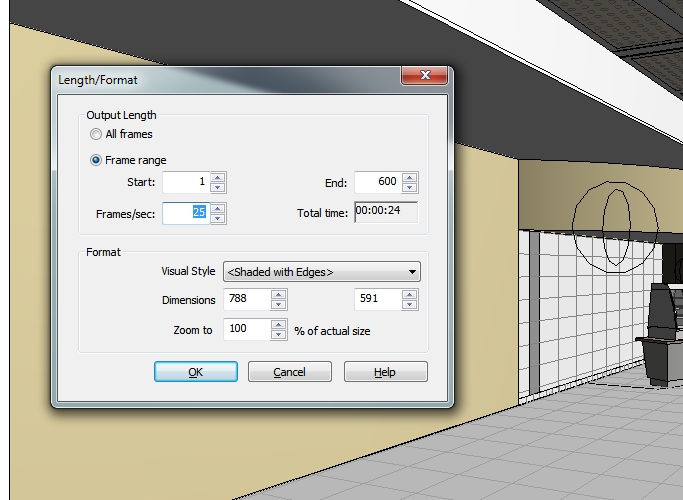
  1. Create a rendered AVI walkthrough from Revit with HALF the frames you actually want.  In other words, this walkthrough will be twice as fast as the walkthrough you will end up with.
  2. Install Adobe After Effects trial
  3. Open Adobe After Effects.
  4. New – Project
  5. Drag the Revit walkthrough file into the ‘Project’ area
  6. Right click on the file in the Project Area – Interpret Footage
  7. Set Loop = 2 times
  8. Drag the file from the Project Area to the Composition Area
  9. Right click on the file in the Composition Area
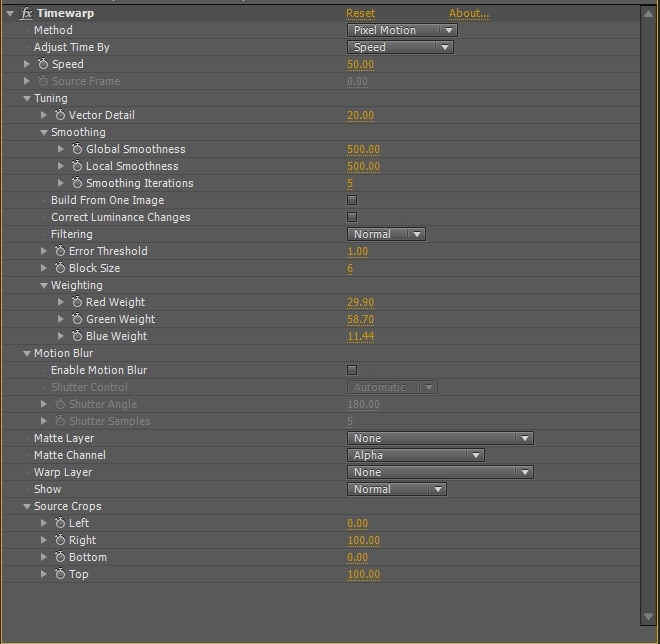
  10. Effect – Time – Timewarp
  11. Ensure speed is set at 50 (that is 50%, or half speed)
  12. Composition – Make Movie…
  13. Adjust the Output settings to suit.
  14. Click ‘Render’
  15. View your new ‘slow motion’ walkthrough

I have found this technique to be effective on a very large, 1800 frame walkthrough.  You could further tweak some settings in the Timewarp effect to get better results.  You could even try slowing the walkthrough down further – although I anticipate that the output will degrade quite quickly once you go lower than 50% Timewarp speed.

Here is a video that describes the process:

Here are a few associated posts:
Distributed Parallel Rendering in Revit

Using Avisynth and VirtualDub to join BMP to AVI

Awesome post from Klaus over at:
Revit and Camera Match / FOV and Focal Length

He provides a family file and a step-by-step process for how to match a Revit 3D perspective view with a real life camera photo. There are some nice implications to this, especially if you want to use a real life photo as a background for a rendering or other visualisation. Thanks Klaus!

Note:  his post relates especially to a Canon EOS1000D (some tweaking may be required for other cameras).

via
RevitForum Blog: Best posts of the month of May 2011

Are your renders taking ages?  Trying to output a big rendered walkthrough?  No matter how fast your PC is, these things can take time.  Why not enlist a few of the other computers in your office to help produce that high-resolution animation?

Distributed rendering (or Parallel Rendering) is possible when using high end visualization products, including 3D Studio (now part of the Building Design Suite Premium).

In pure Revit (without using 3D Studio), the solution is a little bit more crude.  However, it does work.

Here are the basic steps:

  1. Set up your walkthrough.
  2. Save the Project or Save to Central.
  3. Get your other computers running and open the same walkthrough on all of these PCs.
  4. On PC#1 in Revit, go to Export – Animation – Walkthrough, and pick a set number of frames for that PC to output.  For example, frames 1 to 600 out of 1800.
  5. Make sure you choose BMP for the output, and when naming the file, just put in 1- (this will make sense later.
  6. On PC#2, export frames 601 to 1200 to BMP.  Name it 601-.
  7. On PC#3, export frames 1201 to 1800 to BMP.  Name it 1201-.
  8. Using Advanced Renamer, rename all the files to suit the appropriate frames. (see associated post)
  9. Put all the BMPs in one folder on the server or on one of the PCs.
  10. Using Avisynth and VirtualDub, join the BMPs into an AVI. (see associated post)
  11. Then, either use some video compression software, or do some post-processing.

There you go, you have successfully done some distributed or parallel rendering in Revit!

As Revit users, we spend about 99% of our time behind a computer screen.  The brains of a computer are commonly known as a CPU (central processing unit).  These days, most CPUs have multiple cores.  The Core i7 975 that I use has 4 cores, and Hyperthreading means that Windows actually sees 8 cores.

Previously, I have discussed adjusting affinity and priority to make the best use of the cores you have.

If you are using an Intel chip, there is a high chance that it is using a technology called SpeedStep.  This basically ‘slows down’ your processor when its not busy.  I don’t know about you, but if I pay for a 3.33 ghz chip, I want it running at 3.33 ghz ALL THE TIME, not just when it thinks it has to…

To disable SpeedStep, head into your BIOS settings.  On the Gigabyte X58 I use, there is a section for ‘Advanced CPU Features’ and inside this, you can ‘turn off’ EIST (Enhanced Intel SpeedStep Technology).  There is also a similar feature known as ‘C1E‘ – I disabled this as well.

Now my processor is running at a consistent 3.33 ghz!

Here are a few tools and utilities you may find useful:

To disable SpeedStep WITHIN Windows while using a laptop with an appropriate Core processor, check out ThrottleStop.

To monitor CPU temperatures: CoreTemp

Benchmark and Torture Test: Prime95

Intel Processor Information Utility

Use all of these tools carefully.

corei7-7173705

If you have lots of materials in a project, it can become a chore to actually ‘choose’ them in the Material dialog box.

Here is a quicker way:

Scroll down for step by step version…

  1. In the Element or Type Properties box, select the Name of the material you want.
  2. Use Ctrl+C to copy the text.
  3. Go to the other Element or Type Properties box.
  4. In the appropriate material parameter location, select existing text with your cursor and then use Ctrl+V to paste the text.

Revit 2011 (Mental Ray) utilises all available CPU cores that the OS can ‘see.’  When multitasking, your PC may slow to a crawl after a render begins.  You can limit the amount of CPU time that the Render process sees by either:

  1. Adjusting the ‘Affinity’ to limit the amount of cores the render process can access (using Task Manager).
  2. Adjusting the ‘Priority’ to Low to allow other processes to have more overall CPU time.

Simply open Task Manager (Ctrl+Shift+Esc) and then right-click on the render process (fbxooprender2.exe).  You can now adjust the Affinity and Priority.

Video below:

Here is a brief how-to on creating a large, high resolution rendered Revit walkthrough (or sun study) and then subsequently compressing and uploading it to Youtube.

  1. Setup your walkthrough view.
  2. In Revit, Export – Walkthrough and divide the total frame count of the animation into parts that have a manageable number of frames (I recommend 100).
  3. Do this for each part of the Walkthrough (ie. create files with frames 1-100.avi, then 101-200.avi, 201-300.avi etc). Use ‘Full Frames (uncompressed)’ when creating these parts.
  4. Use VirtualDub to join the parts together. In VirtualDub, open the first part. Press Ctrl-Right arrow (this takes you to the end of the file), then go File – Append AVI Segment… and choose the next part. Do this however many times is need to append all parts to the original file.
  5. In VirtualDub, go to Video – Compression and I recommend using the ‘Cinepak Codec by Radius’ if you have it. Quality = 100.
  6. In VirtualDub, go to Audio and choose ‘No Audio’
  7. Choose Video – Full Processing Mode
  8. Now go File – Save as AVI and create your combined and partly compressed AVI file.
  9. Open Windows Movie Maker. Import the combined file into the collections.
  10. Drag the file into the storyboard at the bottom.
  11. Go to File – Publish Movie. Choose ‘This computer’ and click Next. Choose a filename and location and click Next.
  12. I recommend choosing ‘Best quality for playback on my computer’. This should reduce the file to a manageable size.
  13. Now, open your browser and login to your Youtube account. Choose ‘Upload’.
  14. Select the compressed video you have created, and upload it. This may take a while, so just wait patiently (or do some other work!)
  15. Once uploaded, you can now share the link code with Clients or others who may like to view the animation.

Below is an example of a 1000 frame rendered animation we recently produced at Dimond Architects. It started out at about 1.2 gb, then VirtualDub compressed it to around 225 mb, then Movie Maker compressed it to about 20 mb.It took about a week for one workstation to produce this:

Feel free to share links to any files you upload to Youtube by commenting on this blog post.

Update: check out this page for the 64-bit Xvid codec

I encountered a problem today related to walkthrough creation in Revit 2010 64 bit with Vista 64 bit. I was exporting a large walkthrough to uncompressed AVI format, and the file size would reach 4.00 GB (4,294,967,296 bytes), and then corruption of the AVI would result. It appears that a 4 GB limit was being imposed at some point in the walkthrough creation process.

Therefore, I tried to use an encoding format. When using Revit 32 bit, I recall that I had a number of options in the Video Compression ‘codec’ dialog when exporting a walkthrough. However, in Revit 64 bit, I only had a couple of basic options (Microsoft Video 1, Intel IYUV Codec, Full Frames (uncompressed)).

After some searching, and trialling a few different ideas, I found that I could access some decent codecs in this box after installing Shark007’s 64 bit components (link below).

64 bit Encoding Components

In addition to the above, it is recommended that you install Shark007’s 32 bit Codec Pack (link below):
Vista Codec Package 5.5.3 Final

After installing both of the above and restarting Revit (you may also need to restart Windows), I was intermittently able to access an additional filter in the dialog called ‘ffdshow’ – clicking ‘Configure’ opened up a whole range of encoding formats for use!However, there appear to be a few problems:

  1. The ‘ffdshow Video Codec’ encoder only appeared in the Video Compression dialog when a certain ‘Size Crop’ and resolution were selected. For me, the only settings that consistently seemed to work were: Size Crop width = 150 mm, and export resolution 886 x 500.
  2. The corruption still seemed to result if the uncompressed AVI format would have exceed 4 GB (even while using a compressed codec).
  3. Choosing H264 actually crashed Revit.
  4. WMV 8 using libavcodec simply did not proceed past the first frame.

Given the above limitations, my solution at this point is:

  1. Split the walkthrough into parts that have a size less than 4 GB (ie. part 1 = frames 1 to 100, part 2 = frames 101 to 200 etc) and use FULL FRAMES (UNCOMPRESSED) AVI format.
  2. Use VirtualDubMod to ‘append’ these segments together, and
  3. Use VirtualDubMod to ‘Save As…’ a different format. I was able to choose ‘Cinepak’ compression in VirtualDubMod, which turned my approx 5.4 GB uncompressed AVI into a 167 MB file in only about 5 mins of processing time.

After spending quite a few hours trying to make this work in a satisfactory and simple manner, I decided to contact our reseller and lodge a support call. I will let you know if I learn anything helpful.During this investigation, I tried a few things without success. They may be of interest to you (see links below).

Windows Media Encoder 64 bit

Xvid 64 bit

x264 64 bit