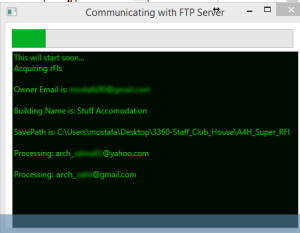
Moustafa Khalil has freely released an Android app and a Revit listener addin that essentially accomplishes a site-to-Revit connection for RFI input into Revit. Essentially, you install the Revit addin, setup the FTP connection, login on the Android app and then take some pictures of RFIs from site. You then add some comments and data to the photo submission, and this is automatically captured into Revit through the FTP site and Revit addin.

Its an interesting approach to this problem. Amazing what someone can accomplish when they think a little outside the box and connect a few different technologies. Nice work.

connecting-to-server3-8900198

Download links from Moustafa:
I have uploaded the two applications Mobile and Revit on these 2 sites:
Mobile app: http://a360.co/1yZfNDb
Revit APP: http://a360.co/1vWKFhW

2014-10-11-07-16-05-33777692014-10-11-07-17-04-78177842014-10-11-07-17-43-4617660
via SUPER RFI | Architecture For Humanity

Basically, you overlay a 3D view over an image placed on a Sheet to allow you to see the photo background while you match the view.

Step-by-step:

  1. Make a new 3D view from approximate eye location to approximate eye target (centre of photo)
  2. New Sheet
  3. Drop the photo (image file) be matched on the sheet and size it to suit
  4. Add the 3D view on the sheet on top of the photo – Turn off Background and Set to Hidden Line, Transparency 40%, Edges Off.
  5. Roughly scale 3D view using the view border Size Crop in the X dimension (Width) to match some known points in the middle photo
  6. Drag the crop edges of the view to match the photo (this accounts for some of the “warping” / perspective)
  7. Use Focal Length on the Steering Wheel to try to match vanishing lines, somewhere in the middle of the photo
  8. Zoom and Pan a bit – use Temporary Hide/Isolate to select a couple of objects and use these to do most of the View orientation adjustments
  9. Use Orbit for final fine tuning – you can drop the Centre point, then Rewind and it will remember that as the Orbit centroid.  Drop it on a known point and Orbit.  You can turn off Keep Scene Upright in Steering Wheel settings.  With a SpacePilot, just turn on all your axis and slowly and carefully match the view.

From here, you can use Render Settings and set the image as a background with “Stretch”.

Also, for each camera position you can have one 3D view set for “camera matching”, and one set up for rendering, and to align one to the other use ViewCube “Orient to View”.

Overall, it can still be a tricky process. The 3D mouse makes it much easier – you can basically just rotate, zoom, pan until it looks about right.  Remember to select a couple of “known” objects in the model, this will allow better control when using the 3D mouse…

There are other more geometric methods available for Camera Matching too:
What Revit Wants: How to match a Revit 3D view to a real life Camera Photo

Here’s one that has been sitting in my draft posts for a while…

Basically, its an example of what you can do by overlaying views on Sheets.  In this case, I have used a Drafting View with an imported Image, as a background to a 3D Camera View.  As this was an alteration job on an existing dwelling, I was able to essentially ‘line up’ my Revit Camera with the physical camera location.  After a bit of tweaking, I had basically matched the Camera to the Photo.

Then, its simply a matter of putting the 3D View on top of the Drafting View on a Sheet.

Now you have a photo background to a live 3D view – you don’t have to re-render to see the changes to your building.  You can use various visual styles like Shaded or even Realistic.  I hope some of you find this technique useful!

I rarely advertise for paid programs.  In this case, the program is still useful in Trial mode, so I’ll make an exception.

Basically, download the trial and install it.  Then open Help and go to Geometric rectification.  Follow the steps and guess what?  You can use a single photo of a building as a scaled, rectified background to help you model an existing elevation.

Unlike Photofly / 123D Catch, you don’t need a stack of images to make this happen, just one.

You can then use Export button to export a DXF file with a PNG linked in – all at the correct scale.  To bring this into Revit, I just drafted some lines in AutoCAD around the image frame in the DXF and exported those 4 lines to a DWG.  This was linked / imported into a Revit view.  Then, I placed the PNG in the same Revit view and used the 4 lines to scale the image appropriately.

The only real caveat with the Trial version is that it watermarks the image severely – but if you just want to use it as a reference, it is fine.

Download link:
Download

Company site:
Perspective Rectifier

I’m sure many of you are very experienced Photoshop users, so I won’t bore you with too much detail.  There are just two things I wanted to mention:

  1. If you have a photo that was taken in less-than-perfect light, try the Image – Adjustments – Shadow/Highlight tool.  Some experimentation with this adjustment can yield very good results.
  2. One principle of Architectural Photography is that of Straight Verticals.  If you have an image that has warped verticals due to perspective, you can use the Filter – Distort – Lens Correction tool in Photoshop.

Here is an example:

Original Photograph
Adjusted Shadow / Highlight and Lens Correction

For more photography and composition principles, check out AB4061 Is That a Photograph? Architectural Photography for 3D Rendering