Have you tried Showcase yet?

Like Shades of Grey, I’m relatively excited about Showcase:
One of my brightest hopes for Revit 2013 is Showcase, which is a totally separate application.  Could this finally be the viewer that works ?  I’ve tried Design Review & Navis Works Freedom,  Quicktime FBX plugin, Tekla Bimsight … People are doing clever things with Game Engines, but I need a quick and easy way of bringing a lightweight export from the model into meetings.  
via
Shades of Grey: BROAD BRUSH & FINE DETAIL

Evidently, you need a pretty decent system to make everything smooth, as Neil Thompson says
@jrostar it eats ram more than revit on full render.

A few links:
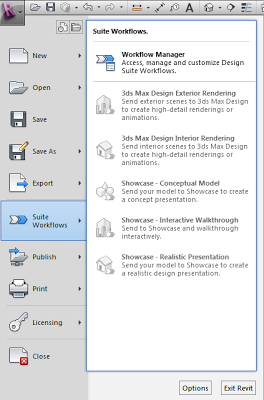
Suites Workflow Manager – WikiHelp

Revit Workflows in the Autodesk Building Design Suite – WikiHelp

Installation notes:

I really tried to get Showcase working without installing the whole Building Design Suite, but I haven’t figured it out yet! Here are some of the steps I tried:

  1. Install Revit, Showcase and Max (separate downloads, not from BDS media)
  2. Activate all products using a Suite license
  3. Extract the folder WorkflowInstaller from your extracted Suite archive – Content subfolder.
  4. Close all Autodesk programs
  5. Run the file AutodeskBuildingDesignSuiteWorkflows.msi from the appropriate subfolder (x64 or x86)
  6. Open Revit – Suite Workflows still not visible 🙁

Direct download Showcase 2013 (use this method):
http://trial.autodesk.com/SWDLDDLM/2013/SHOWCASE/ESD/Autodesk_Showcase_2013_Multilingual_Win_64bit.exe

Direct download 3dsMaxDesign 2013 (use this method):
http://trial.autodesk.com/SWDLDDLM/2013/MAXDES/ESD/Autodesk_3ds_Max_Design_2013_EFGKJS_Win_64bit.exe
http://trial.autodesk.com/SWDLDDLM/2013/MAXDES/ESD/Autodesk_3ds_Max_Design_2013_EFGKJS_Win_32bit.exe

AutoCAD Design Suite Standard 2013
http://trial.autodesk.com/SWDLDDLM/2013/DSSTD/ESD/AutoCAD_Design_Suite_Standard_2013_English_Win_32bit.part1.exe
http://trial.autodesk.com/SWDLDDLM/2013/DSSTD/ESD/AutoCAD_Design_Suite_Standard_2013_English_Win_32bit.part2.rar

Some notes about Workflows:

Need to install 3dsMax to make it work:
Revit Workflows in the Autodesk Building Design Suite – WikiHelp

Install Workflows – WikiHelp
BDSP 2013extContentWorkflowInstallerx64
“C:ProgramDataAutodeskWorkflowsProducts.xml”

What is Autodesk DirectConnect? – WikiHelp

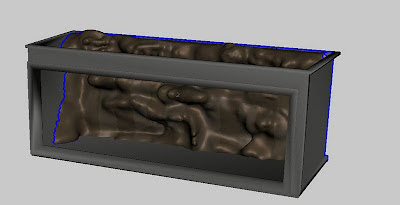
I was speaking to CJ from Crossley Architects yesterday.  He said that he had been experimenting with creating freeform rocks in Meshmixer and bringing them into Revit.  Here is an example of what he has produced:

 As part of his workflow, he first of all used the STL Exporter add-in to export the fishtank context from Revit.  This ensures that sculpting work is done in a way that can be accurately scaled and proportioned.

After importing the STL context into Meshmixer:

  1. Bring a plane object (Import Plane) into Meshmixer and transform it to suit the tank wall that is to be sculpted.
  2. Do the freeform modelling in Meshmixer.
  3. Export to 3ds Max (see previous post).  Holes may need to be capped.
  4. Go from 3ds Max to a SAT file into a Revit family.

I’m glad to see that the Meshmixer organic workflow is getting some real-world Revit use!

Here is my previous post on Meshmixer:
What Revit Wants: Freeform and organic modelling from MeshMixer to 3ds Max to Revit

Updated links: https://www.autodesk.com/developer-network/platform-technologies/fbx-converter-archives

Windows

Mac

Autodesk have provided a bunch of handy FBX converters and plugins at this link.

The goal of FBX is to “constantly and significantly improve interoperability between Autodesk products and other Digital content creation (DCC) software packages.” http://en.wikipedia.org/wiki/FBX

Transfer files from one file format to another quickly and easily with the FBX Converter. This utility enables you to convert OBJ, DXF™, DAE, and 3DS files to or from multiple versions of the FBX format. New tools are now available with the FBX Converter 2012.1. You can view FBX animation files in real time with the FBX Viewer, explore and compare FBX file contents with the FBX Explorer, and manage animation takes with the FBX Take Manager.

Mac *

FBX 2012.2 Converter for Mac (tgz – 33931Kb)

via
Autodesk – Autodesk FBX – FBX Plug-Ins, Converter, and QuickTime Viewer Downloads

Here is a quick video of me converting a OBJ to FBX using the above tool.  In the video I also use the FBXIMPORT command to bring the FBX into AutoCAD.  From there, you could save as DWG and bring into Revit:

PS – This still doesn’t quite solve the Mesh to Solid conversion problem … I am currently experimenting with MESHSMOOTH and CONVTOSOLID.

EDIT:
Here is a vid showing Revit to 3dsMax via FBX.

I’ll admit it – I’m a bit excited about MeshMixer.  I downloaded it today and was very pleased at how easy it is to sculpt things.  A few years back, we worked on an aquarium project with another architect, and it was suggested that it would be great if Revit could generate freeform rock formations that looked realistic.  At the time, I played with Blender and a little add-on called ‘Blender World Forge’.

However, I think MeshMixer can also do the job.  After installing the program I was very surprised that it is actually called Autodesk meshmixer – anyone tell me what is going on here?

Anyway, to see me create some organic-looking rocks and bring them into Revit, check out the video:

Basically, this was my workflow:

  1. Install MeshMixer
  2. Open it, grab a Sphere, do some sculpting.
    (EDIT: You can probably skip steps 3,4 and 6 if you use the built-in Export feature on the File menu… let me know if it works for you.)
  3. Create a part out of the sculpted form you made
  4. Save the project, and find the part OBJ file at
    C:UsersusernameDocumentsmeshmixerlibrariesdefault
  5. Import that into 3D Max
  6. Cap the holes in the mesh
  7. Export to SAT
  8. Import into Revit family, adjust materials.
  9. Load into Project.

Here is the download link again:
MeshMixer

Heads-up via http://labs.blogs.com/its_alive_in_the_lab/2012/03/software-makes-me-look-20-years-younger.html

EDIT Keep in mind that if you import an SKP directly into Revit, it will create materials for each shading material as “Render Material xx-yy-zz” in the Material Library.  You can check which is which by looking at the colour on the Graphics tab, but you will need to manually map Render Appearances from here.

Also, remember that you can save all related material resources if you go via 3dsMax.
There have been many posts about how you can control Sketchup materials in Revit using Object Styles.  However, this relies on the existence of different layers for each distinct material in the original file.  If you have an SKP file and would like to create the layers you need (without using Sketchup itself), you can use this method:

  1. Import Sketchup SKP file in to 3ds Max Design
  2. Export as FBX file
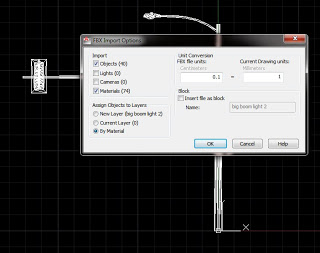
  3. Use Import command in AutoCAD, choose the FBX file – choose to have a layer for each material (Assign Objects to Layers – By Material)
  4. For some reason, I had to untick the Block option – otherwise the file would not import at all.
  5. Save the DWG file
  6. Import to Revit – you now have granular control over each Material / Layer combination through Object Styles…

Note – this method uses only Autodesk tools, it does not require Sketchup to be installed.  If I remember correctly, you can instruct Sketchup to export different layers for each material when exporting a DWG (?)

If you have an alternative way of doing this, feel free to comment.

Autodesk is offering a free upgrade to Autodesk Building Design Suite Premium.  I just got off the phone from our reseller (KarelCAD) and those who currently hold one of the Revit Suite subscription licenses (RAC Suite, RMEP Suite, RST Suite) qualify for this free upgrade.

According to our reseller, this is a limited time promotion for 2 months.

I’m unsure if it is going to be rolled out globally, or if it is just limited to Australia.

This is basically equivalent to Autodesk giving you a free copy of Autodesk® 3ds Max® Design to play with.

Here is the only catch – if you accept this free upgrade, your subscription cost will increase.  In our case, it will be an additional $375 (ex GST) per license per year.  In real terms, I guess it will take quite a few years of paying this increased subscription to actually ‘break even’ with how much it would have cost to buy 3ds Max outright.