Many Revit users will encourage you to convert your AutoCAD details into Revit details.

However, perhaps this isn’t a valid option for you (due to time constraints). You can find some good information on how to successfully link the AutoCAD details into Revit (some links below). In addition to these, I have found the following to be successful:

  1. In the Revit project, set up lineweights for you detail scale levels (1:5, 1:10 or similar) to equate to the lineweights you would use in AutoCAD.
  2. Setup your ‘Import Line Weights’ (Ribbon – Insert tab, Import panel, little ‘arrow’ for settings). Basically, this maps your AutoCAD colours to Revit lineweights.
  3. In the AutoCAD detail, use Multileaders if possible. In our case, this wasn’t an option (as Multileaders simply didn’t give enough graphic control for one of our architects). If you can’t use Multileaders, explode all MTEXT to DTEXT (this fixes problems with the MTEXT not wrapping correctly in Revit. If you need to come back and edit the text in AutoCAD, then use the Express Tool to convert the DTEXT back into MTEXT before editing. Convert all QLEADERS and LEADERS to MLEADERS with blank text boxes. The arrows didn’t work for us using LEADERS, but MLEADERS showed up fine in Revit. I did this manually – I set up a MLEADER style that didn’t have a landing or text, and then traced over the LEADER objects. I then deleted the original leader objects. So I was left with DTEXT and blank MLEADERS – this displays perfectly in Revit.
  4. Set up your detail DWG files such that there is ONE detail per DWG.
  5. Link into AutoCAD drafting views using ‘black and white’ for colours (the Import Line Weights takes care of the lineweight settings).
  6. In each drafting view, if you need greyscale or colour layers to be linked from AutoCAD, use the Revit Visibility/Graphics to override those layers to the original colour. (You could also do this in reverse – link layers with original colour, and override black layers to black…)

These were just a few things that made this process work for me. I encourage you to check out these links:http://forums.augi.com/showpost.php?p=829155&postcount=6Maximum number of linked files?Using AutoCAD details Best Practices

Check out the new Maintenance Update for AutoCAD 2010 at http://usa.autodesk.com/adsk/servlet/ps/dl/item?siteID=123112&id=13760520&linkID=9240618

Apparently,
Autodesk has recently released a maintenance update for your product. Errors similar to those you have encountered have been resolved and are part of this update. We recommend that you install this maintenance update to update your product, or contact your system administrator.

Well, I hope this fixes some of our issues with AutoCAD 2010!

Download AutoCAD (R) 2010 Product Update 1 26.215 MB
64 bit version
Readme (Learn more…)

Seriously, what is the point in accusing AutoCAD of all the world’s ills? Please, educate me…

We KNOW AutoCAD isn’t a BIM tool. We KNOW it can’t compete with Revit when it comes to holistic building documentation.

But then, Revit can’t compete with AutoCAD when it comes to many CAD tasks!

Bashing AutoCAD is like telling your grandpa he is no longer needed because you have a brother now. It’s just pointless (that is, unless you are trying to sell Revit to AutoCAD users…)

You wouldn’t be here without your grandpa, would you?

Autodesk Impression 3 has been readily available for some time now. But would you like to know how to turn your Revit drawings into ‘sketchy’ looking plans?

Its simple:
1) Install Autodesk Impression 3 from Subscription (or the trial from here)

2) Open your Revit project, and open the view that you want to make ‘sketchy’

3) Export the view to a DWG file. Ensure that it is a ‘single’ DWG – untick the ‘Xref views on sheets’

4) Open AutoCAD and open the file you just exported.

Now, we want to make a CTB from the PCP, so do the following:

5) In AutoCAD, type ‘STYLESMANAGER’ – this opens the location for all your CTB files.

6) Double click the ‘Add-A-Plot Style Table Wizard’ shortcut

7) Select ‘Use a PCP or PC2 file’ and hit Next 
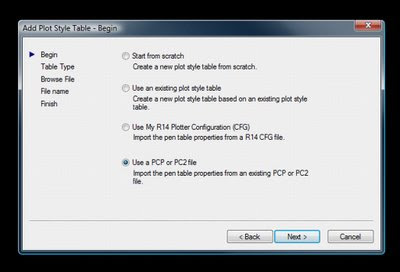
8) Select ‘Color-Dependent Plot Style Table’9) Browse for the PCP that Revit automatically created when you exported the DWG earlier and hit ‘Next’

10) Choose a filename for the new CTB file that you have createdOkay, now we go back to AutoCAD and export Impression. I found that the scaling was simpler direct from AutoCAD, rather than trying to put the DWG file straight into Impression.

11) In AutoCAD, you should still have the file open that you exported. Now, type ‘IMPRESSION’ and hit Enter.12) Under ‘What to Export’, choose ‘Layout1’
13) Choose your CTB under ‘Plot style table’14) I like the ‘Pen Wiggle Slight’ for ‘Stroke type’15) Hit ‘OK’ – Autodesk Impression will now open, and your file will look sketchy!!16) You could do more work in Impression, or you could just hit ‘File – Save As…’17) Choose PDF (if that’s what you like), then under Resolution, choose ‘Custom’ and type 300 dpi if you want decent quality. Type your File Name and hit OK.There you go! It seems like a lot of steps, but once you have done it a couple of times, you will very quickly be able to convert your Revit floor plans into sketchy drawings for presentation!These can be very useful early in the design process – if your drawings look ‘sketchy’, the Client may feel like you haven’t resolved everything without consulting them. Therefore, the Client may feel that you care more about them and their ideas.

Check out this link for some examples.