Autodesk Impression 3 has been readily available for some time now. But would you like to know how to turn your Revit drawings into ‘sketchy’ looking plans?
Its simple: 1) Install Autodesk Impression 3 from Subscription (or the trial from here)
2) Open your Revit project, and open the view that you want to make ‘sketchy’
3) Export the view to a DWG file. Ensure that it is a ‘single’ DWG – untick the ‘Xref views on sheets’
4) Open AutoCAD and open the file you just exported.
Now, we want to make a CTB from the PCP, so do the following:
5) In AutoCAD, type ‘STYLESMANAGER’ – this opens the location for all your CTB files.
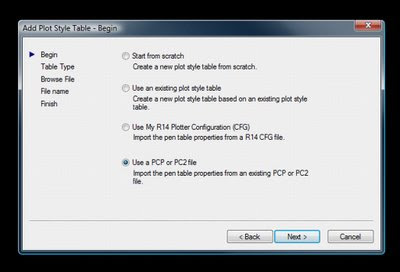
6) Double click the ‘Add-A-Plot Style Table Wizard’ shortcut
7) Select ‘Use a PCP or PC2 file’ and hit Next 8) Select ‘Color-Dependent Plot Style Table’9) Browse for the PCP that Revit automatically created when you exported the DWG earlier and hit ‘Next’
10) Choose a filename for the new CTB file that you have createdOkay, now we go back to AutoCAD and export Impression. I found that the scaling was simpler direct from AutoCAD, rather than trying to put the DWG file straight into Impression.
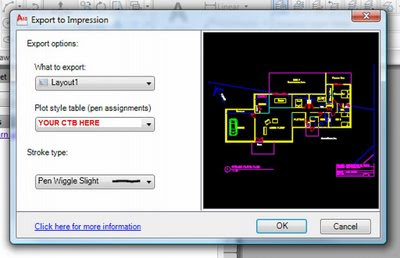
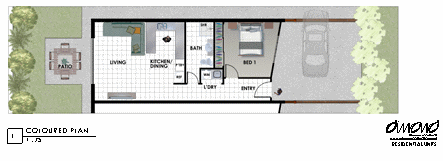
11) In AutoCAD, you should still have the file open that you exported. Now, type ‘IMPRESSION’ and hit Enter.12) Under ‘What to Export’, choose ‘Layout1’ 13) Choose your CTB under ‘Plot style table’14) I like the ‘Pen Wiggle Slight’ for ‘Stroke type’15) Hit ‘OK’ – Autodesk Impression will now open, and your file will look sketchy!!16) You could do more work in Impression, or you could just hit ‘File – Save As…’17) Choose PDF (if that’s what you like), then under Resolution, choose ‘Custom’ and type 300 dpi if you want decent quality. Type your File Name and hit OK.There you go! It seems like a lot of steps, but once you have done it a couple of times, you will very quickly be able to convert your Revit floor plans into sketchy drawings for presentation!These can be very useful early in the design process – if your drawings look ‘sketchy’, the Client may feel like you haven’t resolved everything without consulting them. Therefore, the Client may feel that you care more about them and their ideas.
 8) Select ‘Color-Dependent Plot Style Table’9) Browse for the PCP that Revit automatically created when you exported the DWG earlier and hit ‘Next’