Check out the solution suggested by Andreas Dieckmann:

“I ended up using one of Python’s abilities to handle lists which is called groupby() because I did not want my head to hurt thinking about how to go about this in Dynamo… 😉
Here’s how:
  1. Sort list by X values using the method Steve explains above
  2. Sort list by Z values 
    (Notice that within each group of equal Z values, the X values retain their order from the previous sort operation)
  3. Create a list of lists with XYZ values (sublist 0) and just Z values (sublist 1)
  4. Group that list of lists by the Z values (using a custom node with some Python code inside)
  5. Extract only the list of lists of XYZs by combining two map nodes
You will need the package Group List of Lists By Key for this to work.
(For what it’s worth, I also uploaded another package called Sort List Of Lists this week which was related to that project but isn’t needed here. But it might be worth checking out, too.)”

Heads-up:
https://twitter.com/Jbenoit44/status/420673580838293504

Not all actions will be available in all circumstances…

When performing a coordination review, you can specify how to handle each change in the current project. To specify an action for a change, click in the Action column and select an action from the drop-down list. The available action values vary depending on the type of change.
Note: Actions that result in changes affect the current project only. They do not change a linked model.
Postpone/Do nothing: Take no action. This value leaves the change to be addressed at a later time.
Reject: Select this action to indicate that the change made to the element in the project is incorrect. Instead, a change must be made to the associated monitored element in the linked model.
Accept difference: Select this action to indicate that the change made to the monitored element is acceptable, and to update the relationship without changing the corresponding element. For example, suppose 2 monitored grid lines are 200 mm apart, and one is moved to 300 mm away. When you select Accept difference, the monitored grid lines are not moved, and the relationship is updated to 300 mm.
Modify: A grid line or wall centerline has changed or moved. Select Modify to apply this change to the corresponding element in the current project.
Rename: The name of a monitored element has changed. Select Rename to apply this change to the corresponding element in the current project.
Move: A monitored element has moved. Select Move to apply this change to the corresponding element in the current project.
Move Fixture in Host to Position of Fixture in Link: A monitored fixture has moved. Select this action to move a fixture in the host model to the location of the fixture in the linked model. This action only works for fixtures that are not hosted. If the fixture in the host model has been hosted on a surface using the Pick New Host tool, then selecting this action will display a Fixture is Hosted warning message.
Ignore new elements: A new hosted element was added to a monitored wall or floor. Select this action to ignore the new element in the host. It will not be monitored for changes.
Copy new elements: A new hosted element was added to a monitored wall or floor. Select this action to add the new element to the host, and monitor it for changes.
Delete element: A monitored element has been deleted. Select this action to delete the corresponding element in the current project.
Copy Sketch: The sketch or boundary of a monitored opening has changed. Select this action to change the corresponding opening in the current project.


Update extents: The extents of a monitored element have changed. Select this action to change the corresponding element in the current project.

via
http://help.autodesk.com/view/RVT/2014/ENU/?guid=GUID-2593470B-FBC9-49CC-9962-664D508B2B91
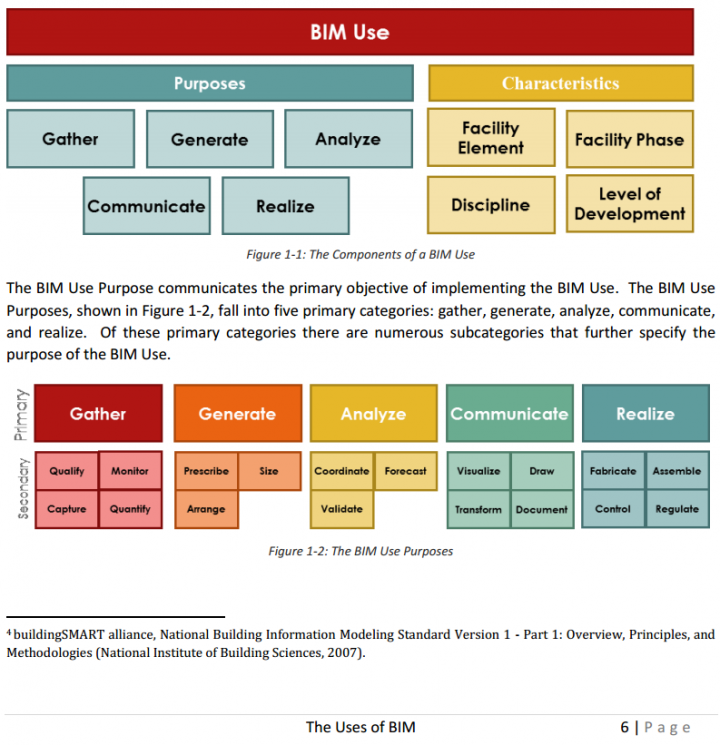
 John Flanagan details an interesting concept in a recent post – he shows how you can use a Basic Wall with two Glazing layers separated by a core layer to essentially model double glazing systems.

You then simply add this Basic Wall to a Curtain Wall type as the applied Panel.  Great idea!

Read the whole post at:
Create a Curtain Wall type with double-glazed pane – Blog – CADline Community

Link is dead so I have resurrected the content from archive:

I’ve always felt that the Floor tool in Scan to BIM is a bit lacking – rather than analysing and deforming an existing Floor element, I want it to work like the Topo tool (just select a bunch of points and decimate).

Well, now it can (sort of).  Like this:

  1. Use the Scan to BIM topo tool to make temporary topo “Floors”
  2. Then use the Topo to Shape Edited floor macro from Boost Your BIM

Sometimes, What Revit needs is for you to put two workflows together to solve a problem in the most efficient way…

Had an interesting challenge this week – we needed to restore some 20 year old CAD files from archive.  Turns out we had no viable way to restore them from the physical tape, but we could get the old workstation going.  In this case, it was a SPARCStation 5 which runs a UNIX derivative called SunOS.  On top of that was a window manager called Open Windows 3, and it had a somewhat proprietary CAD system called Sun Eagle installed.  The main file format was a *.mod.

There were a few challenges: we didn’t know the root password, so I couldn’t modify any system settings (IP / network etc) on the workstation.  Additionally, it obviously did not have a USB port, so copying any of the data off was going to be challenging.  It did have an external SCSI drive (1gb I think) daisy chained with the 150 mb QIC tape backup drive.

I tried connecting these SCSI devices to a modern system using a PCI to SCSI card.  While I could get the basic devices to be recognized, I couldn’t get the UFS file system to mount in Linux Mint.

The solution?  As the SunOS was running Samba / smb, I needed to get LAN access to it to copy the files.  But I couldn’t change the IP or subnet… In fact, I couldn’t even run IFCONFIG (the UNIX program for setting IP etc) easily, because I wasn’t a root user.  I could copy the IFCONFIG executable to the home directory and run it in a console from there.  This gave me the current IP and subnet.

Then, I connected my netbook running Linux Mint to a network switch, and connected the SPARC system to the switch also.  I manually edited the IP for the LAN adapter on the Linux system to match the same IP range and subnet – and the shared folders from the SunOS workstation appeared almost instantly.  I could then copy the project files from the old system to the Linux one.

Happily, someone had already converted this particular project to DXF and DWG files on the SPARCstation, so the end result?  Success!

Here is the system:

And my ad hoc network to copy the files:

Paolo has “managed to complete tools for conversion from internal units and metric (meters, centimeters and millimeters) for lengths, areas and volumes (LAV).”

Download these and put them in C:AutodeskDynamoCoredefinitions
https://docs.google.com/file/d/0B_gxi8GkU4FEelNHQkpVQ1hIOTQ/edit

Original post:
http://puntorevit.blogspot.com.au/2014/01/dynamo-metric-lav.html

We have come across a slightly annoying issue: someone modifies a Linked DWG file in AutoCAD, and upon reloading in Revit, the Import Scale will have been somehow automatically and incorrectly set to some Imperial conversion factor.

The fix is relatively simple – just reset the Import Units and Scale Factor to correct settings:

The cause of this particular seems to be that some users are modifying DWGs in versions of AutoCAD and saving them in newer formats than Revit can understand.  In this case, Revit 2012 was not impressed with 2013 DWG files from AutoCAD 2014…  If the AutoCAD Options Dialog, Open and Save was set to save as an older DWG version (like 2004), there was no problem.  However, if the file was saved to 2013 version, this would trigger various errors from Revit 2012 when trying to reload it.

In the course of this change (including messages about “Do you want to import from Paper Space” etc), Revit 2012 basically modified the Scale of the DWG.  The trigger point for this could actually be when you try re-linking the DWG, because it seems to have “disappeared” after the version problem.  When finally resaving the dwg to an older version and reloading to fix the scaling problem (often associated with a fatal error / crash), the Scale would probably have to be reset as detailed above.

This PDF may be useful:
http://communities.autodesk.com/india/sites/default/files/india/resources/Acad-imports-issues.pdf

Read about it on the Help page:
http://help.autodesk.com/view/ADSKFD/ENU/?guid=GUID-C5218E9E-5122-4720-B62D-A968F96A7D02

From Labs blog:
updated version of Falcon with an improved user interface for the stand-alone version (PC and Mac) and some upgrades inside Inventor and Revit.

Here are the features honed by the Autodesk Labs community:

  • 64-bit solver process with greater access to memory
  • Expanded graphics card and driver support
  • Voxel size and overall tunnel size information
  • Solution status indicator
  • Ability to key-in specific values for velocity, resolution, orientation, etc.
  • Expanded CAD imports (ipt, iam, sldprt, prt, x_t, STEP, etc.)
  • Ribbon-style controls, standard menus, and model navigation cube
  • Color banding and contour display options
  • Revised tunnel and flow line seed box size controls
  • Improved video recording controls and feedback
  • Simplified iso-surface controls
  • Saved run configurations for fast recall of past runs
  • Multi-axis wind tunnel orientation control inside Inventor
  • Pressure shading on building surfaces inside Revit
  • Wind velocity profile option inside Revit”

PDF download:
http://labs-download.autodesk.com/us/labs/trials/worldwide/AutodeskFlowDesignInformationBrief01132014-2.pdf

Read more:
Project Falcon graduates from Autodesk Labs to Autodesk Flow Design – It is Alive in the Lab

I don’t think the API programmers should get scared just yet, but is there a day coming when visual programming will completely replace custom code?  Julien seems to think so:

“I firmly believe Dynamo could be used for many many purposes, and addin-like behavior is one…
Definitions are easy to share and update. Users can tune them with only some basic Dynamo skill. It is not the same with addins. It is a lot of work to manage and deploy. And users will not be able to tune things. Same thing for macros.”

Read more:
API or not API: addins vs Dynamo in Revit | AEC, you and me.

Heads-up: https://twitter.com/Jbenoit44/status/414322858823659520