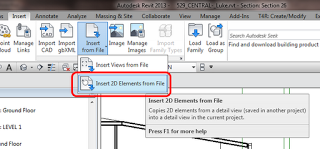
So if you want to copy annotation and detail elements from one Plan View to another (without having to fiddle around with filtering of selections etc), just go to:
Then, browse to the currently opened file, select it, and then select the source view. Click to place. Done.
Also very cool:
● this command has intelligence with regard to Detail lines vs Model lines! Even though the Filter command cannot tell you if a line is Detail or Model, this Insert 2D Elements command will only bring detail lines
● running this command places the items onto the Clipboard as well. In certain situations, you can use the Paste Aligned command (such as between aligned Plan Views) AFTER you have finished placing the first instance of the 2D elements …
To be quite honest, I haven’t really used the new 2013 features for Railings, perhaps because my recent work has been more on a master planning level rather than construction documentation. In any case, there are plenty of resources out there to get you started.
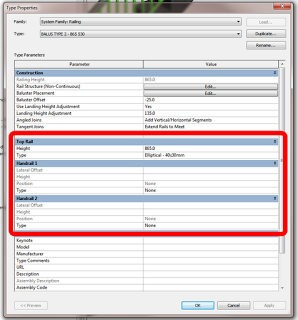
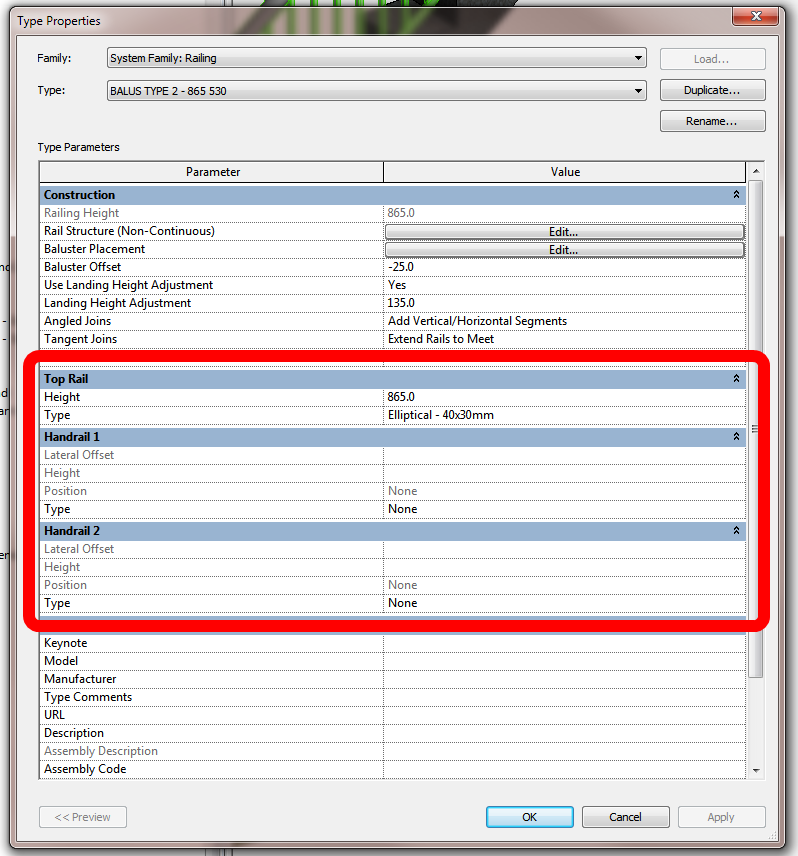
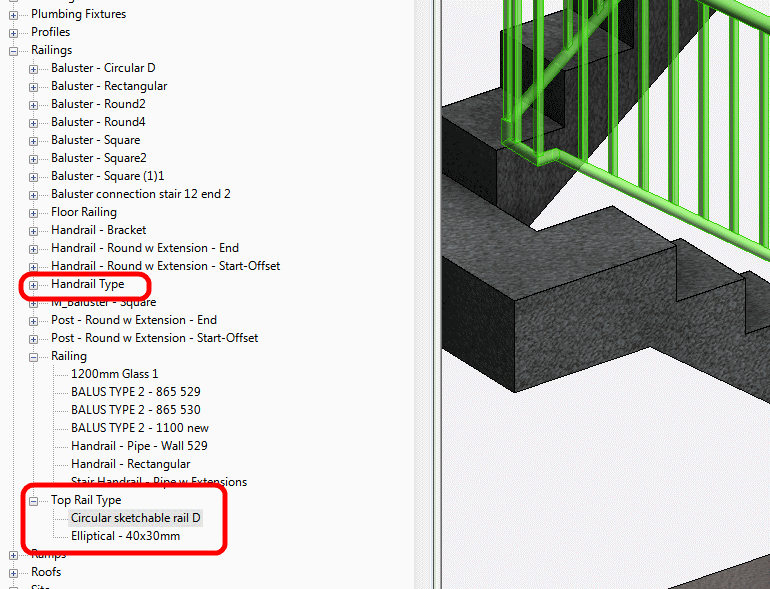
Here is a quick crash course – in the Type Properties for Railings in Revit 2013, you will see new options for ‘Top Rail’, ‘Handrail 1’ and ‘Handrail 2’. You can set the Type and Height of these.
To make new Types, go to the Project Browser under Families -> Railings and you will see nodes for Handrail Type and Top Rail Type. Duplicate and edit the type definitions you see here to make new 2013 ‘continuous’ railing types.
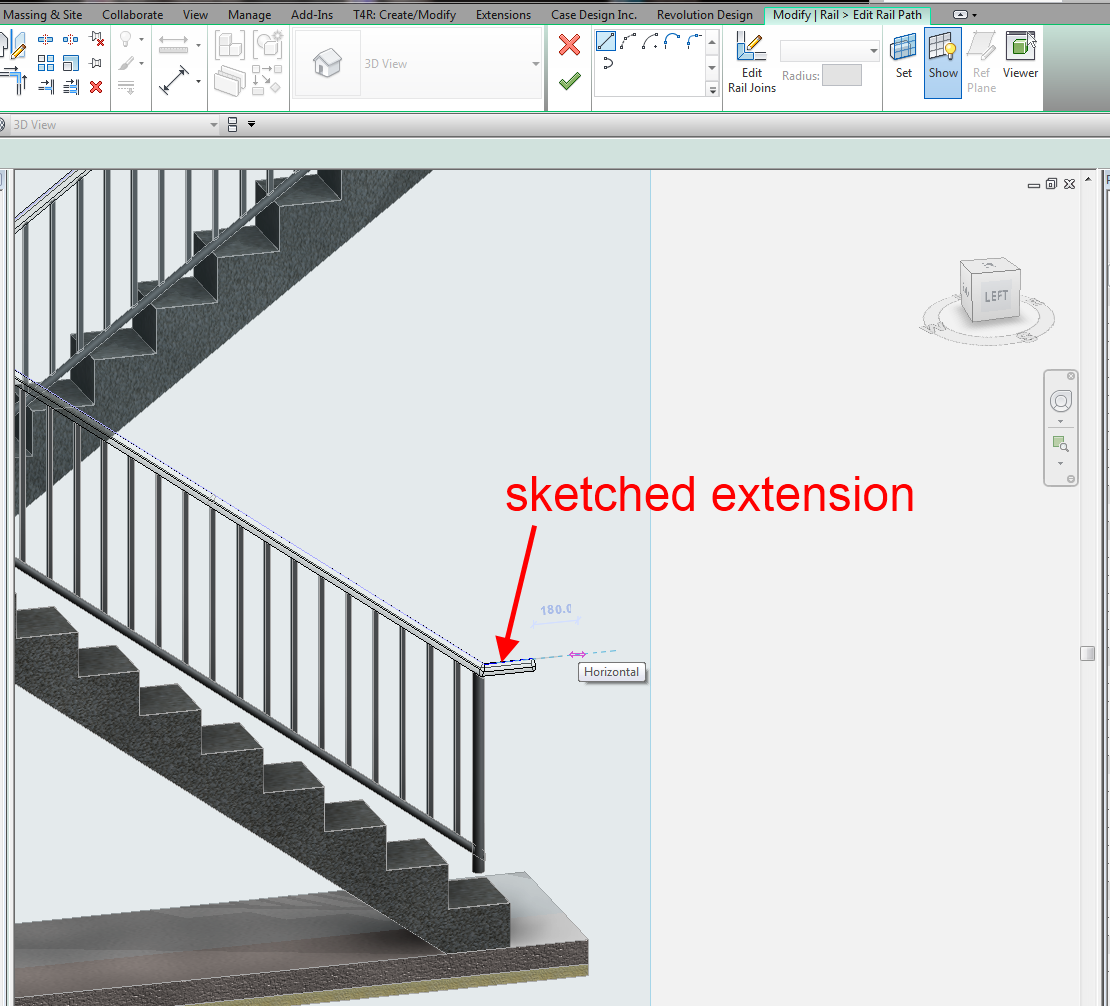
Once you have applied a Top Rail Type to a Railing Type definition, you can now Tab to select the Top Rail! It is basically separating the Top Rail out as a component so that you can perform advanced edits to it. From here, you can access the real awesomeness of Revit 2013 Railings – a sketch mode to extend and adjust the Railing …
Click Edit Rail and you are in business. It will look something like this:
So, if you haven’t used this feature in the past 7 months, hopefully this post will help you get started with it.
I also found the audio interview linked below quite insightful. It describes the reason railings are undergoing upgrade, including the requirement of railing extensions for accessibility. For me, this has probably caused the most pain with regard to railings in pre-2013 versions.
Also, this interview gives the following ‘insight’ into Revit 2014 and future versions: Railing features would be upgraded over several Revit releases
Railings: Hear Jean Foster, Senior Interaction Designer, speak about railing enhancements. Jean describes how the top rail and hand rail elements have been changed to better accommodate continuous conditions. She explains how additional controls allow you to add extensions and different types of extensions to a railing, and how making components within the railing system makes the system more flexible as a whole.
Something you might have noticed about What Revit Wants is that there is no ad banner and no Donate button. However, I really do enjoy hearing and responding to your comments – so if you have something to say, please feel free to use the comments box below every post.
Here’s a thought to start your Monday with: A license of Revit is just like a ticket on a plane. You have to use it to get anywhere. The final destination? BIM excellence.
If the UDP functionality is necessary, enable the RDP Transport policy, and then set the value to Use both TCP and UDP. The setting for the RDP Transport policy is under the following node:
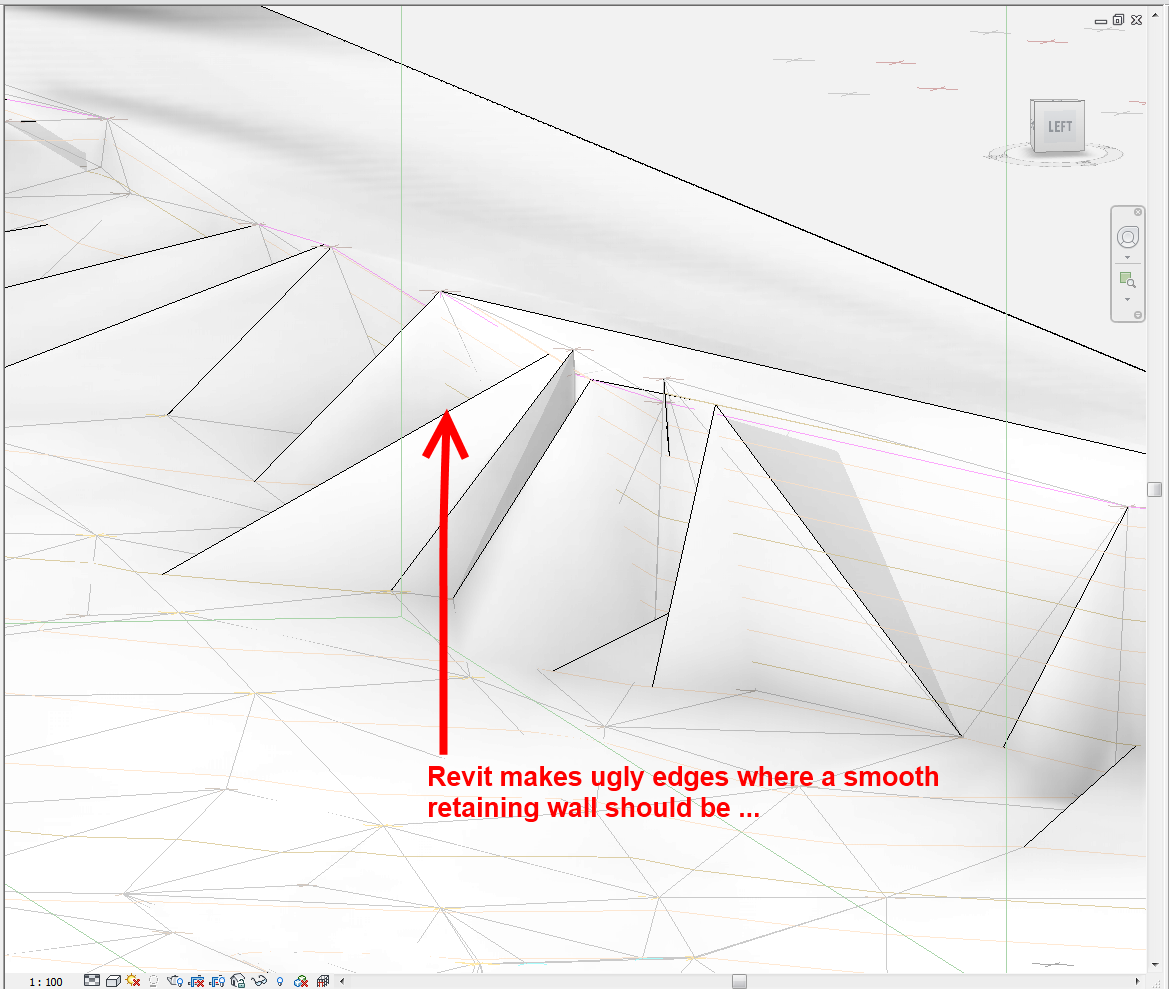
You receive a DWG file from a surveyor, and you need to get it into Revit. You go through all the usual cleanup steps. You have purged, scaled, done a write-block, audited. You link the DWG into Revit, create the topo – and it looks like rubbish.
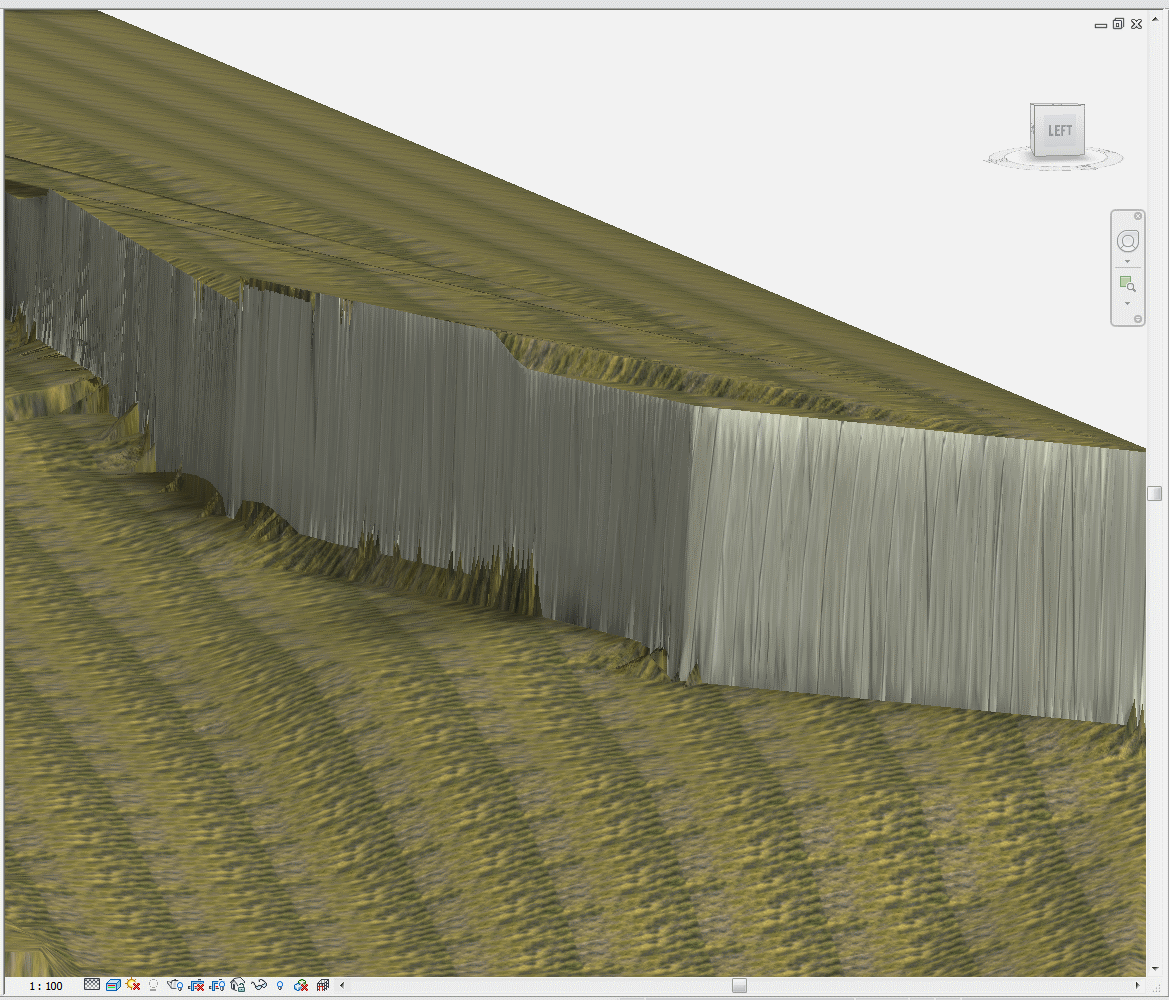
If your survey data has some severe gradient, perhaps relating to a steep retaining wall on the site, you may find that Revit does not model it ‘smoothly’. Here is an example
The problem is likely related to Revit’s triangulation method for topo surfaces. You get weird flat surfaces where things should look much smoother and more organic.
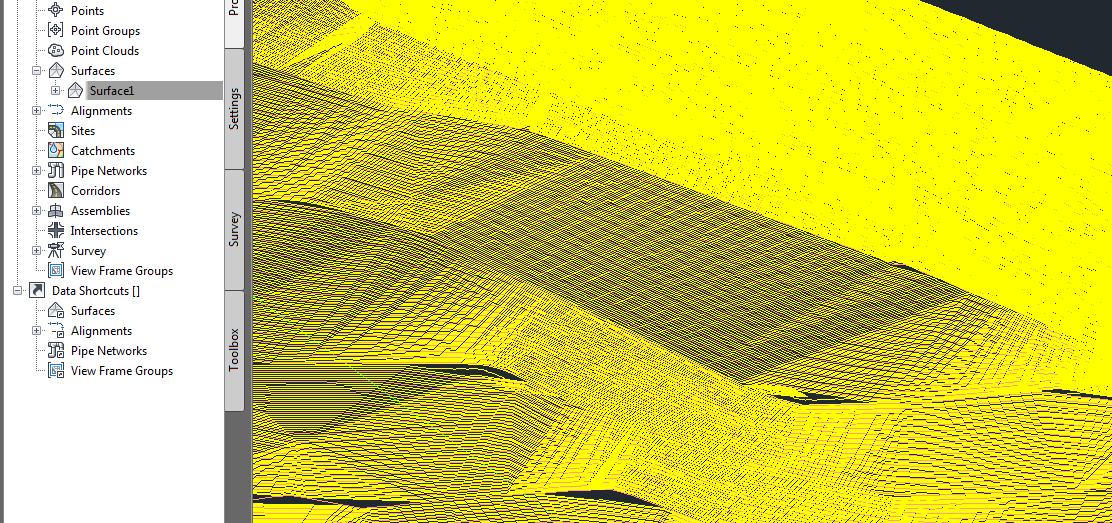
Here is a quick workflow that I have used to add some realism to a survey DWG without sacrificing accuracy (note – this method uses AutoCAD Civil3D, you can download a trial):
Open the survey DWG in Civil3D
Create a new Surface (Right click Surface in the Toolspace – Create Surface…)
Add the objects to surface (can be easier to isolate the necessary layers first). To do this, expand the Surface node, then the Definition node, then select the Drawing Objects entry. Right-click and choose Add… You may want to add Contours separately using the Contours node.
Edit Surface Style
Contours – Contour Interval. Change contour interval to something very small – I find 10mm works well
Turn on the Contour layers for the Surface in: Surface Style, Display. Also, set a new Layer to be the ‘layer’ for the Surface Contours (major and minor)
Extract the newly created contour objects (select the TIN Surface and click ‘Extract Objects’). To make my site look better in Revit, I actually had to export the Triangles as well.
Select the extracted Contours / Triangles and save them out to a new DWG file (you can use write-block or the inbuilt Export command in C3D). You will need to take some geometry from the source file (like boundaries) so that you can locate these new contours in your Revit model. Or keep them in the same file with the new layers you made in step 6.
Import this new ‘high resolution’ contour plan into Revit
Use these contours to make your topography (select only the appropriate layers when using Import Instance while creating Revit toposurface).
Lots of contours here – thanks Civil3D
The result? Something with a much more ‘organic’ appearance:
it will take a bit of processing power, both on the Civil3D side and on the Revit side
once you have your high resolution data in Revit, it will mean you are dealing with lots (thousands) of points in the topo – you have to decide if the nicer looking surface is ‘worth it’ to you
Also, using my Quadro FX580, if there were too many points, my computer would basically just hard-crash to a BSOD – save often! I ended up switching to software emulation (turning off Hardware Acceleration in Revit).
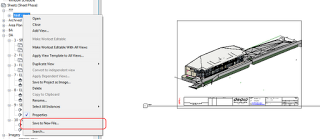
You may want to do a very aggressive cleanup of your Revit file, getting rid of all Views while retaining all 3D elements as proper Revit elements. You can use the ‘Save to New File’ function to do this. (Note: when I say aggressive, I mean it – use at your own risk, and be sure to verify the contents of the output file). Thanks to the revitogbim blog for this tip.
This is the trick: when you right-click a 3D view, the Save to New File option is grayed out, but when you put it on a sheet – its back!
Here’s how to do it:
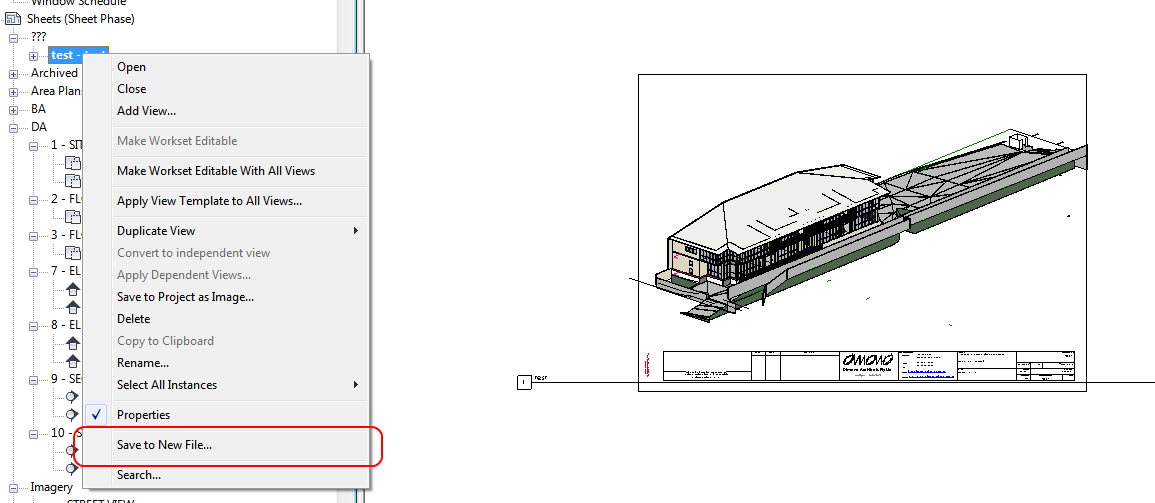
Create a Sheet and place a 3D view on it. The 3D view has to ‘contain’ all of the elements you want to keep in the new file.
In the Project Browser, right-click on the created sheet and select “Save to New File …” (it will take a while as it collects the elements, then it will prompt you to save the RVT file somewhere)
Open the exported file and Transfer Project Standards for Line Weights / Patterns / Styles and also Object Styles (and anything else you want)
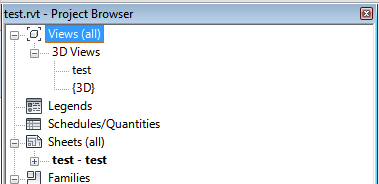
Views in the resultant file:
(the following lists are not exhaustive) Things that are removed:
Design Options
Floor Plans – well actually, the only view that remains is the ‘export’ view and the Default 3D view
Everything else that was unused or not visible
Things that are retained:
Floor levels
The 3D Revit elements that you could ‘see’
RVT links if they were visible in the 3D view
the Sheet that was exported
To make things look right, you will probably need to Transfer Project Standards for things like:
Line Weights / Patterns / Styles
Object Styles
For my test case, I also turned off all Annotation Categories in the original 3D view, and I scaled it so it would fit the sheet.
The Q3 Update includes enhancements to bridge modeling, integration with Autodesk® Robot™ Structural Analysis Professional 2013, and improvements to the reinforcement extensions. Refer to the “Feature Summary” for details.
I recommend that you read this prior to investing in a new graphics card for use with Revit.
The post even includes an FAQ section – here is a little sample:
“Autodesk/my reseller/unnamed CAD expert says I should only use “Professional” (workstation/CAD) cards with Revit. But then I read here that lots of people use and recommend “Gaming” cards for Revit. Who is right?” Despite what you may have been told, consumer (gaming) video cards can work just as well with Revit as professional video cards.
“Someone told me that SLI or CrossFire will double the speed!” SLI and CrossFire are great for the latest video games, but it’s of no use at all for Revit. At least it’s never been demonstrated. If you want to give it a try, be my guest. 😉


