If you want to transfer your 3Dconnexion SpacePilot Pro custom settings:

via email:
The button customisations are stored in your Users folder. On my Windows 7 laptop it’s 
C:UsersUserAppDataRoaming3Dconnexion3DxWareprofiles

In here you will find a bunch of SCG files which you can read with Wordpad and near the top of the file is the application that the file relates to. You can then copy and paste this file onto anyone else’s workstation. With a bit of tweaking you can also make this the default configuration for every workstation on a network …

Some of the old-school Revit users may already be familiar with this process, but here it is…

… you want to make your own RPC, perhaps to signify an existing tree to be retained, and you would like it to show in a render.

These are actually very useful in Realistic views too, because (as you probably already know) Revit shows the RPC image when a view is set to Realistic.

In simple terms:

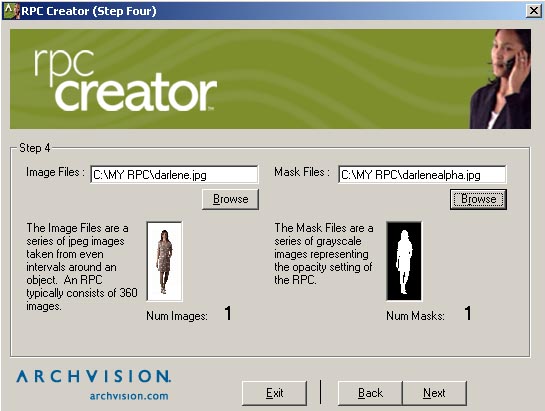
  1. Use the free RPC Creator utility, a photo of the tree, and an image mask (a black and white image created in Photoshop or a similar tool, where white is the part of the image to be rendered)
  2. After you have created the RPC file, you need to put it into the appropriate location, probably:
    somepathCommon FilesAutodesk SharedMaterials2013assetlibrary_base.fbmRPCs
  3. Restart Revit
  4. Your RPC will now be available in the RPC library, and accessible when creating or modifying a Family based on the RPC template.

I used an old version of the RPC Creator installer that I had, but you can download the ‘current’ free version at:
http://acm.archvision.com/support/downloads/RPC_Creator_1610.exe

One key thing – you need to enter size units in cm when using the RPC Creator.  For a full tutorial, check out:
Creator Pro Tutorials

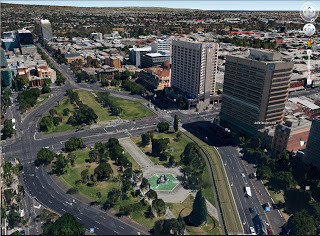
Also, to help size the ‘width’ of your tree, you might want to measure the aerial image on Google Earth (using the Google Earth measure tool).  At least then you know that the image will be in the right ballpark for size.  The size can be easily modified in the Family Type Properties once you have the RPC installed in the right folder.

Notes:
RPC location for XP 64 bit:
C:Program Files (x86)Common FilesAutodesk SharedMaterials2013assetlibrary_base.fbmRPCs

You need to exit and restart the Revit program each time you add or modify an RPC file in that folder

If you want to activate RPC creator (this should be free), use the ID number submit tool at:
http://archvision.com/products/plugin#rpc-creator-pro

I actually posted about RPC Creator way back in 2009.

Enjoy 🙂

These are part of the Standard, Free BIM Project Suite by CTC:

BIM List is a content management solution providing the ability to sort, search and leverage your families more effectively.
  • Locate and insert families into a Revit project
  • Search parameter data using filters
  • Administrative controls help enforce company standards


Detail Link automates the process of linking AutoCAD DWG details for use in the Revit project environment.
  • Reduce errors and ensure consistency
  • Save time by automating an otherwise manual process


Project Link is an easy and customizable system for finding and organizing documents from inside the Revit interface.
  • Make important documents and hyperlinks accessible from within Revit
  • Locate and group all families that have a hyperlink associated with them
  • Both administrative and user interfaces are provided


Renumbering provides a fast and simple way to renumber your rooms and doors.
  • Auto-swapping avoids duplicates
  • Alphanumeric sequential numbering
  • Add separators and suffixes to room and door numbers

Download at:
BIM Project Suite Standard

Heads-up:
Revit Add-Ons: BIM Project Suite 2014 from CTC – Includes 4 New Tools!

Is available, if you use the Communications Center in your Revit 2014 product.

Direct Download for Revit 2014 Update Release 1:
http://updatesdl.autodesk.com/updates/files/rvt2014ur11.exe

Readme

The Live Updater from in-program uses mshta.exe to download and execute the file.

On Windows 7 64 bit, you might be able to prompt the download page by opening:
file:///C:/Program%20Files/Autodesk/Revit%202014/WebServices/WSLiveUpdate.htm

Also, after using Comm Center, you will find a HTA in this folder that you can run:
C:UsersUSERNAMEAppDataLocalAutodesk, IncAutodesk Revit20130308_1515(x64)

Heads-up via tweet from Steve Stafford:

Forum:

I just installed the new version of Google Earth:
Google Earth
7.1.1.1888
Build Date 7/12/2013

Playing with this and my SpacePilot Pro – what an a fun experience!!  Basically, much of the world now seems to have 3D depth – houses have height, trees protrude up from the terrain, city CBDs are highly detailed.  With the SPP, I can fly around, look in every direction.  How am I supposed to get real work done when I can play Google Earth SPP Flight Sim?

Workflow by Darren Snook:
steps are as follows

  • Place the component into the 3D model onto its host face
  • Right click the component and ‘Edit Family’. 
  • In the Family Category Parameters, uncheck the ‘Work Plane-Based’ box 
  • Reload into the project
  • Place the Legend Components into the Legend with the required extra views
  • Re-edit the family, Re-check the ‘Work Plane-Based’ box and re-load
via

Another new cloud offering from Autodesk, specifically tailored for manufacturing.  Links and details below.

Mockup 360™ has now publically launched and is available for a limited time as a Free, 90-day trial. 

To get started you can download the new client from here.

Quick Start Video
Watch this introduction to Mockup 360 that will show you how to get your data in, and start collaborating in no time.

Join the Community
Get answers and share knowledge on the Mockup 360 Community Forum.

Mockup 360 offers:

  • Open collaboration for manufacturing workflows
  • Large-scale 3D aggregation
  • Powerful clash analysis and fast setup
  • Full use of Mockup 360 for 90 days
  • No credit card required

From Zach Kron’s buildz blog:
Peter Boyer, Matt Jezyk, and I did a presentation on getting started with Dynamo, and I have posted the step by step instructional on the GitHub wiki. If you are just looking to get started, or have mastered the initial concepts, this pdf can help. Starting from the basics of how to launch and make a point, through formulas and custom nodes. 

The lessons are:
-Getting Around in Dynamo:  Installation and Interface
-Create a Point, or, “Hello World!”
-Creating and Laying Out Geometry on Lines, Grids and Lattices
-Synchronizing Family Instance Parameters
-Doing Basic Math with the Formula Node
-Attractors: creating relationships between elements
-Using Revit Geometry in Dynamo and Placing Adaptive Components
-Using Python to Build a Sine Wave in Dynamo
-Using Custom Nodes and Recursion to Create a Fibonacci Sequence

via
buildz: Learning Dynamo: Programming for Non-Programmers Workshop

At RTCNA this past week, Harry Mattison has been taking API challenges and answering them left, right and centre.  Most of us are trying to figure out What Revit Wants, while Harry seems to inherently understand What the Revit API Wants – and what it can handle.

Take this example – he was challenged to provide a method of printing Sheets from a Linked RVT in the host project.  Turns out it was easy!  Read his full post below:
Print Sheets from Host & Linked RVT files | Boost Your BIM – making Revit even better

But this wasn’t the only challenge he answered during RTCNA.  Here are a few more gems:
Live link between Parameters in Model & Detail Families
(yep, it updates itself)

“View” Field added to a Detail Item Schedule
(ability to schedule the View a particular Detail Item exists in — 2014 only)

Automatically Synchronize With Central
(let’s call this “the real Revit autosave” — 2014 only)

Nice work Harry.