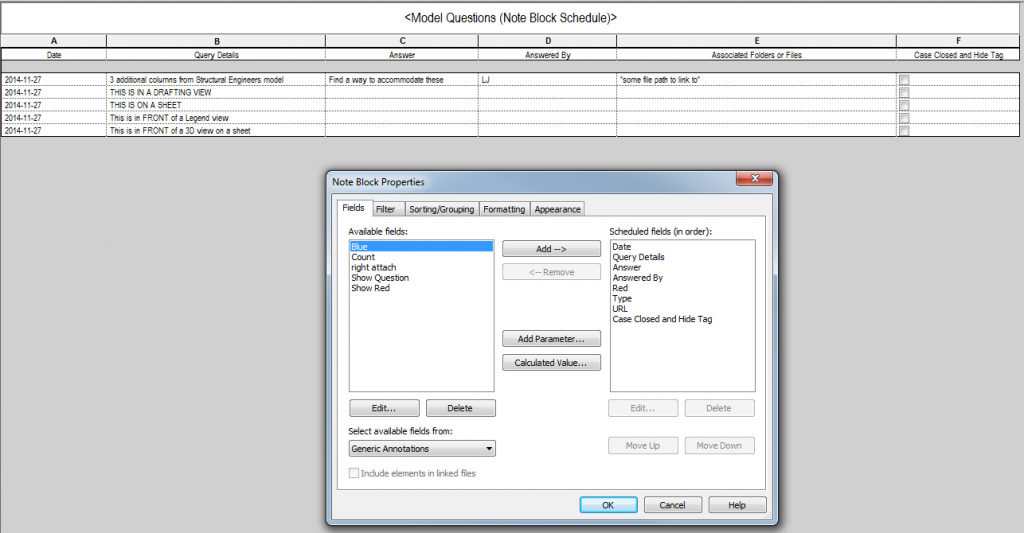
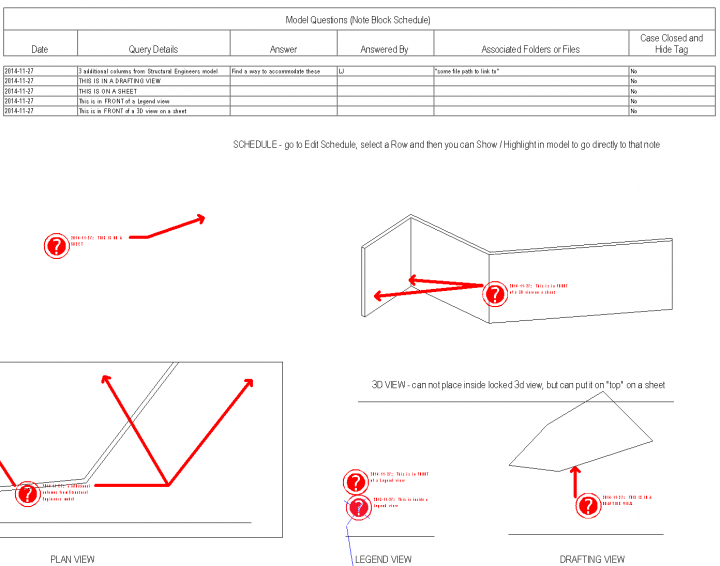
Ok, lets say you have a large team working on a single Revit project, and questions fly back and forth. Some firms use a Clash box, which is then listed in a Generic Model Schedule. Unfortunately, these can’t be placed in drafting views or on sheets.

This is where an annotation family comes in. When associated with a Note Block schedule, it provides a decent “inside Revit” method for creating and tracking questions and answers. It can be used on sheets, in 2D views, plan views etc. It works in Legend views but will not schedule from them. It can’t be placed directly in a 3D view. You can work around both of these by placing them on top of Legend and 3D views that are placed on Sheets.

One big advantage of these is that you can select a Schedule Row, and then click Highlight in Model to take you directly to that issue, clash, or question item.

This particular version uses a saved selection based filter to override the leader colour and thickness by template. You just select all instances and save the selection, overwriting MQ as the saved selection set.

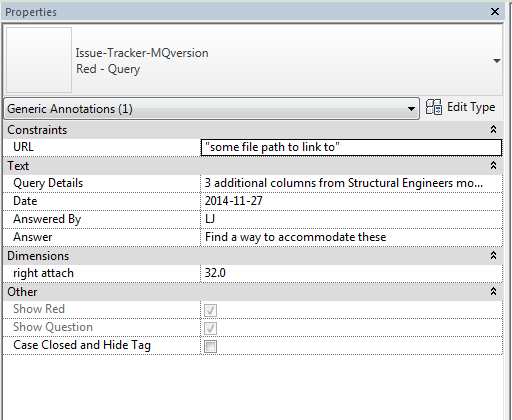
It also has adjustable attachment width using “right attach” instance parameter. Another tip – you can add as many Instance text Parameters as you like to the Note Block Schedule, and they will be instantly visible upon selection of the annotation family, ready for you to add data.

Revit Wants you to associate as much useful data to the model as possible – and intelligent, team-capable issue tracking certainly fits into that category.

For Revit 2014:
Download here

Some images:

We often have to deal with data that hasn’t always “lived” in our CAD, BIM or Revit world. Take a hand sketch, for example – how can you get that into a format that can easily be used in AutoCAD or Revit? Some PDFs have vector information, which I have described how to access before. But the below workflow takes it one step further – how to get any raster image into a vector format, using a few free tools.

Here’s how to do it, without Adobe Illustrator:

  1. Make your source file (PDF / Scan etc) into bitonal TIFF image (I use Bluebeam and Irfanview in the video, but you could easily save the PDF to image using GSView)
  2. Open in Inkscape
  3. Vectorize using Path – Trace Bitmap… Brightness steps, set to 2.
    Untick: Smooth, Stack scans, Smooth corners and Optimize paths.
    (this step makes the black and white image into lines and outlines)
  4. Save as EPS
  5. Open in GSView (requires Ghostscript and pstoedit)
  6. Save as DXF (using Convert to Vector format). From here, you can get to AutoCAD or Navisworks easily…
  7. Open in AutoCAD
  8. NWCOUT and/or
  9. Append the DXF directly to Navisworks
  10. Scale and position appropriately

Here’s a quick video of the process:

The file sizes at each step look like this:

CADmep Object Enabler is a free downloadable collaboration utility that
enables ObjectDBX host applications (i.e. AutoCAD, AutoCAD LT, Volo-View
and Navis) to view the enhanced objects from CADmep.

Read more:

Autodesk Knowledge Network

Downloads:
The Autodesk Fabrication CADmep Object Enabler applies to both 32-bit and 64-bit Windows.

Autodesk Fabrication CADmep 2014 OE — Build 3.02.600 SP2b (exe – 270334Kb)


Autodesk Fabrication CADmep 2013 Object Enabler
(exe
– 246856Kb)

You could use NWCOUT, or…

Steps:

  1. At the command line, type MENULOAD.
  2. Press Return.
  3. In the Load/Unload Customizations dialog box, click Browse.
  4. In the Select Customization File dialog box, change the Files of Type to Legacy Menu Template (*.mnu), and browse to the Autodesk Navisworks menu file.
    Note: For AutoCAD 20xx based applications, this file is located under C:Program FilesCommon FilesAutodesk SharedNavisworks2015NWExport20xxlwnw_export.mnu. So, for example, for AutoCAD 2015 based applications, this file is located under C:Program FilesCommon FilesAutodesk SharedNavisworks2015NWExport2015lwnw_export.mnu, and so on.
  5. Click Open.
  6. In the Load/Unload Customizations dialog box, click Load.
    The loaded menu is shown in the Loaded Customization Groups.
  7. Click Close.

Note: you may have to load this from a trusted location to avoid security problems.

From:
Help: To Load the Autodesk Navisworks Export Menu in an AutoCAD-based Application

Interesting, sounds easy… anyone using this?
Constructivity Server does not rely on any external database or web server; it stores all data within a folder structure as native IFC files and index files. Getting a server up and running requires two settings: folder location and web server port.

Download

Video showing merge control:

via https://twitter.com/Opening_Design/status/464435922944425984