What does it do?
Gives you more granular control over the calculation of wall and opening area

The results you get are divided according to an area value you can set. All the openings below that Maximum value are stored as Opening Area Smaller Max, and the total openings area are added to the Opening Area Parameter. Now, you can schedule this parameters and get the Gross area of the wall by playing with calculated parameters.
Heads-up and more info from here

Where can you get it?
From here

Have you ever used the Workplane Viewer?  It looks like this:

When you open it, a new window opens and orients itself to the current workplane.  This window is the Workplane Viewer.

Revit Wants you to be understand workplanes, and to host things on correct workplanes in the model.  Virtually the entire model in Revit is built up on a series of 2D planes.  Additionally, being comfortable working in 3D views is an important Revit and BIM skill.  This is why you should use the Workplane Viewer…

A few impressive things about the Workplane Viewer:

  • Can be put on a secondary monitor and it remains open
  • It respects the Section Box of the currently active 3D view
  • Auto zooms to the extent of proper sketch elements when in a Sketch Mode
  • Keeps itself oriented to the current and correct workplane
  • It reports the currently set workplane in text form in the bar at the top of the window
  • Triggering Zoom Extents will affect both the current view and the Workplane Viewer
Interestingly, if a horizontal workplane is set (which is typically the case) and you are working in 3D, the Workplane Viewer will be giving you a Top View of the current 3D view – quite useful really.
The extent to which you can edit elements in the Workplane Viewer is dependant on the mode you are currently in.  Sketch modes allow you to edit sketch lines in the Viewer.  Editing a Family In-place allows you to select and modify extrusions.
It is a bit strange that the Workplane Viewer itself actually allows you to Orbit and use the Viewcube (meaning that you are no longer perpendicular to the current workplane.)  To fix this, go to a normal view and use the Set Workplane tool – the Workplane Viewer should now be back in sync with the current workplane.
In some respects, it is like the Replicate Window command, but the Workplane Viewer has a bit more intelligence when it comes to planes, and it is allowed to live on a secondary monitor.
Link to help:
Editing with the Workplane Viewer – WikiHelp

Many of you will know that I made a significant move about 3 months ago – I moved my young family over 2000 kms and took a new position working for Woodhead in Adelaide.

It has been an exciting and eye-opening experience for me so far.  The project range and depth of experience at Woodhead is truly impressive, and it is great to see important technologies like point clouds, laser scanning, BIM for FM and clash detection being used and implemented on a day-to-day basis.

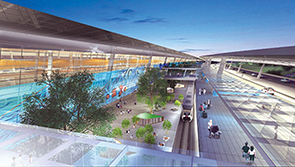
Further, it is exciting to observe the consistent award wins and media exposure for key projects that were designed and delivered by Woodhead.  Some of these, like the new terminal at Jakarta–Soekarno Hatta International Airport, are currently undergoing design refinement – and believe me, the guys here at Woodhead are pushing the limits of Revit in terms of conceptual modelling and the sheer scale of this project.

Please check out the portfolio links at the end of the article if you wish to learn more about the design capability at Woodhead.

August 2013 news

Featured in Airport World at:
Project watch extra – The big build

Woodhead Wins Francis Greenway Award for 

Heritage Architecture – Creative Adaptation at the 2013 NSW Architecture Awards
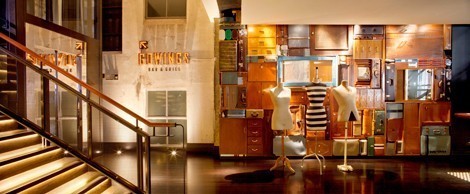
PropertyObserver (ONLINE) – Gowings and State Theatre NSW UDIA award win

Read more:
http://www.woodhead.com.au/news/nswaia2013/

June 2013 award wins

Australian Institute of Architecture Awards NT Chapter
· Enduring Architecture Award – for the Vestey’s Darwin High School Gymnasium

· Commendation for Public Architecture;
o The Australian Centre of Indigenous Knowledge and Education (ACIKE) by both DKJ projects.architecture and Woodhead
o Katherine Regional Cultural Precinct, by both DKJ projects.architecture and Woodhead

Australian Institute of Architecture Awards SA Chapter
· Public Architecture – Architecture Award, Flinders Centre for Innovation in Cancer

· Peoples Choice Award – Flinders Centre for Innovation in Cancer

Australian Institute of Architecture Awards NSW Chapter
· Greenway Award for Heritage Architecture (Creative Adaptation) – Gowings and State Theatre Buildings Restoration and Hotel Conversion (QT Hotel) – Woodhead, and Graham Brooks and Associates

July 2013

Adelaide Desalination Plant and Kauwi Interpretive Centre – Shortlisted in 2013 World Architecture Awards

Portfolio links:

Having repeatedly asked and searched for a detailed, up-to-date and accurate Category Guide for Revit to no avail, I have decided to start one as a simple shared Google spreadsheet.

The purpose of this is to capture all of the unique properties of each Category, so they can be quickly viewed and understood by Revit users at all levels.

The document can be viewed at:
https://docs.google.com/spreadsheet/ccc?key=0AldGdRkpk2bedElRNDZGTFdHLUZPQktqbXktY0pWU0E&usp=sharing

I have selectively invited a few top Revit users to contribute.  Please let me know if you want to help out with editing the document.

The current version of Recap Pro runs on Windows 7 and 8 (download link).

However, for the time being you can still download Recap version 1.0 from this link:
http://labs-download.autodesk.com/us/labs/trials/worldwide/ReCap1.0.exe
and the service pack for x64 at:
http://updatesdl.autodesk.com/updates/files/autodeskrecap_sp1_for1.0.43.27_x64.msp

If you ever need to run Recap on XP, it might be handy to have this installer in your toolkit…

You can host profiles onto the nodes of a divided path (line), however they can’t be conventional Revit profiles, they must be adaptive components – they can be quite simple drawn in 2d (XY axis) without even placing an adaptive point. When hosted on the nodes they will be automatically oriented perpendicular to the divided path. You can then “Repeat” them along the path – the number is then easy to control. The challenge is how to create and manage variations in the Repeater – it can be done but is not so easy.
via Tim Waldock’s comment at
http://wikihelp.autodesk.com/Revit/enu/2014/Help/0000-New_in_R0

Navisworks may have issues importing PCG point cloud files.  For example, if you try to append a PCG directly to Navisworks Manage 2013, it will say “No plugin exists that will open pointfile.pcg”.

If you try to export a view from Revit 2013 to Navisworks and it contains a linked point cloud file, the point file will not be converted even if the “Convert linked files” option is ticked in Navisworks settings.

Here are some workarounds:

Some have recommended importing the PCG into AutoCAD, and export an NWC from there:
Revit OpEd: Point Cloud Data into Navisworks
Point cloud import – Autodesk Discussion Groups

You can also:

  • Import PCG to AutoCAD, then append the DWG to Navisworks
  • get PTS from Cyclone, or even TXT, and then append it directly to Navisworks
As per:

Point Cloud files imported into Navisworks & Revit from Cyclone, .pts vs .ptx. | LinkedIn

Depending on the size of the original point cloud file, it will take some time for Navis to make the necessary indexed NWC file (like half a day maybe).

Obviously, if you are living in 2014-Suite-Land, you can also just use Recap to import the PCG and export as a supported file format for Navisworks.

A 2008 PDF that describes the point cloud types Navis supported:
http://www.sparpointgroup.com/uploadedFiles/News/PDF/peterquinn.pdf

Download it at:
SuperFilter | Autodesk Revit | Autodesk Exchange Apps

It has a dockable interface, shows number of objects and can list ID of elements, as per the translation from this Russian site:

  • Now Super Filter works with all types of objects, including the objects selected in the manager of the project.
  • Now the window is presented in the form of a constantly open window similar to the properties window and the project manager. You can place it on the analogy of these windows, even doing extra tab.
  • The updated interface is both visually and in functionality. Now show the number of objects in each node. It is also available a list of ID elements.

Generic Model families can be a bit overbearing when it comes to visibility.  Unfortunately, you can’t usually change the Show only if Instance is cut property for Generic Models… unless you switch them to a Category that allows this to happen, like Windows.

Andy Milburn describes it thus:
“With a window family this is easily solved by checking the “only show when cut” box. In a generic model family this feature is greyed out.


You will have already guessed my solution. Swap the type to window, check the box, swap back again to GM. It stays checked even though it’s greyed out.”