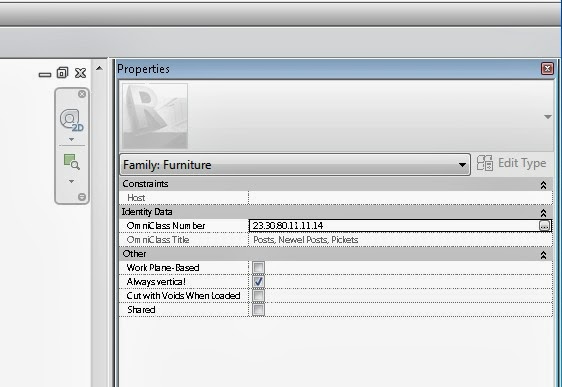
In our case, we had to add local PC “Users” permissions for Full Control to this file:
“C:ProgramDataAutodeskApplicationPluginsADSK-IFCExportUI2014.bundlePackageContents.xml”

I recommend that you review each PackageContents.xml in the ProgramData location to check for appropriate permissions.

Key lines from journal:
‘ 0:< Autodesk Revit 2014 
‘ 0:< 64-bit load point = C:Program FilesAutodeskRevit 2014 
‘ 0:< this journal = C:UsersljohnsonAppDataLocalAutodeskRevitAutodesk Revit 2014Journalsjournal.0008.txt 
‘ 0:< ::0:: Delta VM: Avail -54 -> 8387401 MB, Used +8 -> 186 MB, Peak +39 -> 218 MB; RAM: Avail -15 -> 12989 MB, Used +13 -> 241 MB, Peak +14 -> 242 MB 
‘ 0:< Exception occurred 
‘C 24-Sep-2013 09:05:39.639;   0:< ExceptionCode=0xe0434352 ExceptionFlags=0x00000001 ExceptionAddress=000007FEFD17940D 
‘ 0:<   System (MB) [Available /  Total ]  [Revit Memory Usage (MB)   ] 
‘ 0:< RAM Statistics:    12989 /    16291       241=InUse      242=Peak  
‘ 0:< VM  Statistics:  8387402 /  8388607       186=InUse      218=Peak  
‘ 0:< Unconverted MessageBox “An unrecoverable error has occurred.  The program will now be terminated.  All of your data has been recently saved, so there is no need to create recovery files.” 

Basic fix method found at:
Other possible solutions:
  • Delete Autodesk, Inc. folder
  • Delete cascade
  • Make a new user profile and see if that works
As per:

Just hold down Ctrl button while scrolling with mouse wheel… I have tested this (non exhaustively) on Revit 2013 and Windows 7, and it works fine on the following dialogs:

  • the Properties Palette (wow!)
  • the data section of the Type Properties (Edit Type) dialog
  • Family Types
  • the Family Parameters part (lower section) of the Family Category and Parameters dialog
  • IFC Export and Import Options dialogs
  • Fill Patterns settings
  • Sheet Issues/Revisions

Thanks to this tweet for the heads-up:

Have you ever used Reconcile Hosting?  When you click the appropriate button in the Ribbon, a new UI panel appears (see image below).  You can also assign a Keyboard Shortcut to this panel, although it doesn’t appear as a checkbox item in the View — User Interface list.

You can use the “Sort” button to change the way the list is sorted, and the Show button will take you directly to the appropriate place in the Model to view and “Pick New Host”.

Simply viewing the Reconcile Hosting panel gives you the View Name and Element ID of the orphaned elements.

The panel can be closed by using the X in the top right corner.

Read more:
Reviewing Orphaned Elements from Linked Models – WikiHelp

See below a series of links on IPD, VDC and BIM generally.  Interestingly, this information comes from a contract / legal perspective:

Article Moving Design-Build closer to IPD
PDF IPD Framework
PDF Integrated Project Delivery: The Game Changer
PDF IPD Teams: Creation, Organization and Management
PDF Using a design-build contract for Lean Integrated Project Delivery
PDF Building Information Modeling: Look Both Ways Before You Leap
PDF Diagram of BIM Elements
PDF Diagram of BIM Elements (Interactive)
PDF How IPD Can Help Your Project Succeed
PDF Every marriage—and project—needs a honeymoon
PDF Comparison of Integrated Project Delivery Agreements (Summary)
PDF Motivation and Incentives in Relational Contracts
PDF Negotiating an Integrated Project Delivery Agreement
Video IPD Video Series – Part 1
Video IPD Video Series – Part 2
Video IPD Video Series – Part 3
Video IPD Video Series – Part 4
Video IPD Video Series – Part 5
Video IPD Video Series – Part 6
PDF Comparison of Integrated Project Delivery Agreements
PDF IPD Standard Agreement – Profit Deferred Until Final Completion
PDF Rethinking the “G” in GMP: Why Estimated Maximum Price Contracts Make Sense on Collaborative Projects
PDF Executive Summary of IFOA – Integrated Form of Agreement
PDF Alternative Project Delivery Methods for Public Works Projects in California
PDF BIM/IPD
PDF Managing Integrated Project Delivery
PDF Building Information Modeling: A Framework for Collaboration

via
This Page

As most of you probably know, the call for RTC2013 abstracts has gone out.  Here are some bits and pieces from RTC2012 that you can check out online.

Reconstructing the AEC process (Jay Zallan):
PDF Download Here

PowerPoint Download Here

http://cad-vs-bim.blogspot.com/2012/07/rtc-usa-2012-reconstructing-aec.html
Various re-caps of RTC2012:

James Vandezande / HOK
Brian Mackey / Mackay Consulting
Aaron Maller / Beck Group
Paul Aubin / Consulting Services
Lonnie Cumpton / BIM9
Robert Manna / Stantec
Aaron Vorwerk / D|C|CADD
Jeffrey Pinheiro / Fletcher Thompson (here here and here)
Erik Lewis / Devenney Group Ltd.

Links from:
http://www.architecture-tech.com/2012/07/rtc-usa-feedback.html

Revit Add-Ons: RTC NA 2012 Wrap Up – With an Eye Towards Add-ons

Who’s afraid of the Big Bad BIM?: RTCUSA Day 2 recap

Let’s say you get half way through extracting a very large (like 15gb) archive and for some reason the extraction fails.  For example, the BDSP 2013 media I downloaded had one RPC file corrupt, and the Adesk extractor failed to push through that problem.

7-zip is not only more robust, you can also “resume” a failed extraction attempt by using some switches:
-aos (skips files already there)
-y (prompts yes to every question)

The whole command looks something like this:
7z x {archive_name_and_path} -o{target dir} -aos -y

… is not easy.  Revit prefers that you don’t clog up your drawing with View Templates rather than trying to clean them out later.  You can use various methods to transfer just one Template from project to project, such as this example.

I would assume there is an add-in somewhere that finds unused View Templates and allows you to delete them, but it must be done manually with vanilla Revit.

Further reading:
Deleting a View Template – WikiHelp

View Filters & View Templates – Revit

Revit Beginners: Additive Views vs. Subtractive Views

Purging Unused Views – Sheets | BD Mackey Consulting | The Revit Geek Blog

Using Windows 7, you can switch the BIOS disk management from AHCI to IDE or IDE to AHCI without reinstalling the OS.  However, you need to reset 4 registry “START” keys to 0 before rebooting and changing the BIOS setting.  If you don’t change these settings first, you will get repeated blue screens…

Some more info:

1) I assume u have installed Windows Vista or Windows 7 with AHCI set from BIOS !

2) [Add keys from 3 if they don’t exist)

3) Now the manually regedit part Go to :

HKEY_LOCAL_MACHINE_System_CurrentControlSet_Services_Msahci

HKEY_LOCAL_MACHINE_System_CurrentControlSet_Services_iaStor

HKEY_LOCAL_MACHINE_System_CurrentControlSet_Services_iaStorV

And in thease three keys in the right pan u will find a key named “START” change at all three (Msahci,iaStor,iaStorV) values from 0 To 1

Now navigate to HKEY_LOCAL_MACHINE_System_CurrentControlSet_Services_PciIde

,then change the start value to “0”

4) Now u are allmost done , restart your computer/laptop , and go to Bios and set from AHCI to IDE !!! , save settings in Bios and restart

via
Solved Switch AHCI TO IDE (Tutorial HowTo) !!!