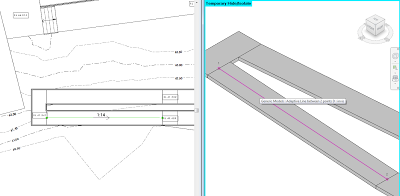
Use Floors with slope arrows instead (to simulate a Ramp)
Make a 4 point Adaptive Component that has a surface with a slight vertical offset, and place it on “top” of the Ramp surface. Apply your Model Pattern to this “skin”.
Orient a 3D view to Plan, Lock it and annotate (instead of using a Floor Plan)
All of these have problems that make them less than desirable. But hey, maybe one of them will get you out of trouble on your current project…
A very interesting Case Study written by Doug Andresen (principal architect at Andresen Architecture, Inc) was posted to AUGI last week. He describes how his firm transitioned from AutoCAD to Revit.
Here are a few quotes I liked: we purchased the product and only used Revit for renderings for the first 3 to 4 years. We were so pleased with just that portion of the program that it was fine with us to sell a project with colored renderings and continue to deliver the project in AutoCad. However, the beauty of Revit is its seamless integration from preliminaries to construction documents and the time savings are phenomenal. … the more experienced people in AutoCad seemed to have the hardest time learning Revit because it was such a different paradigm and it took a great deal of effort to re-learn everything. [Different paradigm? Its called What Revit Wants] … the set-up time is significant and not for the faint-of-heart. What we finally ended up doing is simply taking the plunge into construction documents after completing the Revit tutorial. … We had to install an in-house “virtual cloud” that would run up to 5 seats simultaneously … all of the good things you have heard are all true! Don’t be afraid of the challenges that the program presents. Revit is the future and the sooner you get on-board, the better.
Rather than get lost in the flood of Revit 2014 information, I thought I would wait until closer to the time that most people will actually start installing and using it. The post below is just a collection of my notes and things that I find particularly interesting or exciting about the 2014 release – oh, and there are some pretty cool tips included too 🙂
Non-rectangular crops can be locked You can lock the edges of multiple Plan view non rectangular Crop Regions to a set of model lines. Nudging the lines will adjust the sketch in all ‘locked’ views.
Client based DWF review will probably die slowly and be replaced by web methods Autodesk Design Review development is slowly stalling, and being replaced by cloud-based collaboration methods. Nothing really new here, but one day we will probably say goodbye to standalone DWF viewers in lieu of web viewing and markup tools.
Exploding ACIS For this to work, the source import should be a 3D ACIS solid from AutoCAD or a SAT file from Inventor, Rhino or similar.
Note: 3D DXF isn’t really a “solid” model (probably depending on version), it’s likely a surface model.
Double-click to edit anything Be sure to turn off Drag Elements on Selection to prevent accidental moving of elements
New Selection controls in the Status Bar Don’t forget to try these out
Vault integration Finally starting to become something useful for everyday Revit users…
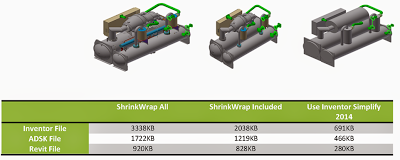
Inventor to Revit conversion / BIM Exchange Environment and Inventor simplification A combination of these tools allow you to simplify Inventor models and export them to RFA files for use in Revit.
Schedule Formatting Click the column top (letter) to select the whole column and change font for that column.
Dockable Palettes Can be docked at top of screen.
Non-rectangular crop regions – limitation Annotation crops are still rectangular only
Slow install? Could be because content is being downloaded during install. Un-tick content packs to try to speed up the install.
Tabbed Browser Panel For example, drag Properties on top of Project Browser. Tabs are at bottom.
Project Browser Organization Can now have more (up to 6) ‘levels’ of grouping.
Displacement set tips How to set up nested levels of displacement:
Select a wall with a window & Displace both of these
Tab select the Window and Displace it again
If you reset the window it will go back to its original location, to get it back in the wall you need to select the wall’s displacement set, Edit and Add the Window to that Set.
You may find it easier to displace a single element first, and then use the Edit / Add functionality to put other elements into that Displacement set.
Citrix Licensing BDSP version of Revit 2014 (Onebox) will now be supported in Citrix environment (removed the need for special licensing to be used for either Citrix virtualization methods, no concerns about obtaining Citrix certification and QA support for all products in a Suite)
Village BIM also reminds us that Generic Model Schedules can now schedule the volume parameter.
Optimized View Navigation Enabling the Optimized View Navigation makes it so ‘while’ you Pan, Zoom and Swivel some display aspects simply get disabled until the action is over…
It does not have any effect when in Realistic or Ray Trace mode however.
If the Optimized View Navigation is enabled it suppresses the display of: fill patterns (including materials), all element ‘edges’, all shadows and mechanical / structural hidden lines.
where once BIM managers wanted to roll the latest version of Revit out to their staff on projects, they are now taking a more pragmatic approach to deployment & often holding back for 12 months or even skipping a release.
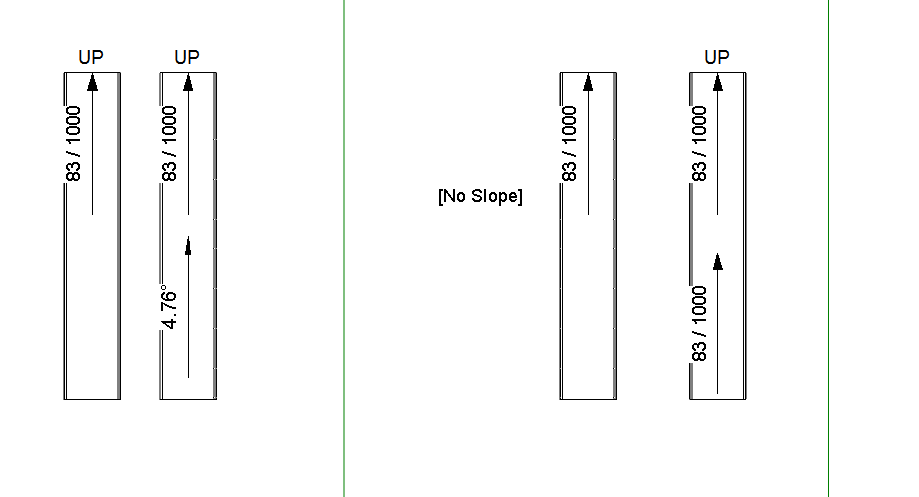
In Revit 2013, you can’t tag the slope of ramps in Plan views using the Spot Slope tool. There are workarounds out there already, but here is an easy one:
Make a new Generic Model Adaptive family with 2 Placement Points
Make a spline between these two points (select them and then hit the spline by points button). Set its category to Invisible
Load this Family into a Project, and using a 3D view, place it at the centre line of a ramp (the two points should snap to the correct location in 3D)
In a Plan view, use the standard Spot Slope tool in Revit – just pick the adaptive component “line” that you just placed.
EDIT As I mentioned above, there are other workarounds for this. One is to put a slope arrow on an adjacent Floor, then copy it on top of a Ramp. It works!
I actually found this did not work too well in Revit 2013 (no problem in 2012). However, after a bit of fiddling, I have created 3 files (one for Revit 2012, 2013 and 2014) – all of which have spot slopes on Ramps that can be copied around. Here is the link: View / download
Remember Julien Benoit’s adaptive component tutorial from a year ago (link here)? Well, Julien has made something pretty cool and posted it on RFO. It is basically a 4 point adaptive component that calculates the area of the resulting surface using Bretschneider’s formula.
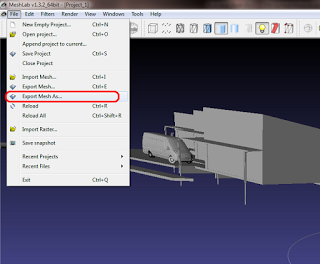
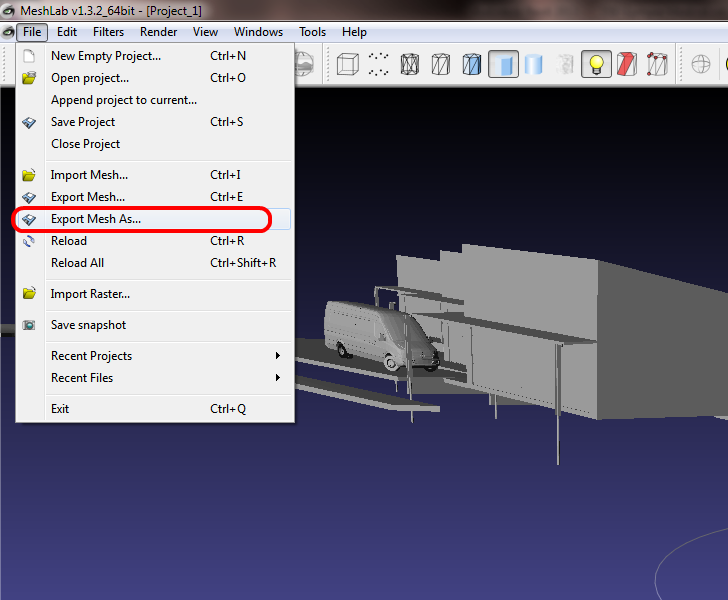
Point clouds are getting a lot of “press” lately, and they can be very useful. But let’s say, hypothetically, that you have a 3D model of a building or a component and you want to deconstruct it back into a point cloud – Can this be done? Yes, and quite easily…