Download it at:
SuperFilter | Autodesk Revit | Autodesk Exchange Apps

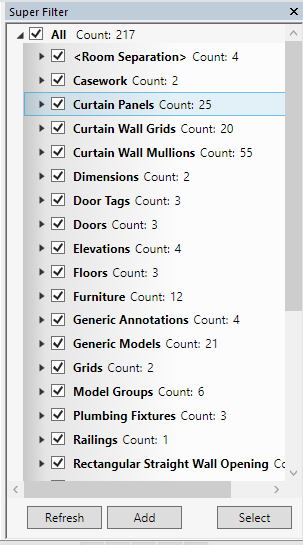
It has a dockable interface, shows number of objects and can list ID of elements, as per the translation from this Russian site:

  • Now Super Filter works with all types of objects, including the objects selected in the manager of the project.
  • Now the window is presented in the form of a constantly open window similar to the properties window and the project manager. You can place it on the analogy of these windows, even doing extra tab.
  • The updated interface is both visually and in functionality. Now show the number of objects in each node. It is also available a list of ID elements.

Just installed CloudWorx (more on this later) and it had a GUID conflict with CADtoEarth – weird?  Wonder if the installer somehow couldn’t properly generate a unique identifier (see image).

In any case, Jeremy describes how to generate a new GUID over here, but I couldn’t find GUIDgen.exe easily on my XP 64-bit PC, so I downloaded GUIDgen from:
http://www.microsoft.com/en-us/download/details.aspx?id=17252

  1. Generated new GUID, copy to clipboard
  2. Open offending (ie. most recent) .addin file that caused Revit to show the error on startup
  3. Paste the newly generated GUID into the ClientID field
  4. Save the .addin manifest and restart Revit
This resolved the GUID conflict.

This is using XP 64-bit with Revit 2013 Update 3, but similar principles will apply to other OS and software versions:

  1. Install Revit 2013 SDK if you don’t have it already, from here
  2. Install RevitAddinManager from SDKAdd-In Manager folder
  3. Open Sharpdevelop, you should be able to find it at:
    C:Program FilesAutodeskRevit Architecture 2013ProgramSDAbin
  4. Drag and drop RevitLookup.csproj to the Projects panel on the left
  5. Compile Revitlookup.  Make sure to Add Reference Path (project / properties) to your Revit 2013 Program folder.  Then click Build, Build Solution.  I received a bunch of Warnings about obsolete classes and properties, but no errors.
  6. Open Revit and any project
  7. External Tools – Add-in Manager (automatic)
  8. Load the compiled RevitLookup.dll and then use the Save to Add-ins folder option
  9. Restart Revit
Now, to use RevitLookup to find the Element ID of a View Template and copy it to another project:
  1. Open a Project
  2. Add-Ins, Revit Lookup, Snoop DB…
  3. Scroll down and select the appropriate View reference, ie. ViewPlan for a Template that was created from / for a Plan View
  4. When you select it, the Element ID will be shown on the right and you can copy it to Clipboard
  5. Select By ID, Paste
  6. Ctrl+C
  7. Switch to another project
  8. Paste – Aligned to Selected Level
  9. Done 🙂

Daniel Monsén has created one of those addins where you just have to say “this makes sense”. The key feature of Bimframe Connect?  It allows users to import and export data from Revit to a Google Spreadsheet.

The overall concept is that you can export data to a Google Spreadsheet, collaborate using a web client or mobile device, then import the data and update the Revit model.  Collaborators obviously don’t need Revit – just access to the Google spreadsheet.

Personally, I love the idea.  The more transparent the Revit building database is, the easier it is to add intelligence to the model, share the model, and detect design problems.

Overview:

The above video includes the following info:
Email: daniel@bimframe.com to get trial key.

Download the version 0.8 beta trial add in here:
https://drive.google.com/folderview?id=0BxQhjQerGcutN3RCV0lCS2pmeFk&usp=sharing

There is a series of tutorials on Youtube here:
http://www.youtube.com/channel/UC4_8PPGYG2g576rssp9ykCw/feed

Strangely enough, I recently came across two different BOQ methodologies for Revit – one is an addin, another is a cloud based solution.  This post is about the addin, called eVox, by Luca Vocella.

To be totally honest, I haven’t had much time to do a proper review of the addin.  However, I was waiting for it to be available on Exchange before I posted about it.  It is there now, at:
http://apps.exchange.autodesk.com/RVT/en/Detail/Index?id=appstore.exchange.autodesk.com%3aevoxbillofquantities%3aen

Luca is very interested in any feedback on comments you may have – feel free to post them here, and Luca will then improve the app according to your recommendations.

Further reading:
http://www.evoxelettronica.com/servizi/evox-bill-quantities-il-computo-metrico-estimativo-integrato-revit/

Translated:
http://translate.google.com/translate?u=http%3A%2F%2Fwww.evoxelettronica.com%2Fservizi%2Fevox-bill-quantities-il-computo-metrico-estimativo-integrato-revit%2F&hl=en&langpair=auto|en&tbb=1&ie=UTF-8

“quickly connect … Revit models to the GRAITEC Advance suite and then optimize the design of their structures in accordance with North American and Eurocode standards and produce effective and error-free general arrangement drawings, fabrication drawings, BOMs, NC files for both steel and concrete structures.Read more.
GRAITEC BIM Connect is available on Autodesk Exchange for Autodesk Revit.”

From:
http://bimandbeam.typepad.com/bim_beam/2013/06/graitec-bim-connect-available-on-autodesk-exchange-for-autodesk-revit.html

I received this request via email:
a question in revit vasari or you can get the orientation and exposure of a face of a mass or a wall
for example
classify all the walls to the north or the south-west?
and
put them in a schedule of the walls?

Vanilla Revit can’t do this. But perhaps someone would like to make a little add-in, macro or script that processes Walls, determines their ‘facing’ orientation, and then inputs this data into a Shared Parameter of Walls? Successful challenger will obviously get a mention on the blog.

Maybe something like this already exists out there… Feel free to comment!

ANSWER
Thanks to Amy Manning, who ‘reminded’ me that Case do have a tool that does exactly that 🙂

Its the aptly named “External Wall Facings”.  More info at this link.

Much of the legwork was done back in this 2010 post by Jeremy:
The Building Coder: South Facing Walls

Note:  I used my Revit Master Search, which led me to this post, which led me to Sort and Mark by tools4revit.  However, I don’t think this adds orientation relative to North – I’m pretty sure it just determines Flip/Mirror orentation?

Dima has moved his blog to http://dp-stuff.org/

Here are the most recent two addins:

PermRemovAreasRooms Revit Addin

PermRemoveAreasViews Revit Addin API from dp Stuff

PermRemoveAreasRooms Revit API addin allows you to delete rooms or areas permanently on the fly directly from any of your Revit views without having to do it from the Revit schedule. You have two options: either pre-select the elements and run the tool to delete just the rooms/areas in your selection, or you can collect ids of rooms/areas that you want to get rid of and copy/paste them via “Type In Element Ids” method.
04-02-2013 PermRemoveAreasRooms2013 (DOWNLOAD for Revit 2013)

RemoveEmptyTags Revit Addin

RemoveEmptyTags Revit Addin API from dp StuffJust as the name suggests this Revit addin allows you to find and remove empty tags from your Revit 2013 document. You will have two options whether you want to remove empty tags in the active view or in the whole document. You can use it in conjunction with out-of-the-box Revit Tag All tool.

via LinkedIn:
Hi Luke,
Just posted a PermRemoveAreasRooms tool on my blog as a part of my revit Utils. Little tool that I use a lot when having to delete Rooms / Areas permanently from my revit doc.
 
Also here’s another one(RemoveEmptyTags) that I posted last week:
 
Incase you find it useful please don’t hesitate to share the link with your readers.

Nice tip + addin coming from Trevor Taylor via Jeremy Tammik – it shows how to rename Interior Elevation views by the Room that they reside in.

Download:
Here is a complete sample project including a test model in case you’d like to check it out yourself.
Many thanks to Trevor for this useful tool, his research, implementation, and generous sharing.

Read more / via: 
The Building Coder: Rename View by Matching Elevation Tag with Room