You are experiencing problems with the installation of an Autodesk product, and you want to enable verbose logging in order to troubleshoot the issue or submit the log files to the Autodesk Product Support Team.
You can configure the Microsoft Installer (MSI) to turn on verbose logging for this installation. Follow these steps:
Click Start menu (Windows) > Run.
In the Run dialog box, enter regedit and click OK.
In the Registry Editor, browse to the following folder:
Note: Windows 7 does not include this key and you will need to manually add theInstaller key to the registry. Right-click on the Windows subkey and choose New > Key and then rename New Key #1 toInstaller.
Right-click an empty area in the right pane. Click New > String Value.
Enter Logging for the name.
Double-click Logging.
Enter voicewarmup in the Value Data box and click OK.
Close the Registry Editor, and run the installation again.
… The log files created using this method are located in the %TEMP% folder and are named MSI#####.log, where ##### is a 5-digit number. …
I am currently installing Building Design Suite Premium 2012 from the shiny USB stick we received yesterday. There are just two quick tips that I wanted to share with you:
If your packaging does not have a Serial Number printed on it, you will need to log in to Subscription Center, go to Contract Administration and then click Coverage Report. From here you should be able to find your Serial Number.
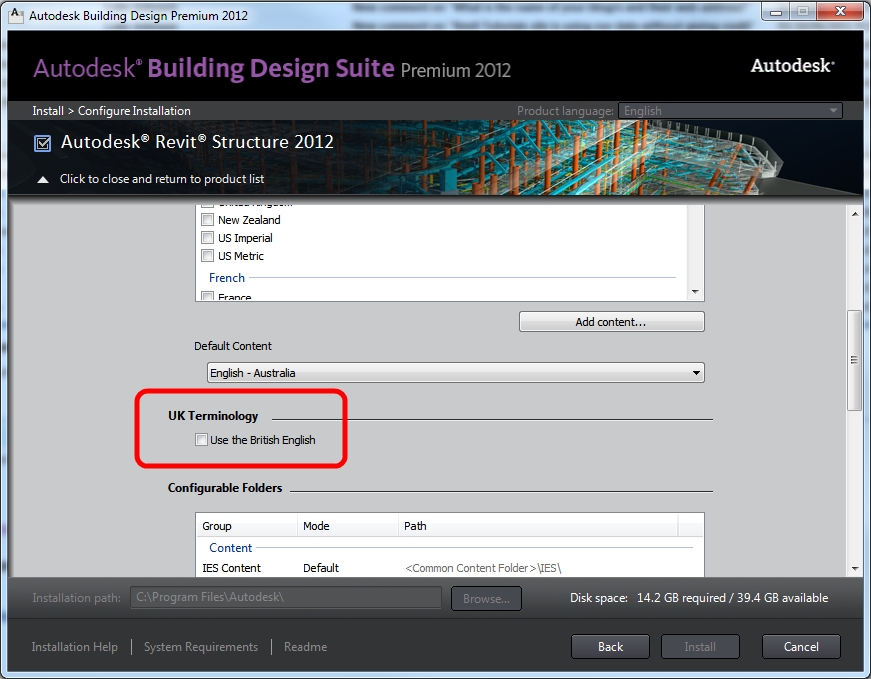
If you want to use the ‘UK Terminology’ in Revit Structure (as previously posted about on various blogs), there is an option in the installation – see image below:
My installation took about 50 mins – and I installed every product. Enjoy!
I received our DVD media for Revit 2011 today – and man, what a box of goodies! Here is a list of the discs in the box:
Autodesk Revit Architecture 2011
AutoCAD 2011 32-bit (Disc 1 of 2)
AutoCAD 2011 64-bit (Disc 1 of 2)
AutoCAD 2011 32-bit and 64-bit (Disc 2 of 2)
AutoCAD Architecture 2011 64-bit
AutoCAD Architecture 2011 32-bit
The interesting difference between the download page and the DVD media is that the media includes a set of Vanilla AutoCAD discs, whereas the download page ONLY allows you me to download AutoCAD Architecture. (And yes, I know that you can run AutoCAD Architecture as Vanilla AutoCAD with a shortcut.)
But if you chose not to receive your media, it seems you are going to miss out on a purely AutoCAD-only install option.
I had to format and re-install Vista on a laptop over the holiday break. Given that it was an OEM version, and the original disks were not available, I was faced with a bit of a conundrum. How will I restore the activation data without having to contact Microsoft?
Perhaps you have faced a similar problem. Often, OEM installation media is packed with software you don’t need, and it only serves to slow down your PC right from the get-go. However, you can install Vista using standard installation media, and then ‘backup and restore’ the Vista activation data. This way, you are starting with a truly ‘clean’ system. Of course, you will then need to download and install all the necessary drivers for your system.
Before starting the process, I backed up the activation data using the software at the link below. After obtaining some installation media, I installed Vista without providing any product keys (you should be able to do this with any retail Vista media). Then, I restored the activation data. It worked perfectly.
It’s interesting to see where Revit stores it’s stuff in the Registry.
However, I’m not too sure on the recommendation to ‘Use the End Task feature to end any anti-virus programs’ before reinstalling Revit. Anyone see any complications with this?
It is most commonly used by programmers in the Revit API. You may find it useful, however, in just understanding the structure of the database. You can also use it to find information that otherwise may be very difficult to obtain.
How do you get this RvtMgdDbg, and how do you make it work?
Go in to the RvtMgdDbg_0504 2009 subfolder. Then, double click the RvtMgdDbg2008.sln file.
If your PC is set up correctly, Microsoft Visual Studio Tools for Applications 2.0 should open up.
Now, just click on the ‘Build’ menu, and then click ‘Build RvtMgdDbg2008’.
If all goes well, you can now close Microsoft Visual Studio Tools for Applications 2.0.
Go to the RvtMgdDbg_0504 2009bin folder. RvtMgdDbg.dll should be present in this folder.
There are a few different ways to do the next couple of steps. I’ll just describe one simple way…
Go to your C: drive and make a folder called RVTMGDDBG.
Copy the RvtMgdDbg.dll file into the C:RVTMGDDBG folder.
In your Revit program folder (usually C:Program FilesAutodesk Revit Architecture 2010Program), open the file Revit.ini
Scroll down until you see the [ExternalApplications] subcategory.
Check the EACount= value
Change the EACount= value by increasing it by 1 (eg. if 2, change it to 3)
After the final EAAssembly line (eg. EAAssembly1 or EAAssembly2 etc), add the following lines (you need to replace the question mark with your EACount= value PLUS 1):
EAClassName?=RvtMgdDbg.App EAAssembly?=C:RVTMGDDBGRvtMgdDbg.dllThere you go! Close and save the Revit.ini file.Now, to try it out…
Open Revit.
Make a new project.
Make a bit of wall.
Select the wall you just made.
In the Ribbon, go to the ‘Add-Ins’ tab.
Click Snoop Current Selection… button on the RvtMgdDbg panel.
A window should come up showing you the properties of the wall you made.
Or, to browse most of the Revit database at once:
On the RvtMgdDbg panel, click Snoop Db…
The window should look something like this:
You can now browse around and learn how the database is put together.Keep in mind that there may be issues and bugs with this method. For instance, on one version of RvtMgdDbg that I was using, it seemed to cause Revit to prompt me to Save Coordinates (on a project with linked Revit models using shared coordinates) – even though I had not moved the linked models.So, be careful! You might want to use this on ‘test’ projects to start with. If you want to remove this add-in, simply reverse steps 15 and 14 in the first list (remove the lines you added to Revit.ini and reduce the EACount= value by 1).Feel free to comment or contact me if you have any problems or questions related to the above method.If you are really interested in the Revit API, head over to http://usa.autodesk.com/adsk/servlet/index?siteID=123112&id=2484975 and check out some of the material on that page.