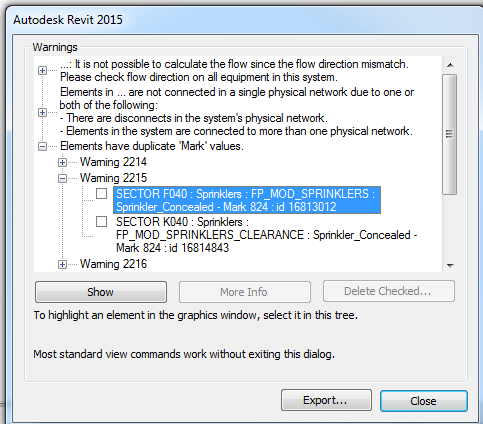
For some projects, Revit Warnings become a metric in model audit processes (this may be regardless of how much impact those warnings may have in real terms). For example, perhaps your model has become populated with many “Elements have duplicate ‘Mark’ values“. How can we fix these quickly?

I explored a number of options, and I think I have found the easiest. In one particular situation, the Mark value was not important for documentation, and it was simply necessary to make them unique to clear the warnings. What if we could also grab some otherwise unavailable information and apply it to the item? Like Element ID or GUID?

Bonus Tools can do that. Here’s the steps:

  1. Get Bonus Tools
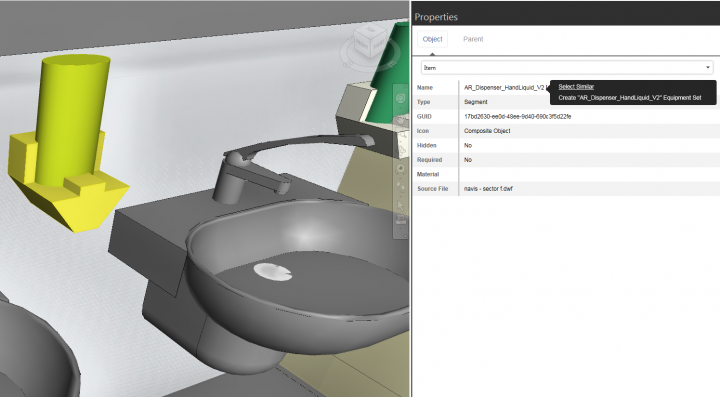
  2. Open your RVT model, check the Warnings dialog, and see what Category is affected
  3. In Bonus Tools 1 ribbon, start Copy Parameter tool
  4. Pick options as per screenshot below

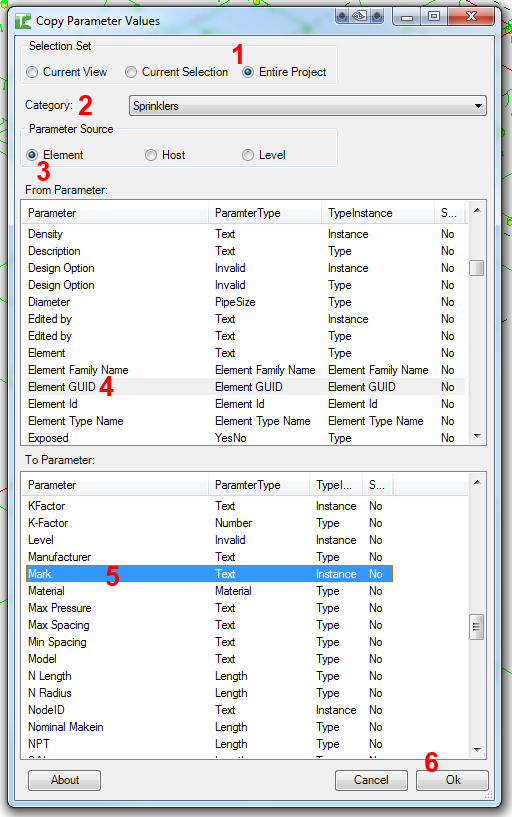
After clicking Ok, the tool will quickly copy the unique ID into the Mark parameter. You can now tag it or schedule it (keeping in mind that it is a static value and may need to be updated from time to time). What I like is how quickly the tool runs – it can do an entire category of thousands of elements in a minute or so.

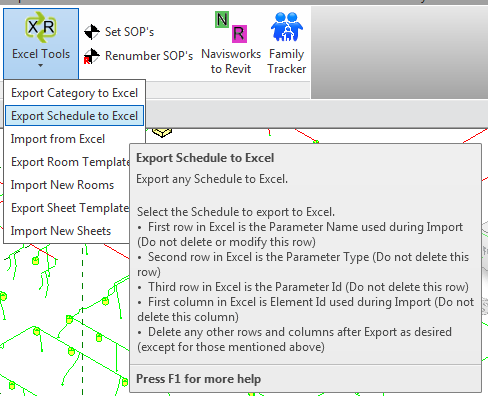
Note: you could also use Bonus Tools to:

  1. Export multiple categories to Excel using a Multi-Category Schedule – “Export Schedule to Excel”)
  2. Adjust the Mark quickly in Excel with autofill, and 
  3. Re-import to Revit. This method is a bit slower, but you can have more control over how the parameter looks, and you can span multiple categories with unique-yet-readable Mark values.

There have been various other automated ways suggested to fix this over the years, such as:
Automatic Numbering of Elements Within Revit 2015 – Cadline Community 
using element positioning

Revit OpEd: Duplicate Mark Values
using Model Review
 
UPDATE: Recent updates to Bonus Tools include

  • new “Show Warnings” tool (applies a temporary Hide/Isolate after you select a html warning export from Revit) and 
  • a “Renumber Categories” tool (select multiple elements on different categories and it will renumber all elements on those categories by pushing the Element ID into the Mark parameter. It is very fast)

When building Revit addins, you may want to implement some specific selection filter. Here is some more good stuff via Alexander Buschmann and The Building Coder:
The zip file SelFilters.zip contains

  • the SelFilter class, 
  • the interface files, an 
  • example external command
    using some of the SelFilter functionality, an 
  • add-in manifest file for
    the example command and a 
  • small Revit project to test it in.

Source:
The Building Coder: SelFilter, a Powerful Generic Selection Filter Utility

To try it out:

  1. In Visual Studio (I use Express 2013 for Windows Desktop), make a new Class Library Project
  2. File – Save project as – RevitSelectionFilters.csproj
  3. Add RevitAPI.dll and RevitAPIUI.dll references (2014)
  4. Add – Existing Items. Choose all the .cs files from the zip
  5. Set project properties Assembly Name and Default namespace to RevitSelectionFilters
  6. Save All
  7. Build Solution
  8. Copy
    SelectionTest.addin and RevitSelectionFilters.dll
    to C:ProgramDataAutodeskRevitAddins2014

Related screenshots:

And screencast showing the examples:

Good intro to Revit customization:
http://help.autodesk.com.s3.amazonaws.com/sfdcarticles/kA230000000tiXXCAY/handout_2116_CM2116.pdf

From the help:
Help: External Commands

Setting up an External Command in Revit 2015:
EXTERNAL COMMAND IN 10 STEPS FOR REVIT 2015 API 

You can use the “Require” option. Any item that is set to “Required” will show as red, while normal unrequired items will remain black. This allows you to quickly, visually review two sets of models for differences, without having to check the Properties – Source File Name constantly:

Obviously, the Required function isn’t really meant for this – Navisworks will try to always keep those items drawn in the scene, so keep that in mind if you are having performance problems after making many items Required.

Also, don’t forget about Properties+… I have also shared my JSON property set for this Navisworks addin over here. You can put it into your UsersUsername folder to get started quickly:

Did you ever notice this little button, available in the Manage Images dialog in Revit 2015?

Although it is pretty self-evident, here you can replace an image by reloading from a different one. You can also use the Reload button to reload an image from the ‘saved path’.

Example:
 

This was a platform enhancement in 2015, as per:
About Managing Images | Revit Products | Autodesk Knowledge Network

You can read more about it at:
About Managing Images | Revit Products | Autodesk Knowledge Network

To simulate a temporary search set in Glue, select an object and view its properties. Then, right-click on the desired “search” property and click Select Similar:

To merge Clash Groups in Navisworks:

  1. Select the Groups you want to Merge with Ctrl key
  2. Right-click, Explode (the child clashes will remain selected)
  3. Right-click, Group

Screencast of above:

  1. Go to https://geoauth.google.com/gev0/free_trial.html
  2. Fill out the form and submit
  3. Download Google Earth Pro and start install
  4. Check your email for username and the free key
  5. When installation prompts you, enter username and serial number, and tick ‘Automatic Login’

As you probably know, Google Earth Pro adds some useful extra features for AEC and BIM… enjoy.

via
LinkedIn

More on the free release:

http://google-latlong.blogspot.com.br/2015/01/google-earth-pro-is-now-free.html

EDIT Thanks to Cornel for this great link, it shows a page with various flavours of the updates for Revit 2015:
http://revit.downloads.autodesk.com/download/2015RVT_RTM/UR6/AutodeskRevit2015UR6andA360CollaborationforRevitv3downloadlinks.htm

Here is the link for Revit 2015 R2:
http://download.autodesk.com/SWDLDDLM/Updates/Revit/UR6/Autodesk_Revit_2015_Update6_forR2.sfx.exe

Readme:
http://download.autodesk.com/SWDLDDLM/Updates/Revit/UR6/Autodesk_Revit_2015_R2%20_UR6_Readme.htm

Enhancements:
http://revit.downloads.autodesk.com/download/2015RVT_RTM/UR6/Enhancements_List_RVT_2015_UR6_forR2.pdf

Autodesk® Revit® Architecture 2015 Updates
 – Corrects the behavior that caused view templates to apply incorrectly for some views, if a temporary view
template was also applied to the view.*
– Improves stability when editing a families.*
– Improves loading and editing families which contain extensible storage.*
– Allows type parameters in upgraded families to swap from one type to another.*
– Improves stability when upgrading a project which contains corrupt families.*
– Improves notification reliability when closing a workset in which a rvt file link has been placed.*
– Improves stability while opening the Material Dialog.

Autodesk® Revit® MEP 2015 Updates
 – Improves highlighting of circuits in the plan view from a panel schedule or System Browser.*

Autodesk® Revit® API 2015 Updates
– Improves querying of point cloud on RCS files using the Revit pointcloud API.*
Direct links copied here: 

Please refer to the Readme links for installation and update enchancement information.

Revit 2015 R2
Link Description
Link
File Name
Readme
Autodesk Revit 2015 Release 2 UR6 Readme.htm
UR6 for Existing Installs
Autodesk_Revit_2015_Update6_forR2.sfx.exe
UR6 for inclusion within Deployment Image
Autodesk_Revit_2015-x64_Update6_forR2_Deployments.exe

Revit Architecture 2015 R2
Link Description
Link
File Name
Readme
Autodesk Revit Architecture 2015 Release 2 UR6 Readme.htm
UR6 for Existing Installs
Autodesk_Revit_Architecture_2015_Update6_forR2.sfx.exe
UR6 for inclusion within Deployment Image
Autodesk_Revit_Architecture_2015-x64_Update6_forR2_Deployments.exe

Revit MEP 2015 R2
Link Description
Link
File Name
Readme
Autodesk Revit MEP 2015 Release 2 UR6 Readme.htm
UR6 for Existing Installs
Autodesk_Revit_MEP_2015_Update6_forR2.sfx.exe
UR6 for inclusion within Deployment Image
Autodesk_Revit_MEP_2015-x64_Update6_forR2_Deployments.exe

Revit Structure 2015 R2
Link Description
Link
File Name
Readme
Autodesk Revit Structure 2015 Release 2 UR6 Readme.htm
UR6 for Existing Installs
Autodesk_Revit_Structure_2015_Update6_forR2.sfx.exe
UR6 for inclusion within Deployment Image
Autodesk_Revit_Structure_2015-x64_Update6_forR2_Deployments.exe

In the Revit 2015 Project Environment, you can access the tools to Manage Selections from the Manage Ribbon:

However, this Ribbon Panel is not available on the default Manage Ribbon in the Family Environment  (Build 20141119_0715(x64) Update Release 5). What to do? Well, we can just add these tools to the QAT (Quick Access Toolbar), so then at least we can use them while building families. There are a couple of ways we can do this, but here is how you can do it while staying in the Family Editor:

  1. In the Family Environment, select more than one element
  2. Right-click on the Save Selection button that appears in the contextual ribbon (the green one) and “Add to Quick Access Toolbar”
  3. Save a Selection
  4. Select more than one thing
  5. Right-click on the Load Selection button that appears in the contextual ribbon (the green one) and “Add to Quick Access Toolbar”

You can also just add these items from the Project Environment, and as the QAT is shared with both environments, they will show when you edit a family.

However, while you can add the “Edit Selection” button to the QAT, it will not work in the Family Environment 🙁

The next generation of successful designers will have one important thing in common – the ability to quickly build the tool they need to accomplish a given task. Revit macro coding is one way to do this (Dynamo is another, even powerful Excel spreadsheets can qualify as BIM tools). But if you have had limited involvement with Revit macros in the past, you might be wondering “So… What is a macro anyway?”

One good place to start would in this great little article by Troy Gates on AUGI. Here are three tips from the article to get you interested:

  • I highly suggest creating the macros in the application tab so you can reuse the macros in any Revit model. If you store the macro inside the model, then it is only available to that Revit model.
  • The Revit API also allows the use of Microsoft LINQ (Language Integrated Query) functions. LINQ allows you to use a database-like query system to filter the elements contained in a collection. It is much more powerful and easier to use, in my opinion, when working with collections of Revit elements.
  • your code needs to define objects that the Revit API will use to interface with these. These objects are called UIDocument and Document…

Read the whole article:
Introduction to Revit Macros | AUGI