Keep this command window open, and type admintool at any time to get an update on your download (speed / bytes downloaded). To do this, type: admintool info http://trial.autodesk.com/SWDLDDLM/2013/RVT/ESD/Autodesk_Revit_2013_English_Win_32-64bit.exe
You need to keep the Trial download window open in your internet browser too…
The Autodesk Sync component does not upgrade properly under the following conditions:
You installed AutoCAD Beta 2013 (or Showcase Beta 2013) and subsequently install Inventor 2013.
You installed Inventor Beta 2013 and subsequently install AutoCAD 2013 (or Showcase 2013 )
A couple of problems arise with this combination of products. Problem 1: Autodesk Sync from the Beta Product cannot be uninstalled Problem 2: You will receive a warning message that the Autodesk Sync component cannot be uninstalled during the installation process of the officially released product. You will need to dismiss this dialog and proceed with the installation. Problem 3: After the installation of the release product is completed, you will find two entries of the Autodesk Sync component listed in Add/Remove Programs. If you decide to do nothing about this problem, the Beta Product and the release product will continue to work as expected. However, if you decide to remove the two entries of the Autodesk Sync component, you will need to follow the instructions described in the Solution section. It is not recommended that you uninstall either of the duplicate entries of the Autodesk Sync component, as this action may break the sync functionality.
Solution
To replace the two entries of Autodesk Sync by the appropriate single entry of the Autodesk Sync component, follow these instructions:
Download and run preInstall.exe
Uninstall the two Autodesk Sync entries in Add/Remove Programs
Install Autodesk Sync using the standalone installer that comes with the software
Oftentimes, you will want to flatten a DWG file before bringing it into Revit, so that Revit isn’t confused by all the Z-values… you can use FLATSHOT or the DXB plotter methods, as described below:
Issue You want to create a flattened two-dimensional (2D) drawing of a three-dimensional (3D) model.
Solution If you are using AutoCAD 2007 and higher, the FLATSHOT command is available to convert 3D solids to flattened 2D views. (Note this command is not available in AutoCAD LT.)
The other method to create a 2D drawing from a 3D model is to:
Configure a DXB plotter using the Add-A-Plotter wizard
Transfer files from one file format to another quickly and easily with the FBX Converter. This utility enables you to convert OBJ, DXF™, DAE, and 3DS files to or from multiple versions of the FBX format. New tools are now available with the FBX Converter 2012.1. You can view FBX animation files in real time with the FBX Viewer, explore and compare FBX file contents with the FBX Explorer, and manage animation takes with the FBX Take Manager.
Here is a quick video of me converting a OBJ to FBX using the above tool. In the video I also use the FBXIMPORT command to bring the FBX into AutoCAD. From there, you could save as DWG and bring into Revit:
PS – This still doesn’t quite solve the Mesh to Solid conversion problem … I am currently experimenting with MESHSMOOTH and CONVTOSOLID.
EDIT:
Here is a vid showing Revit to 3dsMax via FBX.
I am deeply interested in interoperability between form creation tools, as well as workflows that allow you to translate forms between these tools. Unfortunately, there is really no reliable way to bring forms from other tools into Revit and retain parametricism. They have to be imported into Revit as geometry that Revit ‘likes’ (smooth ACIS solids), and then the geometry needs to be re-created as vanilla, or native, Revit geometry.
However, the end result is a good one – because you are giving Revit What it Wants.
This post will look at the following main topics:
Translating geometry from Mesh to Solid
Rebuilding or re-creating the Solid as native Revit geometry
Going from Revit into Rhino via gb XML
Some plugins for Grasshopper
Mesh to Solid I am always on the lookout for ways to convert a mesh 3D form into a nice ACIS solid. From what I hear, Rhino / Grasshopper is the best way to do this.
Here are a couple of other methods: Automesher This is essentially an AutoCAD plugin that can translate polyface mesh forms to proper solids.
Geomagic I installed Geomagic Studio 2012 64 bit. It comes as a fully functional 30 day trial. This software does have various plugins to facilitate parametric data exchange – including one for Inventor. It can convert a mesh to polygons, and fill holes in a the object. It can also smooth faces.
You can convert an object to Points, and then Wrap the points in a new Mesh, use some Mesh tools to tidy it up etc. You can save as a 3DS or Open Inventor file…
From ACIS solid to genuine Revit Form Once you have a nice, smooth closed ACIS solid form, it is time to import into Revit.
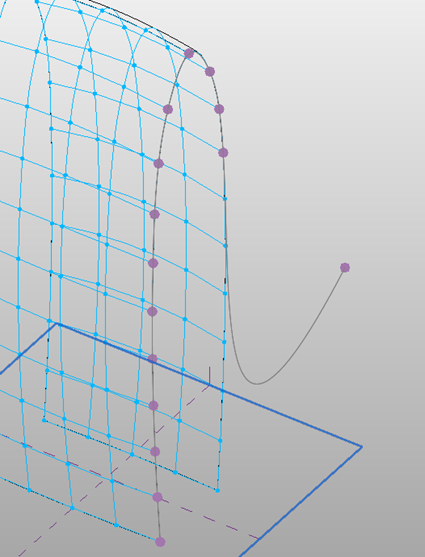
Earlier this year, David Light provided an example on how to re-create a (relatively simple) form that was imported from Rhino. His method essentially involves:
Importing the geometry into a Conceptual Mass family
Divide surface of the imported geometry
Create a template of intersections on the U and V grid.
Going the other way – Revit into Rhino via gbXML Sometimes you may want to translate geometry from a Revit model and bring it into Rhino for analysis. The following quoted paragraph provides one method, and a plugin:
I wanted to streamline the process of transferring Revit geometry into Rhino and simplifying it for DIVA analysis. gbXML seemed like a good way to do that. So that being said, the plugin currently only uses a small portion of the gbXML schema to transfer basic geometry. I would be interested in feedback as I am sure there are bugs… You can download the plugin at the link below. Installation instructions and an example are included. http://www.hilojacobs.com/?page_id=464
Image sourced via http://www.grasshopper3d.com/forum/topics/chameleon?xg_source=activity
Things you can do in Grasshopper with C# Grasshopper features an impressive amount of highly interlinked components – from lines to trees, from circles to graph editors. Sometimes, however, when design tasks become more advanced, we might need to further customize this plugin by directly borrowing from Rhino commands. With these scripting components, the user can quickly solve otherwise more complex design behaviors. This list of C# scripts is a work in progress and is open for requests.Supporting v. 0.8.2 and some previous versions.
Above paragraph via Giulio Piacentino
Image from http://www.giuliopiacentino.com/grasshopper-tools/
These are the latest Revit 2012 Files available for download. They are ready for use but the documentation is very out-of-date: Note: These are compiled with 64-bit Revit and Windows 7, and .NET 4.0. I’m not sure of the effect if you don’t have these. 2012-03-21 WhiteFeetMenuSetR2012.zip 2011-06-31 WhiteFeetMenuDocumentation R2012.zip You’ll need an addin file. Note that you need to edit the path in it to the location where you put the other files. (See installation instructions below.) WfRevitRibbonPanel2012AddIn.zip