Mario Guttman does – he is a Senior Associate and the Firmwide Design Applications Research Leader for Perkins+Will.  He is also the author of the Whitefeet Revit Menu Utilities.

He has changed the way that he provides access to his public downloads – go here.

In the video below, he speaks about the development of the Whitefeet suite.  Here are a few quotes:

“I want to own the automation of my own profession.”

“I’m now part of a large community that has a very short attention span.”

“Let’s not become ‘knowledge Machine Operators’ “

“Own your own value proposition.”

Read more:
Why Mario Guttman is “Still Coding After All These Years”

Quite simple really.  These steps were tested using Revit 2013.

  1. Select all masses, Group, and then Save as Library – Group
  2. Open the RVT from step 1
  3. R button – Export – Export Options – IFC Options
  4. Set Mass and sublevel Form to IfcBuildingElementProxy (copy-paste from another field)
  5. Ok
  6. R button – Export – IFC
  7. R button – Open – IFC
  8. Your new file has all the same Forms, but instead of being Masses, they are now of Generic Model category.  You can copy-paste them back into the original file, and either delete or hide the original Masses.

You could vary some of these steps to change the target category.   But once you have the in-place Generic Models, you can switch them to basically any Category you like.

I get pretty excited when a new Revit blog comes online – is that sad? Revit: Down to the Details has put out some cool posts since it started two months ago, particularly related to fine detailing and also a few posts on rotating curtain panels – both Pattern and System based.

One that particularly caught my eye was this (also thanks to Andy):
Revit: Down to the Details: Rotating Curtain Panel Revisted

In the words of the blog author, MerryMan:
I pride myself at being very efficient at creating Revit components and sometimes going a bit overboard when it comes to creating some of the details of the object.

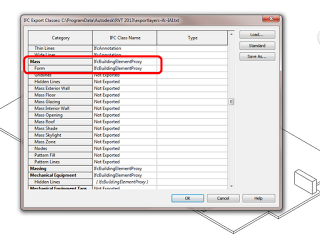
One of the greatest things about Revit, and BIM in general, is that we usually design ‘in context’ – that is, with as much site information as we can get our hands on…

Vasari has that handy little option to import a Google Earth image into your model – well now, Revit has an add-in that does a bit more, including:

  • import surface from Google Earth
  • upload building to Google Earth

It is called:
CADtoEarth | Autodesk Revit | Autodesk Exchange Apps

Here is a quick guide on importing topography from Google Earth:

  1. Close Revit
  2. Install the tool from above link
  3. Start Revit
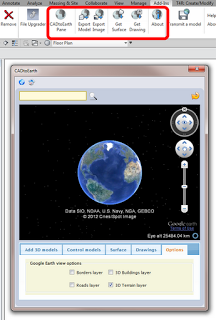
  4. Click the CADtoEarth Pane button
  5. Use the search box at top of the dialog to find your site
  6. Zoom in until the ‘can’t save’ message disappears
  7. Click the Surface tab in the dialog and click  Save Earth’s Surface
  8. Leave the dialog open, and click the Get Surface button on the Revit add-ins Ribbon panel
  9. Your surface has now been added to the Revit file as a Import Symbol.
  10. Use the Topography tool if you want to create a proper Revit topo from the imported data

Heads-up:
http://revitaddons.blogspot.com.au/2012/08/cadtoearth.html

From their website:

CADtoEarth is a family of innovative add-in applications for the most popular CAD packages that link modeling environment with Google Earth and Microsoft Virtual Earth.
CADtoEarth offers some very exciting capabilities. Here is the partial list of what you can expect from the tool:
  • Upload a model directly from modeling session onto Google Earth or Microsoft Virtual Earth
  • Import a section of the surface of the Earth directly from Google Earth into modeling session
  • Position your 3D structure on the imported surface within modeling session and then upload it back to Google Earth or Microsoft Virtual Earth
  • Perform the same operations on 2D objects in modeling environment and Google Maps
At the moment you can download CADtoEarth for the following platforms: SolidWorks, Autodesk Revit and Autodesk Inventor.
Please, take a look at the video demonstrations of CADtoEarth below. Those will give you a good idea about what this tool can do for you today and what you may want to see changed or added to fit your specific needs. So, if you would like to customize or enhance this generic tool to better fit you company guidelines then we’ll be more than happy to discuss the requirements with you.

CADtoEarth | amcbridge.com/

(embedded JWPlayer)

I had some problems with the Autodesk Inventory Advisor.  Basically, I couldn’t get it to access all of the PCs in my domain network.

Evidently, the main issue was DCOM / WMI access.  I tried using Group Policy on the server and I even installed a free Group Policy update utility to push the update through to Client PCs.  However, the server side GP method wasn’t really working for me.

The key thing that seemed to work was using this command on each PC individually:
netsh firewall set service type = remoteadmin mode = enable
(from Enable or Disable the Remote Administration Firewall Rule: Windows Firewall (WF) and Help: Enable or disable the remote administration exception: Windows Firewall (WF) )

In Windows 7, the above command will probably still work, but the proper one is:
netsh advfirewall firewall set rule group=”Windows Remote Management” new enable=yes 
here
and
Windows 7 Remote Administration Firewall group

After the above command was run on a PC, the Inventory Advisor could access it.

It is a pretty cool utility, because you can access hardware information from all PCs in the network (as well as the Autodesk related info).

Download the Autodesk Inventory Advisor.

For detailed instructions, refer to the Autodesk Inventory Advisor tool guide.


Autodesk Inventory Advisor Tool Guide (pdf – 1369Kb)

Note: Some products may not be located by the Autodesk Inventory Advisor.

via
Autodesk – License Compliance – Autodesk Inventory Advisor

Another blog post about this utility:
Adventures in the World of BIM: Complacent or Compliant? You Decide!

I have been using Revit for over 5 years now, and I don’t think I have ever used the Show Hidden Lines tool.  Am I the only one?  Basically, its a two pick tool, first pick for the ‘front’ element, second pick for the ‘back’ one – then, then lines from the back element will show through as Hidden Lines.

This tool is hiding on the View ribbon panel:

From the Wiki:
After you put detail components in the correct graphic draw order, you can use the Show Hidden Lines tool to obscure the lines behind a detail component.
via
Show Hidden Lines – WikiHelp

Greg beat me to these ones … new Subscription enhancements:

Download software enhancements and Autodesk 360 desktop clients.

Title Type Release Date
AWWA Pipe Content for Autodesk Revit MEP 2012 and Autodesk Revit MEP 2013 Extension 2012-07-31
Suite Workflows 2013 Extension 2012-07-30
Structure Generator Extension for Autodesk Revit 2013, Autodesk Revit Architecture 2013 and Autodesk Revit Structure 2013 software Application 2012-07-30
Timber Roof Framing Extensions for Revit 2013 Extension 2012-07-30