Download the add-in:
Topo From Lines | Autodesk Revit | Autodesk Exchange Apps

Update it:
Use this files in this ZIP to replace the files installed in C:ProgramDataAutodeskApplicationPluginsTopo From Lines.bundle
http://gdurl.com/i2vu

Read the post:
Topo From Lines now available on the Autodesk App Store | Boost Your BIM – making Revit even better

Heads-up thanks to Belinda Thompson

Oh, but if you want a super high resolution contour import, check out:
What Revit Wants: Using Civil3D to increase your Topography resolution in Revit

No one has created the FBX importer that I requested for Revit, but hey, maybe one day.  In the meantime, here are some other importer / exporters of interest…

Read the whole past:
The Building Coder: Graphics Pipeline Custom Exporter

Quote:
“Philippe Leefsma recently presented an online 3D WebGL viewer for both mobile and desktop devices implemented using JavaScript, WebGL and the threejs library.
It displays graphics stored in the same custom JSON format that Philippe already defined for his initial cloud based viewer and for which Adam Nagy in turn implemented a Revit 2013 exporter.
I would love to create a Revit exporter for this format based on the new custom exporter API, for fun and comparison.”

Have you noticed that (typically) Revit 2014 will only show Import Categories for those imports that actually exist in a view?

I think this is a great feature that makes things a bit cleaner when navigating Visibility / Graphics and looking for Imports etc.

Short post, but you know, there is always more to come 🙂  Over 250 draft posts, and about 100 more in my ‘to blog’ email folder…

You may want to know how to set up access to the public macro repository.  Here is a bit of a step by step:

  1. Install SourceTree
  2. Follow prompts to install additional packages
  3. Login to the BitBucket Page in a web browser (register if you haven’t already)
  4. Click on the arrow and Check out in SourceTree
  5. Clone New — Make sure the path is set exactly to this (make folders if you have to):
    C:ProgramDataAutodeskRevitMacros2014RevitAppHookupPublic_2014
  6. After fetching, restart Revit.

Its important that it looks like this in SourceTree:

Upon restart, you should see the Public_2014 tree in your Macro Manager.

To ensure you have the latest version:

  1. Do a Fetch and Pull in SourceTree
  2. Edit one of the macros
  3. Do a Rebuild by hitting F8 – any new code or extra macros should now show up

(thanks to Troy Gates for above tip)

Note:  Make a sample macro and it will populate files and folders in:
C:ProgramDataAutodeskRevitMacros2014

You can also carefully follow the images at :
A public Git repository for sharing Revit Macros at BitBucket | Boost Your BIM – making Revit even better

After reviewing Andy’s and Tim’s recent posts surrounding trees and reaction, I would like to contribute this little idea.

Its a very simple setup – just a 2pt Adaptive with an “extension” (created by controlling the host reference planes of a couple of points), that has been loaded in and repeated across a treetop form.  As you move the centre adaptive point up and down, the surrounding spines react to maintain a perpendicular relationship to the main form.

I have added parameters for the extension length, and top and base radius of the spines.  You can adjust these in the Project Browser by modifying the Type Properties of the 2pt family.

Here’s the family for download.

In previous versions of Revit, Key Schedules were often used for generic data, general notes and the like.  However, Key Schedules have limitations – one of which is that you cannot insert an image in a Data Row.

Are you ready to see a more powerful version of generic, custom schedules in Revit?  Do this:

  1. Make a Schedule that finds no elements (you can use a Filter), and turn off “Show Headers” but leave “Show Title” checked
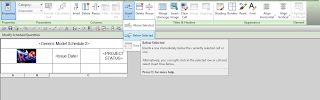
  2. Click in the Title
  3. Insert Row Below Selected, as per image:

You can also insert columns (these are not “aligned” to actual Schedule parameters).

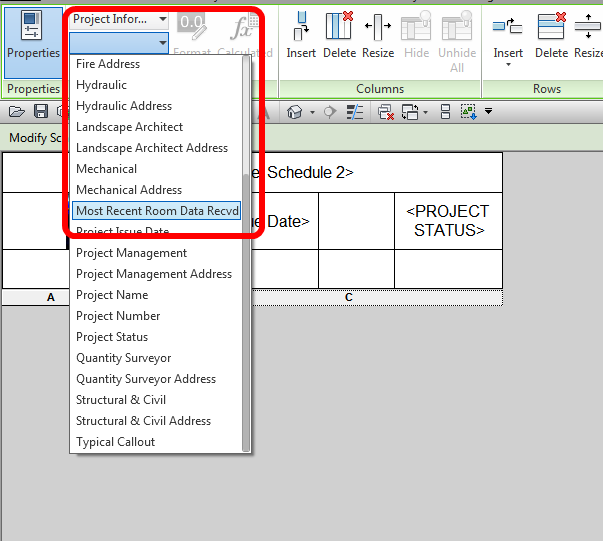
And guess what?  You can insert images into these cells, AND you can insert Fields / Parameters by using the drop down list:

Interestingly, this is a somewhat un-Revit workflow – we have a sandbox here for creating a custom Schedule, perhaps for Title Sheets (including Consultant Logos).  But you cannot really enter or leverage new data here – it is reading data from the Project or View (Schedule) parameters.  However, you can enter “dumb” text in any of these fields.

Idea via this comment:
David Conant (yep, that guy)
Principal User Experience Designer

In 2014, create a schedule that finds no elements (use an unused category or filter out the elements). Go to the header and add rows and columns. Voila, a generic table into which you can add text, project parameters, view parameters, or images. You can modify cell shading, borders, font properties etc. The table will appear in the project browser schedule section.
link: Revit Users | LinkedIn

Full thread:
I know Revit schedules are very versatile and can be used many other ways than simply scheduling items in a model. What are some of the more creative ways you have found to use Revit schedules? | LinkedIn

You can do a logical test between a Project Parameter (in essence, a global constant for this Revit file) and an element parameter in most schedules.  If we leverage this for Rooms, we can check if the current Room Data has been checked against the most recent set of briefing documents from the Client.

To reveal Project Information as a possible parameter in a Room Schedule, just tick the “Include elements in linked files” box.

Both the Project Parameter and the SP parameter applied to the Room in the image above are Number type, meaning we can do the “greater than” test.

You can colour a given column field using Conditional Formatting, but did you know you can base the conditional formatting test on any of the fields in the Schedule (not just the target field for the formatting?)

From the github page:
uses a python script to automatically generate Revit journal files. When run, these journal files handle opening a specified model, instigating the testing plugin, and running the specified test. This document outlines the components of the Dynamo Revit Test Framework and provides examples of how to run NUnit tests against Revit from the command line.

results file is a proper nunit results file and should be able to be parsed as such by continuous integration systems like Jenkins, etc.

via

Is anyone using this?  Seems to be a competitor to BIM360 / Glue / Revizto?  These “collaboration” tools are starting to pile up quickly…

This can be downloaded if you login to SlideShare:

via

More info: Collaborative BIM | Corporate Collaboration in the cloud – asite.com

Typically, large point clouds are stored on local hard drives.  Revit allows for this with the Options – “Root path for point clouds” setting.
Here is an easy way to copy them:
Use Robocopy. (Should be located in C:WindowsSystem32)
Make a BAT file that looks something like this:
robocopy C:ProjectsPointClouds OTHER_PC_NAMEPointClouds(shared folder) *.RCS *.RCP /MIR /COPY:DAT /DCOPY:T /ZB /LOG:C:TEMPlogfile.log /R:2 /xn
This script was used to copy only RCP and RCS files from my local hd to a shared drive on another users PC, so that we could both work with large point cloud files without clogging up the server with like 50gb of point data. Keep in mind you need to put these files in the same place relative to your Revit Options – Root Path for Point Clouds.

Additionally, if you have not previously been using the root folder for all your point clouds, you may have to re-link them to create the appropriate path associativity.