Currently, exporting a flat 2D DWG file from AutoCAD or Navisworks to Revizto will probably yield the following message:

However, you can simply take these steps to work around the issue:
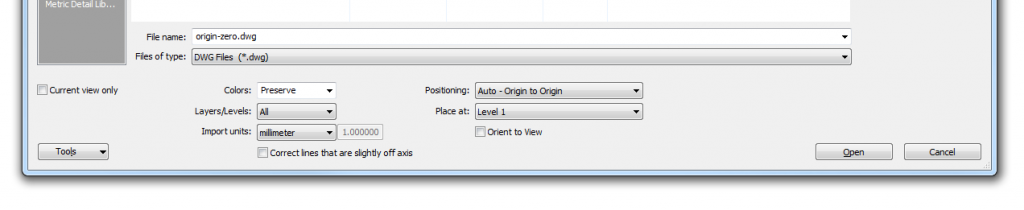
  1. Open the DWG file
  2. Select all objects
  3. Change the Thickness to something small but non-zero (like 0.1)


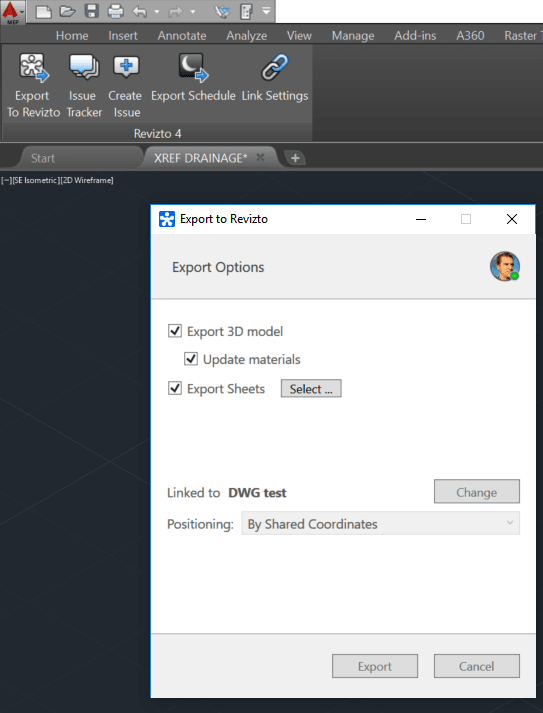
  4. Export the model to Revizto (either directly or via Navisworks)

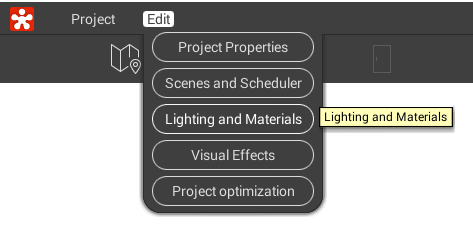
  5. Once in Revizto, you may want to change the background of your Scene to all-white or some solid colour. Just click on Edit -> Lighting and Materials

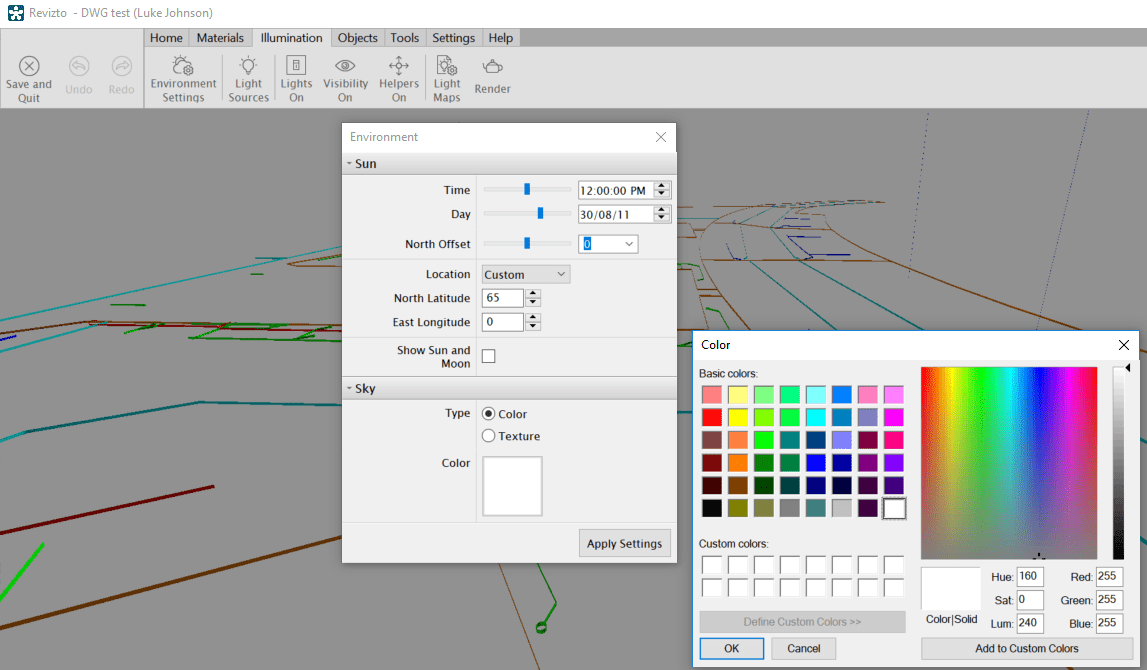
  6. In the Editor, click on Illumination -> Environment Settings and change the Sky Type to Color

  7. Finally, click Save and Quit

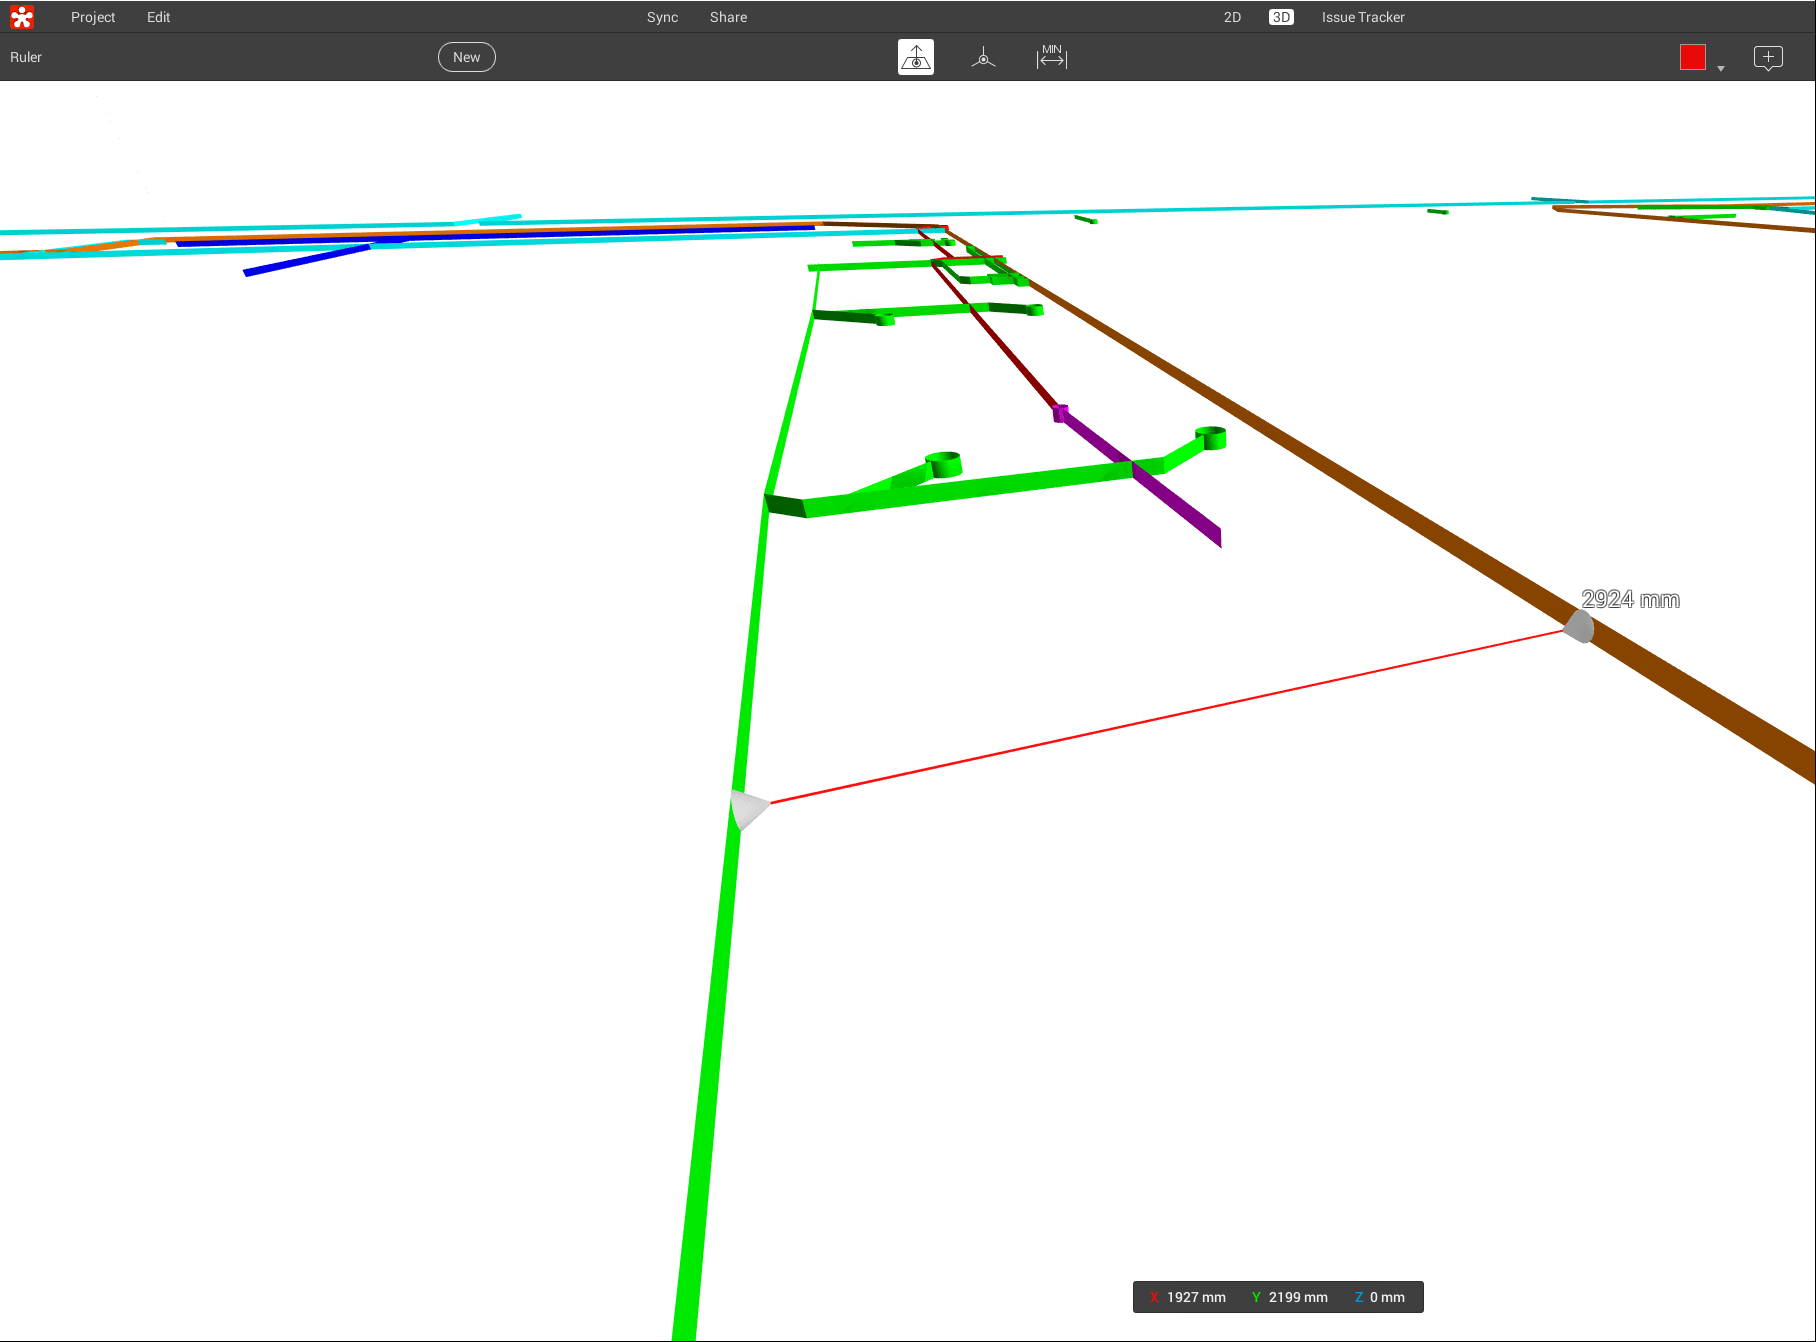
In Revizto Viewer, you can now see your DWG file as thin surfaces where there used to be 2D lines. This also means that you can use the measure tool:

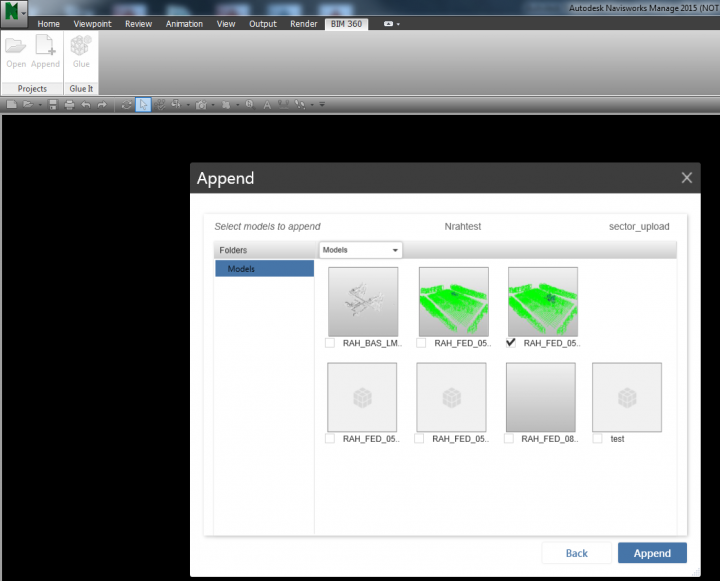
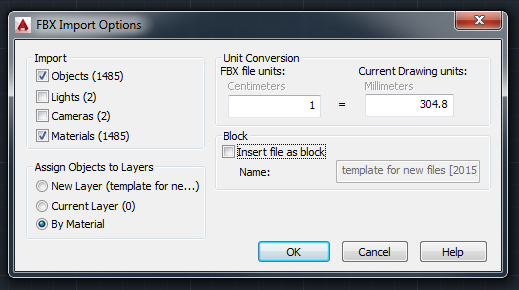
You can use a similar method to the above (change Thickness to non-zero) while using a 2D DWG file, to:

  • export from AutoCAD to Navisworks as ‘3D’ elements
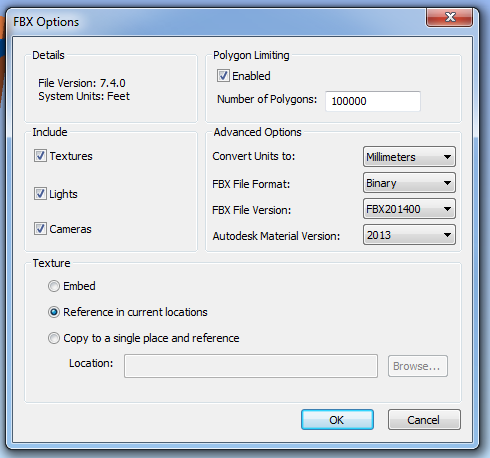
  • export an FBX from AutoCAD as 3D

Here’s another way to make a 3D PDF, this time with all native Autodesk products.

  1. Use Virtual Agent to download Inventor Publisher 2015 trial
  2. Export a view from Revit (or 3dsMax, or AutoCAD, or Navisworks) as FBX that you would like to make into a 3D PDF
  3. Start Inventor Publisher
  4. New file
  5. Select the FBX
  6. Orient the imported FBX in the view and use the Viewcube to Set Current View as Front or Top as appropriate
  7. On the Home Ribbon under Publish, choose Adobe PDF
  8. Select 3D PDF
  9. Save the file

It makes very decent quality 3D PDFs, with good colour representation.

Idea via:
http://forums.autodesk.com/t5/revit-architecture/3d-pdf/td-p/2843148

I know you can use various addins (like Case Extrude Rooms to 3D Mass) to make a form out of a Room element in Revit. However, there is a vanilla Autodesk way you could go about this:

  1. Export a Revit view to Navisworks with all of the Room-related export boxes ticked in the Navisworks Exporter addin
  2. Open / append the NWC in Navisworks
  3. Turn off everything except the Room objects that the Navisworks Exporter created
  4. Export the scene to FBX, convert to DWG, import it to a family, place that family back in the project (using parts of this workflow). Use origin-to-origin linking to get things right.

You could then use the Room 3D element “family” in an Interference Check, to determine what elements exist in Rooms (this would only work for Categories that support Interference Check in Revit).

As one of the reviews states, this is a “very fast” way to open and view FBX files.

New in FBX Review v1.2

  • Added support for geometry and textures contained in a zip file.
  • Added support for geometry caching: Maya cache, 3ds Max cache, and alembic format.
  • Added Camera refocusing based on user-targeted area.
  • Added support for iOS and Mac OS X operating systems. 

Download at:
Autodesk FBX Review – Windows 64 Bit – Autodesk Exchange Apps

Or for iOS, Mac OS, Win 8 see below:

iOS 7.0

Visit iTunes online or browse in the App Store directly to download for iPhone or iPad.

Mac OS X

Visit the Mac App Store to download for OS X.

Windows 8

Visit the Microsoft Windows Store directly from your Windows 8 device.

Windows 7

Visit the Autodesk Exchange Store to download for Windows 7.

Part of working in a BIM environment is putting together all of the little pieces that you know and turning it into a useful workflow. Do you have a 3D file, such as an FBX, that has some camera views saved in it, and you would like to convert these to BCF, perhaps for eventual import to Revit or some other application?

Navisworks can help here. It is pretty smart when it comes to most 3D formats. Importing an FBX will bring in camera views as Saved Viewpoints. If you have an FBX file from 123D Catch, it will contain Camera views that match the actual camera locations. Here’s what to do:

  1. Append the FBX to Navisworks 2014
  2. Use the addin and method here to export from Navisworks viewpoints to BCF issues
  3. Import to Revit or your software of choice using the relevant BCF importer

Firstly, make sure you have a model on Glue that you can access. Did you know that when you Glue something from Navisworks, it makes an NWD and puts it in a folder like this:
“C:UsersLuke JohnsonAppDataLocalNavisworksPlugin63baac4b-76c8-4ff8-9039-d51645fd1ddc.nwd”

Once you have a model on Glue that you would like to download and use as modelling context in Revit, make a new Navisworks file and:

  1. Append that model back to Navisworks from Glue (it will look like you opened an NWD, with Clashes, Search Sets and Viewpoints all appearing. This tells us that BIM 360 Glue stores all that information in the cloud, at least when the model “originated” in Navisworks.)
  2. Use this method to export FBX and import to AutoCAD at correct scale (Limit your Navis view to only the elements necessary for modelling context. For example, walls or facade only.)
  3. Save the DWG
  4. Make a new Revit file. I had problems using the Construction template – it seemed to break the coordinates somehow… In any case, when I just used “None” template, it worked fine.
  5. Link the DWG into Revit, Origin to Origin
  6. Do your Revit modelling (in the screenshots below, I modelled part of a roof)
  7. Glue the new roof directly from Revit (you may want to Hide the DWG file prior to Appending). This will create a new Model. On BIM 360 Glue, you now have the original model plus this new model from Revit.
  8. Go to Glue app in Windows and make a new Merged Model. Tick the boxes for the original model, and this new model from Revit.
  9. Back in Navisworks, we can either choose to Append the entire new merged model, or just the new “piece” that we modelled in Revit.

If you have consistently used origin-to-origin “Revit zero” linking and project internal coordinates, you shouldn’t have any problems.

Some screenshots:

Notes:
55mb NWD took about 20mins to Glue

In this test, I used 2015 versions of Navisworks and Revit

I have previously discussed going from Navisworks to Revit using FBX – 3dsMax – SAT. However, maybe we can do this without 3dsMax. Did you know that vanilla AutoCAD has a FBXIMPORT command?

1) Export FBX from Navisworks – it will ignore Section clipping planes, but it will respect the Hide/Required setting of the view. You can limit polygons (advised for big models)

2) FBXIMPORT in AutoCAD – untick Cameras and Block options as they can be problematic.
Then save DWG. (Note – see below for correct 1:304.8 import scale)
EDIT: If using Navisworks 2015 FBX export to version 2014, with Advanced Options units set to millimeters, you can import to AutoCAD 2015 with 1:1 scale factor (using latest service packs)

3) Open Revit and Link in the DWG.
For this example, I used Origin to Origin as I wanted to try round-tripping back to Navisworks.

Once I exported the NWC and put it back into Revit, I noticed the file was out of scale. Now, I experimented with a few different scale settings, but everytime it was a scale of about 30 or 300 wrong. 1 foot = exactly 304.8 mm. Evidently, the “internal” units of an FBX are feet. So, when we import to AutoCAD we need to use this setting to translate to mm:

This time, when I exported the Revit view to a NWC, and then appended it back to Navisworks – it can came back in exactly the right place. This workflow relies on using the internal Revit Zero point and Origin to Origin linking.

There you go – now you can roundtrip any mesh geometry from Navisworks to AutoCAD to Revit and back to Navisworks 🙂

What’s so good about FBX?
Geometry, materials, lights and camera assets are all contained in the file.  It also supports animation.

What formats can FBX Review handle?
.fbx, .3ds, .obj, .dxf, .dae, .bvh, .htr, .trc, .asf, .amc, .c3d, .aoa, .mcd.

From the App description:
Features
* Import and review 3D files without using full commercial 3D animation software.
* DirectX 11 enabled viewport for high-fidelity asset review.
* Toggle shading modes, animations, cameras, and scene lights.
* Familiar and intuitive playback controls to review animations.
* Formats supported: .fbx, .3ds, .obj, .dxf, .dae, .bvh, .htr, .trc, .asf, .amc, .c3d, .aoa, .mcd.

Essentially, an artist can work with whatever 3D software he or she prefers and then share the asset output without having to worry about compatibility or conversion.
(via View 3D models and animations on Windows 8 with Autodesk FBX Review | Windows Phone Central

 Download for Windows 8

Windows Store


Download for Windows 7

Note – if you are using XP, you will have to use the superseded FBX Converter:

FBX 2013.3 Converter for Windows (exe – 26335Kb)
FBX 2013.3 Converter for Windows 64-bit (exe – 26303Kb)

Heads-up via


Further reading: Autodesk ships FBX Review | CG Channel

Have you made something cool and architectural in Minecraft and you want to make it real?  How about sending it out to Blender?  Direct CG has made a tutorial to show you how …

This tutorial covers:

  • downloading and installing the mcobj Minecraft to .obj exporter by quag
  • converting your Minecraft world into usable .obj format
  • importing your Minecraft world into Blender
  • rendering your first Minecraft image
  • how to showcase your world with clay materials with Fabio Russo’s Clay Render addon

If you then want to move the OBJ file between formats, check out my previous posts:
Sketchup tools – DWG import / export, OBJ importer, IFC importer

Convert OBJ, DXF, DAE and 3DS to FBX for free

Read on at:
Minecraft to Blender – directcg