My previous post prompted me to look for the actual ‘Upfront Ezine’ article…here is the link!
A interesting picture from this page:

What Revit Wants

My previous post prompted me to look for the actual ‘Upfront Ezine’ article…here is the link!
A interesting picture from this page:
This is from an AUGI archive – its worth a read. I have bolded some of the points I thought were cool:
PeterJ
2004-11-17, 09:27 AM
Ralph Grabowski, writing in Upfront Ezine stated “The CAD social event of the month was the Revit launch, which took place April 5, 2000 in Cambridge MA USA.” and then went on to describe the event as follows….Revit Launch: Four o’clock and time for the Revit event at the Aurthur M Sackler lecture hall. There are 125 invited attendees, but very few media. From what I and others could see, there is no one from CADalyst, Cadence, or Penton Publishing. Revit ceo Dale Lemont hosts the two-hour event, calling this “an important moment in the history of CAD.“ The parametric architectural software will be sold by monthly subscription. In stark contrast to SolidWorks, Revit will have no resellers — everything by the Web. Nobody says it for sure, but I finally decide that Revit is short for “revise it.”
Update (April 2002): Almost exactly two years after the launch, Revit sold itself to Autodesk for US$133 million. Although the company had managed to create a huge “mindshare” acceptance, Revit sales were described by Autodesk CEO Carol Bartz as “small pilot user base,” what she would expect from a “start-up.”
Dale refreshingly admits much is missing from Revit, and that the following functions will be added over the next 24 months: massing studies, stacking, canted walls, sloping structures, turn on more AccuRender functions, multi-user enhancements, estimation at all stages, product catalogs, schedules, architectural detailing, Web collaboration, ASP capabilities, landscape, HVAC, plumbing, and electrical.
The product will be available in early May; delivery has slipped by two weeks. A new release is promised every 90 days in first year — “Tough on us book authors,” I note wryly to the Revit employee sitting near me.
http://www.upfrontezine.com/travel/founders.jpg
In the background, ceo David Lemont. In the foreground, founder Leonid Raiz (at left) and Irwin Jungreis.
Revit Dinner: The product launch is followed by dinner in the courtyard of the Fogg Art Museum, located across the street. The museum features a small but broad collection of art: religious, African, modern, and classical. My wife would have enjoyed viewing the paintings by van Gough, Monet, and Renoir.
Each of our nametags have a color. I find out that — ironically enough — green indicates you had ordered beef, while red indicates vegetarian; my color was yellow, for salmon.
On one side of me sits a representative from Atlas Ventures, who asked me what I thought of Revit and the launch. How do you answer a man who has sunk millions of dollars into this?
On the other side of sits Brad Holtz (of ‘CAD Rating Guide’ fame) and next to him, Geoffrey Langdon (of architectural CAD shootout fame). The thought underlying this whole event is “SolidWorks or Numera?” Would Revit rocket into orbit, or burn out at the launch pad? We reminisce over CAD ventures that have burned through their money over the years. Brad declared himself the winner in remembering the worst CAD launch ever: TriumphCAD spent all its money on ads — no product ever shipped.
http://www.upfrontezine.com/travel/brad.jpg
Brad Holtz and Geoffrey Langdon.
We muse over Revit’s business model. “How long does Revit have before investors would want their money back?” The problem with a monthly subscription model is that money trickles in more slowly. Take 60 Revit employees earning an average of US$100,000/yr each. Assume Revit nets $100/mo per subscription. That means they need 5,000 subscriptions just to break even. “The question is,” summarizes Brad, “How long will it take to ramp up to 5,000 subscriptions?” As I write this, I also wonder about “subscription churn” where gains from new subscribers are offset by losses from unsubscribers.
Just as we complete our analysis, an earnest young Revit employee comes by our table to introduce himself. “I’m in charge of developing the business model in conjunction with Harvard Business School,” he explains. The three of us roar with laughter: “Funny you should mention that…”. We give him our analysis — at no charge.
http://www.upfrontezine.com/travel/dinner.jpg
Dinner in the Fogg Art Museum’s courtyard.
link to AUGI Forum thread here
Release 2011: The Families Guide was not updated for Revit 2011. Please use the 2010 edition of the Families Guide.
Autodesk – Autodesk Revit Architecture Services & Support – Families Guide
Do you get the feeling that perhaps, if Autodesk put it off long enough, they won’t have to update some of this documentation?
With the official Wiki now in operation, and a plethora of blogs, where will Autodesk draw the line with regards to Help documentation?
If you want to print all the .htm or .html files in a folder, you could use the function in Internet Explorer that allows you to ‘Print All Linked Documents’:
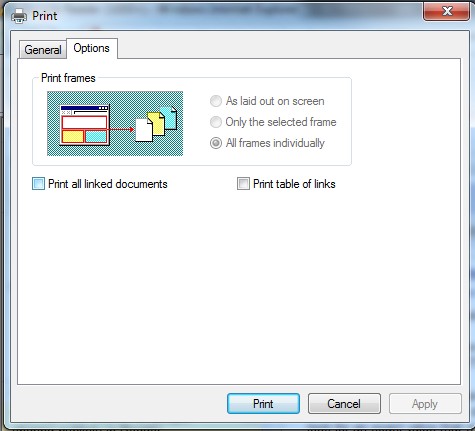
To use this, you need to have a HTML document that links to all of the .htm or .html files in the folder. To automatically generate such a document, you could use this script (you will need to copy the text to a .cmd file, and change the ‘target’ to the folder you want to make a list.htm for):
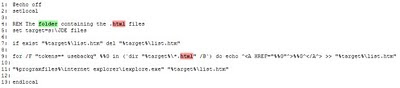
This script was taken from the Google Cache of Experts Exchange:
Batch print HTML files : batch, print, html, files
Consider this – using the above tips, you could convert a folder of HTML files to PDFs using the automatic function in PDFCreator…
You have two views, and you want a DWG Import or Link to be displayed the same in both views. What is the quickest way to accomplish this?
Here is a quick video:
Do you get annoyed by results from certain domains clogging up your Google Search?
Just use Firefox, install Greasemonkey, and then install the script below:
Google Hit Hider by Domain (Filter / Block Sites) for Greasemonkey
Now, when you search using Google, you can ‘block’ certain domains from the results!
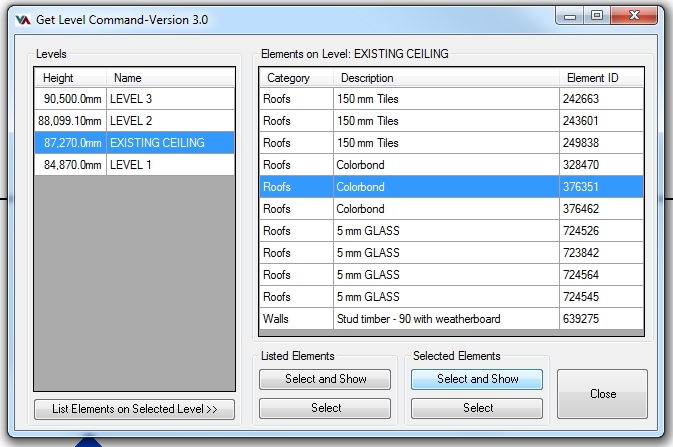
A while ago I posted about the GetLevel addon by Steve Faust. However, I haven’t posted about it since 2011 came out – so here we go…
Imagine you have just picked up a RVT project and it has 20 levels in it – and you have no idea which elements are associated to which particular level. Its a bit of a nightmare, but there is a tool that can help – its called GetLevel.
First, download GetLevel.zip for 2011. You can get it from AUGI at this post, or the Revit Forum at this post (you will have to register for one of these forums, and then login).
Direct Link AUGI
Direct Link Revit Forum
Once you have downloaded it:
To test and use the addin:
Thanks again Steve for this cool add-in! http://www.revolutiondesign.biz/Home.htm
Revit Fox recently re-posted about the 6 Phases of Revit. Ultimate credit for this apparently goes to Chris Zoog.
It is “perhaps the most re-posted Revit resource in history!”
http://seilercadsupport.wordpress.com/2010/12/11/the-6-phases-of-a-revit-user/
One of the oldest blog posts I found about it was at REVITit http://revitit.com/blog/?page_id=207
I am trying to find the ‘original’ post document to link to it – anyone have any idea where the ‘oldest’ ‘in the wild’ version of this exists?
In harmony with the title of this blog, I thought the description of the final phase was worth re-stating (yet again, I know…) Here it is:
You have mastered nearly all things Revit. You “know” what Revit “likes”, and what it “dislikes” during model construction, a sixth sense, really. You spend your time exploring and tweaking advanced scheduling, OBDC, external parameters, AR3. You have a template to beat all templates, families for every situation.
Copyright 2003 Chris Zoog
To know What Revit Wants is indeed to “know” what Revit “likes”, and what it “dislikes”…a sixth sense, really.