The coordinate scheduling tool, developed by Excitech for the Revit Platform will allow accurate and simple scheduling of X,Y and Z coordinates from Revit model elements. This is suitable for a whole range of applications but particularly the easy production of Piling schedules. 

It is part of the free Excitech Revit Toolkit.  It has also been around for a long time, as Revit add-ins go.  The other key function of this tookit is the Element Renumber tool.

Download by clicking on appropriate version link at the bottom of this page.  You will need to register / login.

Other info:
http://www.excitech.co.uk/products/syndicated_content/revit-toolkit.asp

Heads-up:
Revit @ Waterman: Schedule those Levels – A Method (with a little help from our friends)

What is it?  Let’s call it in VNC for Autodesk software…
 It lets you drive Autodesk software installed on your primary computer from a remote computer or iPad for fast access to native design data over standard networks. To use it, simply install Autodesk Remote on the PC you want to share. Install it again on the machine you want to connect from and start your connection. Autodesk Remote currently works in North-America only. Click here for a FAQ.

If you happen to be in North America, check out the app at:
Autodesk� Remote | Autodesk Revit | Autodesk Exchange Apps

Heads-up:
http://revitaddons.blogspot.com.au/2013/07/autodesk-remote-drive-revit-and-other.html?utm_source=feedburner&utm_medium=feed&utm_campaign=Feed:+RevitAdd-ons+%28Revit+Add-Ons%29

via Gordon Price.  Check out his great Revit deployment course on Udemy here.

“with WU1 for 2014 out, and odd, I thought I would let you know I have tested it using the standard WU recipe, and it works fine. It requires access to the initial deployment to run silently, which is different from previous Revit web updates. And so far as I can tell there is no command line switch to tell it where to find the deployment.
We shall see if this is the new (and bad!) way of doing things, or just a one time anomaly.”

On a range of topics:

Finally:

and

This is using XP 64-bit with Revit 2013 Update 3, but similar principles will apply to other OS and software versions:

  1. Install Revit 2013 SDK if you don’t have it already, from here
  2. Install RevitAddinManager from SDKAdd-In Manager folder
  3. Open Sharpdevelop, you should be able to find it at:
    C:Program FilesAutodeskRevit Architecture 2013ProgramSDAbin
  4. Drag and drop RevitLookup.csproj to the Projects panel on the left
  5. Compile Revitlookup.  Make sure to Add Reference Path (project / properties) to your Revit 2013 Program folder.  Then click Build, Build Solution.  I received a bunch of Warnings about obsolete classes and properties, but no errors.
  6. Open Revit and any project
  7. External Tools – Add-in Manager (automatic)
  8. Load the compiled RevitLookup.dll and then use the Save to Add-ins folder option
  9. Restart Revit
Now, to use RevitLookup to find the Element ID of a View Template and copy it to another project:
  1. Open a Project
  2. Add-Ins, Revit Lookup, Snoop DB…
  3. Scroll down and select the appropriate View reference, ie. ViewPlan for a Template that was created from / for a Plan View
  4. When you select it, the Element ID will be shown on the right and you can copy it to Clipboard
  5. Select By ID, Paste
  6. Ctrl+C
  7. Switch to another project
  8. Paste – Aligned to Selected Level
  9. Done 🙂

I love it when an idea just works 🙂  Let’s say you have 100 view templates in a project, and you make a new one.  You want to transfer only that new template to another project (not the other 100 View Templates).  If you use Transfer Project Standards (on View Templates and Filters), you will get the lot.  How can we transfer just one of them?

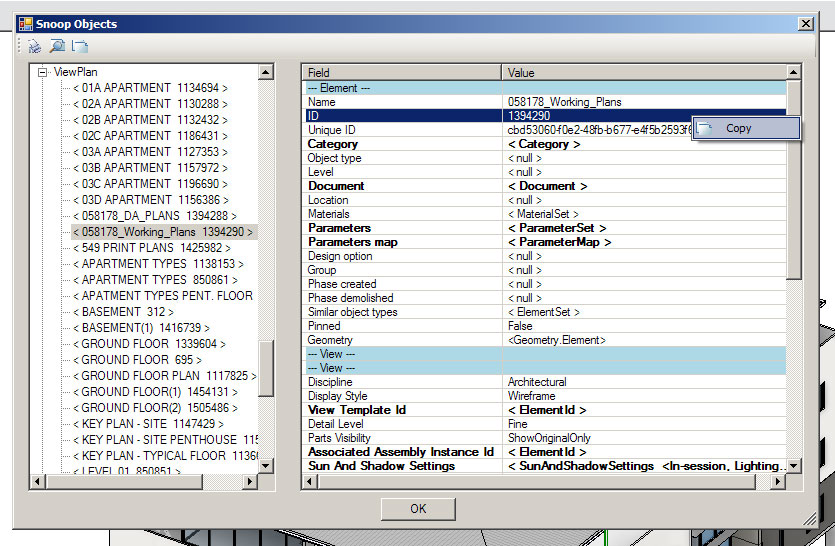
Well, you need to think through the problem.  Everything in Revit has an Element ID.  View Templates are a special kind of view… So we need to get the Element ID of the View Template.  Then we should be able to Copy / Paste it.

Here’s how I did it:

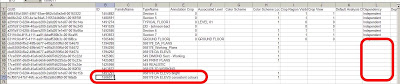
  1. Using Whitefeet Tools, (Utility Tools — Schedule Tools), Write Category to Excel, and select Views.  (Make sure you press the ‘All Elements in Model’ radio button)
  2. Excel will open with all Views listed, including their Element IDs
  3. If you Sort Data in Excel by the ‘Dependency’ column, all of the View Templates will be grouped together as they do not have any data in this column
  4. Select the Cell containing the Element ID of the View Template you want to transfer
  5. In the source project — Select by ID, Paste that Element ID.  Once selected, Copy to Clipboard (Ctrl+C)
  6. In the target project — Modify ribbon, Paste, Aligned to Selected Levels, just pick a level at random
  7. The new View Template is now available in the target project.  Apply it to any view you like…
Note:  At step 6, a simple Ctrl+V would not work
You could also adapt this to copy a selected set of View Templates – just grab their element IDs at step 4, and create a list of them separated by commas.  Use this in the Copy / Paste operations at step 5 and 6.
This is a classic What Revit Wants scenario – if you know how the program works, you can think through the problem and devise a solution that is not readily apparent to the casual user.
PS – it would be nice to figure out a way to get the Element ID of a View Template without using any addins … does anyone have a good way of doing this?

EDIT2 For the add-in free method, use the macro provided by Harry Mattison at:
Transferring view templates, not in 2014 | Boost Your BIM – making Revit even better

EDIT1 I also posted a method using the free RevitLookup add-in at https://wrw.is/2013/07/compiling-and-using-revitlookup-for.html