The webcast addresses two main areas: an introduction to Revit programming for beginners, including a quick walkthrough of basic concepts, and a discussion of some of the new functionality provided by the Revit 2013 API, which will be of interest to both beginners and experienced developers. The two parts are roughly equal in length.
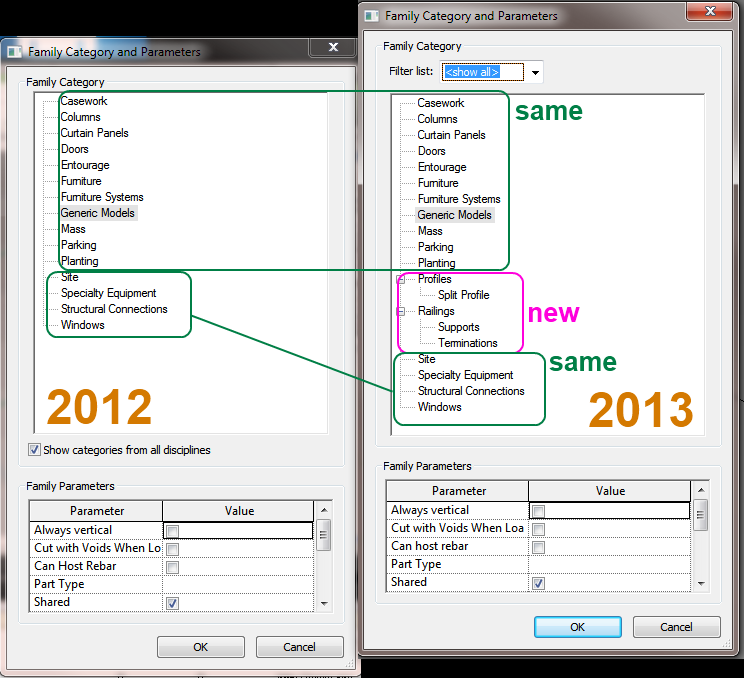
Think of this scenario – you have 5 different Revit projects all linked together in various ways. You want to ensure that there is some consistency in the way the Plan views appear (possibly because you intend to use Linked Views).
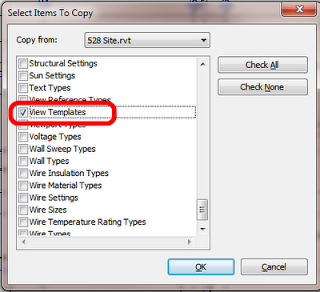
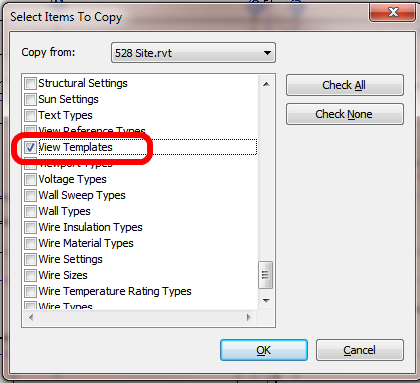
The answer – View Templates 2013 (of course).
First of all, make or open a Template file. Set up the View Templates in this file. Then save it, and Transfer Project Standards (View Templates) from this Template into the 5 other project files.
Apply the View Template to the applicable views in each of the 5 projects.
Now, when you want to update the View Template across all 5 projects:
Open the Template file (it could be saved as an RTE or RVT in your project folder, such as View-Templates.rte)
For each project RVT file: Open it,
Transfer Project Standards from the View-Templates.rte TO the Project file
Overwrite!!!
Rinse and repeat for all 5 project files.
Your View Templates are now synchronised between all the RVT links.
Your Views have automatically been adjusted due to the updated View Template definitions.
There are some traps and limitations with this idea, but I think that it could be powerful if used properly.
Revit au Quotidien has picked up a few mildly scary issues when exporting to DWG from Revit 2013, one seems to be related to dimensions with Text Below, the other to EQ display of actual dimensions.
Go to the Revit program folder (C:Program FilesAutodeskRevit Architecture 2013Program for RAC) and look for a file called AdskHardwareCertificationReport.xml. Rename this file AdskHardwareCertificationReport.xml.OOTB and accept the warning about changing file extensions. You will now be able to enable Hardware Acceleration just like you did in 2012. Performance will not be as good as direct graphics hardware, but it will be much faster than WARP.
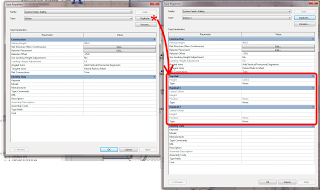
Interesting tip from the Autodesk BIM Blog – after you upgrade Railings to 2013, the actual extended parameter values are not populated until you Duplicate the upgraded railing types…see image.
This goes for upgraded Project Templates too – you won’t see the additional parameters until the types are Duplicated.
Hardware acceleration is not available in the Parallels 7 environment, and Revit will revert to a DirectX 9 based software graphics mode, which will not render materials, sky, artificial lights, and other features when the Realistic visual style is in effect.
o Workaround 1: When you first start Revit and see the Graphics Options – Cannot Use Hardware Acceleration dialog, select the Save Hardware Acceleration Setting option, and then close and restart Revit. Upon restart, DirectX 11 software mode will be used and features will display correctly in Realistic visual style.
o Workaround 2: Manually add the following to the [Graphics] section of the Revit.ini file before startup: UseGraphicsHardware=0
EDIT: Workaround 3 (allow hardware acceleration hack) – from Gordon in the comments:
Dig down to the Revit folder in program files, where Revit.exe lives, and look for a file called AdskHardwareCertificationReport.xml. Delete this file. Revit will now allow you to enable hardware acceleration, and performance will be MUCH better than the no HA fallback of using WARP (which is an API that uses the CPU to mimic graphics hardware and manages to provide performance on par with, say Intel HD2000 hardware). WARP is much better than true hardware acceleration disabled as in earlier versions, but no where near as good as Parallels virtual hardware. End Edit
This issue was also reposted at microsolresources.com:
Workaround 2: Manually add the following to the [Graphics] section of the Revit.ini file before startup: UseGraphicsHardware=0″ Workaround 1 did not present itself to me, but workaround 2 was pretty easy to achieve:
[Graphics] TempDimFontSizeInPoints=12 InvertBackground=0 Antialiasing=0 SemiTransparent=1 UseGraphicsHardware=0 I added the last line above to the 2013 Revit.ini file, restarted RAC 2013, and…. As they say these days: “SWEET!!”
Let’s say you have installed Revit 2013 but you want to use Revit 2012 as your default Revit for the time being (and I don’t blame you).
Here are the steps from RevitForum (thanks Menschmal).
Instructions to set the correct revit.exe file as default for opening Revit files from the file browser in Windows 7 (e.g. I am testing Revit Architecture 2012, but I want 2011 to be my default for now)
Open the Registry Editor (type regedit in the command line in Windows). If you are concerned about messing something up, back up the registry before making any changes.
In the Registry Editor browse the tree to the branch below:
Double-click on (Default) and the Edit String dialog box will open.
Edit the Value data field for the correct location for the version of Revit you want to use. For example, I changed 2012 to 2011.
Close the Registry Editor and you are good to go. This change seems to be the universal default for all extensions that open with the Revit.Project application (.rvt, .rfa, etc.).
importing IFC2x4. Thanks to Geometry Gym, and Jon Mirtschin in particular, an IFC importer add-on for Revit 2012 is under development that aims to support IFC2x4 with nurbs profile / perimeter exchange.
Jon says: I’m developing the Revit addon to import these files as the functionality is not available in the native importers. I haven’t built for Revit 2013 yet, but if you have Revit 2012 and want to try, the installer is available from http://www.geometrygym.com/downloads via the comments at: Geometry Gym: NURBS GH to Revit
And here is the link to the current build of the IFC 2×4 importer for Revit 2012: ggRevitIFCx64 v0.0.11.msi (24th April 2012) Note, Revit 2012 64 bit Addon to import IFC files. This is an early public release for initial feedback and comment. Addon undergoing rapid development. Please use with care and send suggestions and observations. (from http://ssi.wikidot.com/downloads)
Image from Geometry Gym
Here is an excerpt showing how IFC2X4 RC2 improves geometry capability:
Geometry
Additional entities are added to the geometry resources. (1) The definition of manifold boundary representation has been enhanced to include advanced B-reps, based on NURBS. Therefore b-spline surfaces and b-spline curves are added. (2) The curve bounded surface based on bounding p-curves (curves defined in the parametric space of a surface) is added to allow any surface to be bound; it was restricted to only planar surfaces before. (3) Tapered solid of extrusion and tapered solid of revolution are now included to define simple taper, restricted to one section and to topological similarity of the start and end profile. (4) A fixed reference swept area solid is added to define an advance sweep along a directrix with a fixed orientation of the profile. The swept disk solid has been simplified by implicit start and end points on the directrix. (5) Elementary surfaces have been enhanced by incorporation or cylindrical surfaces.