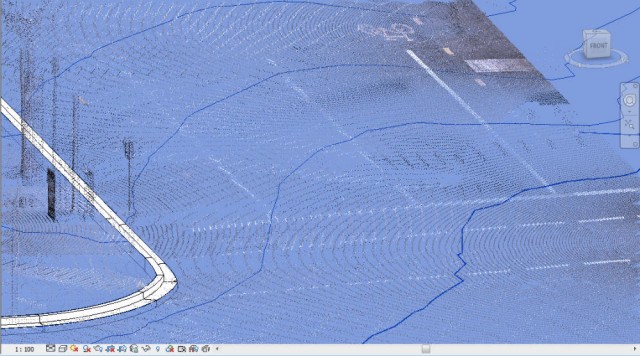
Mark Cronin has put together a nice guide describing how to clean up point cloud data in Civil3D, make a surface and then import that into Revit for topography creation.  This is an alternative to using ScanToBIM for topography creation from point data, and if you already have Civil3D it might be the better route.

Read the detailed guide at:
Generate Revit Topography from Point Cloud Data | betterREVIT

My previous posts about Civil3D and Revit:
Using Civil3D to increase your Topography resolution in Revit

Simple methods to help with Civil 3D and Revit interoperability

The Trimble Scan Explorer Extension dramatically reduces the time required to generate a SketchUp Pro 3D model from scan data. Streamlined tools and one-touch features allow users to quickly extract construction points and lines that are used as a guide to simplify and expedite the modeling process. Automated plane extraction tools further increase modeling efficiency, particularly when modeling building interiors and facades.

Video:

Read the news release:
Trimble News Release

via
https://twitter.com/TrimbleBuilding/status/455775711937060865

I’ve always felt that the Floor tool in Scan to BIM is a bit lacking – rather than analysing and deforming an existing Floor element, I want it to work like the Topo tool (just select a bunch of points and decimate).

Well, now it can (sort of).  Like this:

  1. Use the Scan to BIM topo tool to make temporary topo “Floors”
  2. Then use the Topo to Shape Edited floor macro from Boost Your BIM

Sometimes, What Revit needs is for you to put two workflows together to solve a problem in the most efficient way…

Autodesk offers several different browser-based user interfaces for different reality capture scenarios.

They all use the same underlying ReCap REST API.

You need a special developer key to make use of the API. To obtain one, please contact ADN and ask to become a pilot partner.

ReCap is built on Amazon web services, using queues to manage jobs.

current pilot partners and their work, some of which was also being shown in the AU exhibition:
  • SoundFit custom fit ear gear, creating a precise model of the inner space within the ear for prosthetics, a fully automated complete custom application.
  • Kubit, dealing with AutoCAD applications for real-world as-built capturing.
  • Skycatch, providing a low cost, highly flexible, intelligent & scalable aerial robotics platform.
Tilo Pfliegner of Kubit demonstrated easy integration of calibrated photos, point clouds and ReCap models into AutoCAD.
Point clouds are sometimes too imprecise for modelling needs. Using photos directly instead is better, because they are often more precise, and the photo quality is often better than the generated point cloud.
Read more / via:

While the free Labs Point Cloud Feature Extraction for Revit 2012 is very hard to find these days, there is a version of this tool available for AutoCAD:
Point Cloud Feature Extraction | AutoCAD | Autodesk Exchange Apps

Use this plug-in to create geometry and primitive shapes that align with the features of the point cloud. To help isolate the shapes, planes, and sections you want to extract, you can crop, or hide, one or more areas of the point cloud.

EDIT  It looks like this in AutoCAD 2014:

Just import a point cloud, select it, and the tools become visible in the Ribbon.
Typically, large point clouds are stored on local hard drives.  Revit allows for this with the Options – “Root path for point clouds” setting.
Here is an easy way to copy them:
Use Robocopy. (Should be located in C:WindowsSystem32)
Make a BAT file that looks something like this:
robocopy C:ProjectsPointClouds OTHER_PC_NAMEPointClouds(shared folder) *.RCS *.RCP /MIR /COPY:DAT /DCOPY:T /ZB /LOG:C:TEMPlogfile.log /R:2 /xn
This script was used to copy only RCP and RCS files from my local hd to a shared drive on another users PC, so that we could both work with large point cloud files without clogging up the server with like 50gb of point data. Keep in mind you need to put these files in the same place relative to your Revit Options – Root Path for Point Clouds.

Additionally, if you have not previously been using the root folder for all your point clouds, you may have to re-link them to create the appropriate path associativity.

This is basically what will happen:

So, basically you can choose to re-index to RCP, or leave them as-is and continue to use the PCG.

While there is much to love about the smooth performance RCP point clouds, I have to admit that PCG point clouds seemed to allow:

  • greater point density, perhaps due to different default indexing settings, 
  • more consistent display (ie. once the view had regenerated, that’s how it would stay – while RCP seems to slowly and continuously re-gen until you get a very realistic view)
  • and didn’t have cropping problems – I’ve noticed that a 3D Section Box with an RCP point cloud will require a greater “buffer” than with PCG.  If you crop it too close, the RCP points won’t show (even if they physically exist in that section box space).
On the flip-side, PCG point clouds are typically much larger than the RCP / RCS equivalent.

Related forum post:
Point cloud disappears partially revit 2014 – Autodesk Discussion Groups

After spending lots of time with Point Clouds lately, making heaps of section boxes and then manually rotating them to match walls, I finally decided to shoutout to the Twitterverse for some help…

Following a several-days-long Twitter exchange, Harry Mattison has created a cool add-in and provided it for download at:
http://gdurl.com/Hmdo/download

(also on Boost Your BIM product page)

And yes, it automatically rotates the Section Box!!  Essentially, this produces a box that is “aligned” to the Wall.  Conversely, the Coins version currently only produces aligned section boxes when you produce a section box around a scope box or around a section line.