More info at this page
Heads-up:
https://twitter.com/bel_blthompson
What Revit Wants + Black Grid AI
AI Empowered Project Management
Great tip from Philip Chan. Basically:
Here’s his workflow:
Next window allows me to add fields to my schedule, I then notice there is a field/parameter called “Material: as paint”. Sounds like something suitable in this occasion.
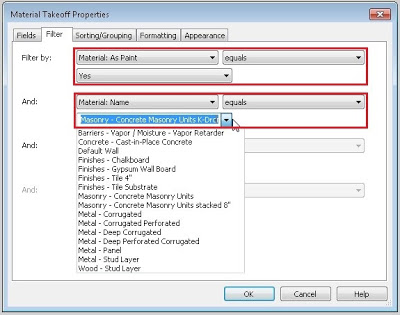
As I move on to the filter tab, something interesting shows up…
I can now set the “Material: as paint” to equal to “Yes”, which means I tell Revit that this schedule only look for the “Paint” surface on all walls; the next filter rule, I can even set it to a specific material to be included in this schedule.

The last thing is to tell Revit to calculate total area for this particular material.
Once this is done. Volia! I can now let Revit to keep track on all my “paint” surface.
via
Dunn Edwards have provided an adsklib file for download that matches their paint colours to Revit materials.
I previously posted about Lysaght adsklib way back in 2011:
What Revit Wants: Lysaght Bluescope Colorbond Autodesk Material Library
I look forward to the day when all manufacturer materials come in adsklib format – would save us all some work 🙂
Here are the Dunn Edwards links:
Revit Materials
‘adsklib’ file (20mb)
D.E. 5000 – 5093 colors
(dropbox access request)
http://www.arch-intel.info/revit-dunn-edwards-paint.html
They also provide some informative videos —
Getting the adsklib into Revit:
Setting up corresponding colours:
Here is how you can assign a material parameter to a painted surface in a family:
You can do this for multiple different materials on different painted surfaces.
This method was mentioned on the French ‘Mastering Revit’ blog:
Translated version of post
Original post
Revit mastering: Peindre
In previous versions of Revit, you could ‘re-paint’ surfaces using the By Category material.
However, this is not available in Revit 2012.
Instead, you need to use the drop-down arrow associated with the Paint tool – this will reveal the ‘Remove Paint‘ button (see image below).
Also, note that I have moved the Modify ribbon panel to be next to the Home panel. Do you know how to do this?
Just hold Ctrl and click and drag the Ribbon Panel title to put it where you want it…
“the paint tool will open the Materials dialog, where now you can visually preview materials and access material properties in order to modify a material. You can see your changes without closing the Materials dialog.
Also, you can use the “Remove Paint” tool to remove a material that has been applied to a face.
Meanwhile, you can identify the quantities of materials used as Paint in material takeoffs.
”
EDIT In Revit 2012 and newer, the quickest way to identify paint is to use the Remove Paint tool. This does not load the Material selection panel, and will thus be faster. Also, switch 3D view to wireframe with Remove Paint to globally scan the project with your cursor for painted surfaces…
RevitTV.com are offering a free ‘Paint’ plugin for Revit 2010.
The features are:
RevitTV.com Paint for Revit 2010 – Beta (download page)
RTV Paint ver 2010 – Windows 32 bit Installer
RTV Paint ver 2010 – Windows 64 bit Installer, coming soon…