Paweł Romaniuk has shared his workflow to take various parameters from a model, run the necessary algorithms and then write the area back to a parameter for use in a Revit schedule. Link to pdf download is below… Thanks Paweł.

UPDATED Download link:

Dynamo_Duct_Fittings_Calculation_V.0.1

Download:

https://www.dropbox.com/s/r1slk1sbo1eo971/Dynamo_Duct_Fittings_Calculation_V.0.1.pdf?dl=0

via
Revit MEP Dynamo – Duct Fittings Calculation | LinkedIn

It is pretty difficult to change the Workset of Pipe Insulation. The Properties Palette allows you to change them one at a time (but not multiple), while the method I posted about previously can change multiple Pipe Insulations to a different Workset, but it didn’t have a nice filtering mechanism.

Enter Dynamo… I made a custom node that takes a list of Pipe Insulations and gives you the Host Pipe element:

Then, I packaged this up in another node that collects all Pipe Insulations, checks their Workset, finds their Host Pipe, and then saves those Pipes to a SelectionSet:

So, if you have Pipe Insulations on the wrong workset:
1.    Install Bakery package in Dynamo
2.    Run definition as in image above
3.    Close Dynamo
4.    Load the Saved Selection
5.    Group these Pipes (which groups the Insulations too)
6.    Change workset (it will have already adopted the current workset)
7.    Ungroup
8.    Done

Thanks to Konrad and Andreas for archi-lab and Clockwork packages respectively. I get a few comments about my Bakery package having a lot of dependencies, but I like the fact that I just need to install Bakery and I get archi-lab, Clockwork, Lunchbox etc. Its like a rough and ready deployment solution…

Oh, one more thing. You may notice in recent versions (like 0.8.2 RC) that there is now some custom path management for Dynamo resources:

Good stuff!

Update
Method 1: after seeing my post, Troy Wright kindly shared his take on this. It uses only one custom node – Eraser by Julien – and it also works for Revisions that have been ‘ticked’ as issued, so this is probably the more powerful method.

Here is a download link to his DYN. Thanks Troy!

I will also add his email as a comment to this post.
Method 2
Steps:

  1. Install Dynamo
  2. Install Bakery package 
  3. Open a Revit project where you want to delete Revision Schedule rows
  4. Open this definition
  5. Run it
  6. Close Dynamo window
  7. Manage – Select by ID
  8. Paste
  9. Delete
  10. Done!

As always in Revit, it leaves behind the first row in the Revision Schedule… However, this method is more robust than deleting Revision Clouds as it also removes items appearing based on the “Revisions on Sheet” schedule. It is also much faster than laboriously using the Merge Up command one by one in the Revision Schedule.

As always, use with care 🙂

Video:

I think its safe to say that Dynamo package deployment is still a work in progress, particularly when considering issues of intellectual property along with the complexity of IT networks in large organizations. For that reason, any step to make Dynamo easier to deploy and use is a good idea.

Dyno Browser gives us a very simple way to share and view DYN definitions using a certain file structure and the Roaming directory inside a user’s profile.

Steps to setup and use Dyno Browser on one PC:

  1. Close Revit
  2. Install Dyno Browser (download link)
  3. Open Revit
  4. Start Dyno Browser from the Dynamo ribbon dropdown (Visual Programming)
  5. Right-click in the pane and select “Open Workspaces Storage”
  6. In this folder, make a new top level folder and then put some DYN files in it, like this:
  7. Once we have some DYN files in the right location, we can right-click in Dyno Browser and select “Rescan Workspaces Storage”. This will update the list of available definitions in the Dyno Browser pane.
  8. Now, right-click on the definition you want to run and select “Open Workspace in Dynamo”
  9. You may not see your definition straight away, so just press the X button on the Start tab to close that tab. Your definition should now be visible
  10. Click Run

 So, what is good about this? Because now we can create a shortlist of important or ‘approved’ DYN files and deploy them using the appropriate file structure to the team, using Roaming profiles.

There is actually a bit more functionality available in Dyno Browser: it supports using JSON to feed certain preset values to Dynamo nodes. This is a bit more in-depth, and can be review at the home page.

Video:

The current alpha version is 0.2.52

Main site:
Dyno – Organising, deploying and running <strong>Dynamo</strong> workspaces tool for <strong>Autodesk Revit</strong>: Alexey Lobanov

I reported this issue on github a while back, but it turns out it is a reasonably serious DLL conflict. More details here:
Collaboration for Revit: 2015.6/2016.1 breaks other add-ins | Revit Products | Autodesk Knowledge Network

Issue:
Users reported that installing the Collaboration for Revit® 2015.6 or 2016.1 add-in is causing other add-ins to stop working.
Causes:
There seems to be a DLL conflict with the latest Collaboration for Revit add-in.
Solution:
Status: This incident is currently being investigated for a possible cause and resolution
Incident ID: 72448
Workaround: Continue using the 2015.5 or 2016.0 version of the Collaboration for Revit Add-in.
Note: If you need to remove the newer add-in (Autodesk A360 Collaboration for Revit…), you will also want to remove the new version of the “Personal Accelerator for Revit” and “Dynamo 0.8.1”

Here’s how:

  1. Make a View parameter (Text) in Revit that will hold the list of RVT Links that are visible in a given view
  2. Install Dynamo and my Bakery package
  3. Go to the required View
  4. Set up your definition as below and run it:

This will create a list and convert it to a single string with a line break between each entry, meaning that the resulting view Label in your View Title needs to account for it to ‘grow’ (vertical align to Top or Bottom as required).

 This will need to be run each time you want to ‘update’ the visible Revit link parameter.

Konrad Sobon has released a very cool and powerful new node package for Dynamo called Bumblebee. I did some very basic beta testing on some of his code a while back, and it looked promising then. It has some more polish now and it will certainly help us get the Revit to Excel connection “buzzzzzing” nicely through Dynamo 🙂

It supports some nice things like writing to multiple sheets at once, offset to specific Cell entries, and writing to multiple locations in the same sheet. Most of this is accomplished through the BB Data node:

There is even some handy documentation already in place:
For specific instructions on how to use each one of the components and what is possible to achieve with each one of them you can refer to Bumblebee Primer: BB Primer

Read more at Konrad’s post:
bumblebee – dynamo and excel interop | archi-lab

We have been told that Dynamo core code can eventually support network sharing of custom node definitions. In the meantime, how can you share custom nodes between a few different pcs and laptops, keeping them all in sync?

There are a few ways to do this:

  1. Packages and package management
    The main issue here is that if you are working on IP related code or just generally don’t want to publish your nodes to the world, there will always be some left over ‘private’ custom nodes in your definitions folder that you still may want to sync with other pcs, leaving us with…
  2. Shared cloud definition folder with live update to local definitions folder

The second way can be done with FreeFileSync and its partner, RealTimeSync. RealTimeSync is automatically included when you install FreeFileSync. How do we set it up?

Let’s say we have a few workstations and we want to share Dynamo definitions between them:

  1. Set up a shared cloud folder called LiveDefinitions between users of these pcs (Google Drive or Dropbox or similar).
  2. Then, set up a sync process that mirrors that cloud version to your local Dynamo definitions folder, in my case:
    C:UsersLukeAppDataRoamingDynamo.8definitions

 It might look something like this:

 In the above example, I also set up a versioning folder to catch any conflicts.

The RealTimeSync can be set up as follows:

  1. Launch FreeFileSync and create a Mirror sync between these folders (that’s in the image above)
  2. Save this as a ffs_batch file
  3. Open that file in RealTimeSync
  4. Save as a ffs_real file
  5. Right-click and Copy this ffs_real file in Windows Explorer
  6. Paste shortcut into your Windows Startup folder, such as:
    C:UsersLukeAppDataRoamingMicrosoftWindowsStart MenuProgramsStartup
  7. Double click the shortcut in Startup and check that it runs ok. It should automatically place a red RealTimeSync icon in your task bar that polls the source folder periodically for changes. If you ever want to stop the sync, just right-click on that red icon to stop the sync running. To disable automatic startup, just delete the shortcut from the startup menu.

The final piece: make sure you save all of you custom definitions directly to the LiveDefinitions folder. In the example above, I should save all of my custom .dyf files to this folder after creating them:
C:UsersLukeGoogle DriveVirtualBuilt (LJ only)DynamowipLiveDefinitions
Even if I just right-click and edit a custom node in Dynamo, I will have to go Save As to the above folder to make this system work.

Google Drive will sync that file up, and then RealTimeSync will push it into the required Dynamo folder.

This way, the point of truth for all of your custom definitions is in the cloud, and these are downloaded and overwritten into your local Dynamo definitions folder (the one that Dynamo uses).

Use this idea with care 🙂 As always make a backup of everything first, and also remember that often simply closing and re-opening Dynamo can help to refresh the dependencies and correct some problems.

Cooking in the Bakery today:

From here we could export a list of Element IDs to CSV, make a Selection Set by Elements using Clockwork, or use one of the Select in Revit nodes.

As you can see, to make a string list in a code block, you need to enclose list in curly brackets, divide with commas and use quotation marks around the entries themselves. More about code blocks at:
http://dynamobim.com/cbns-for-dummies/

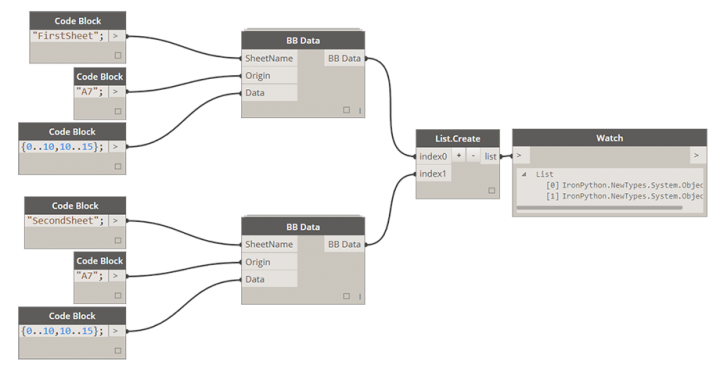
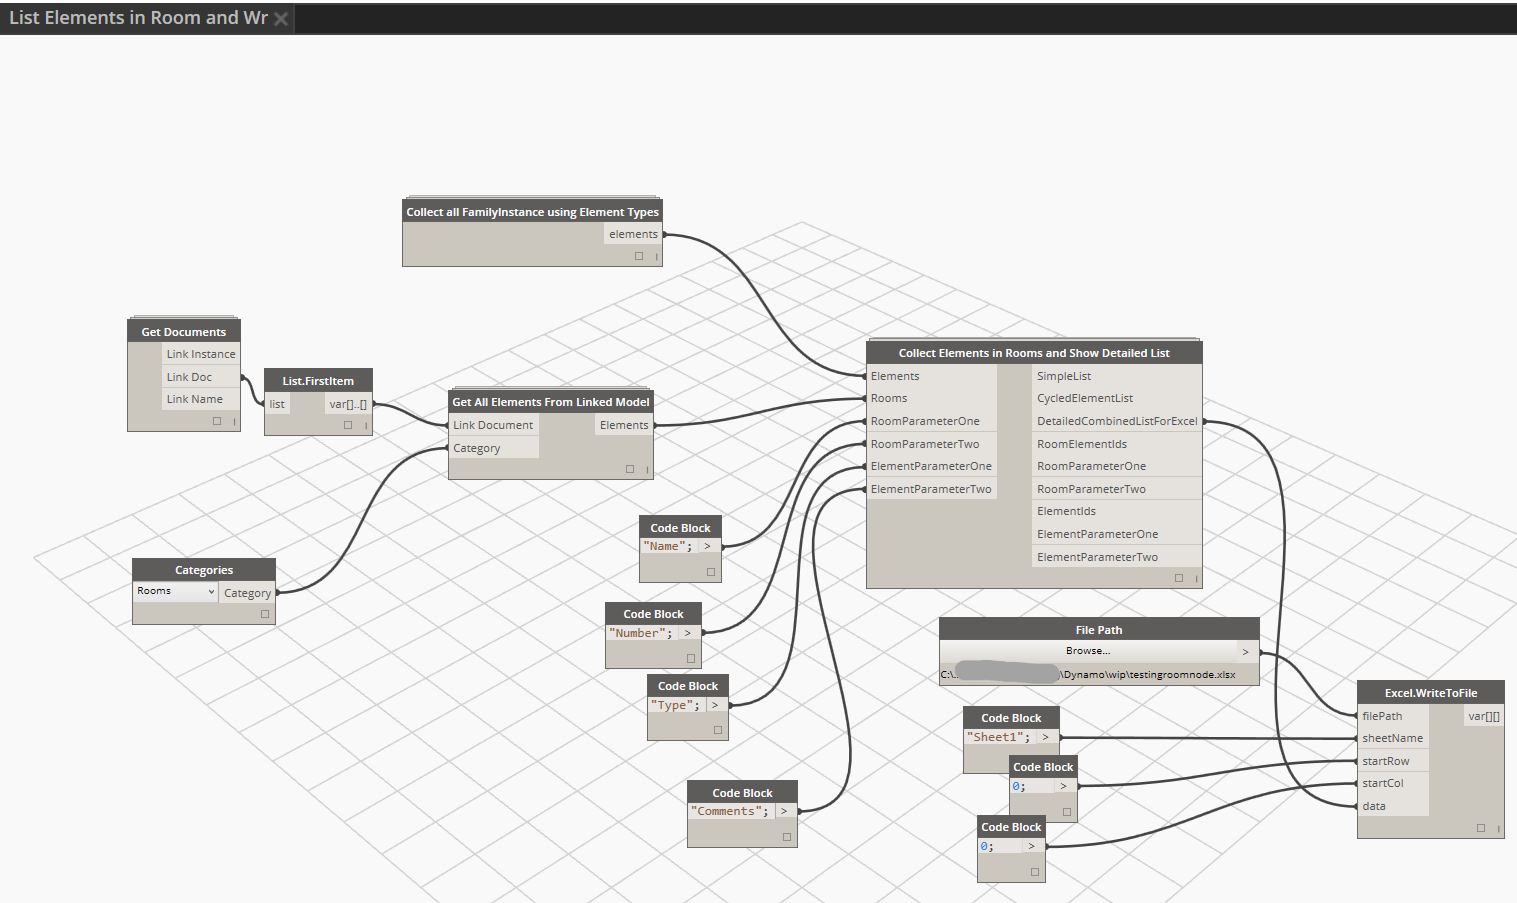
Its a long-winded title, but its only one Dynamo node… Just added to the Bakery package, called Collect Elements in Rooms and Show Detailed List. Basically, it takes a list of Rooms and a list of Elements and then tells you which Rooms those Elements are in. It also works across linked files, so you can have a fixture model, link in the Architectural containing Rooms, and use those to do the comparison.

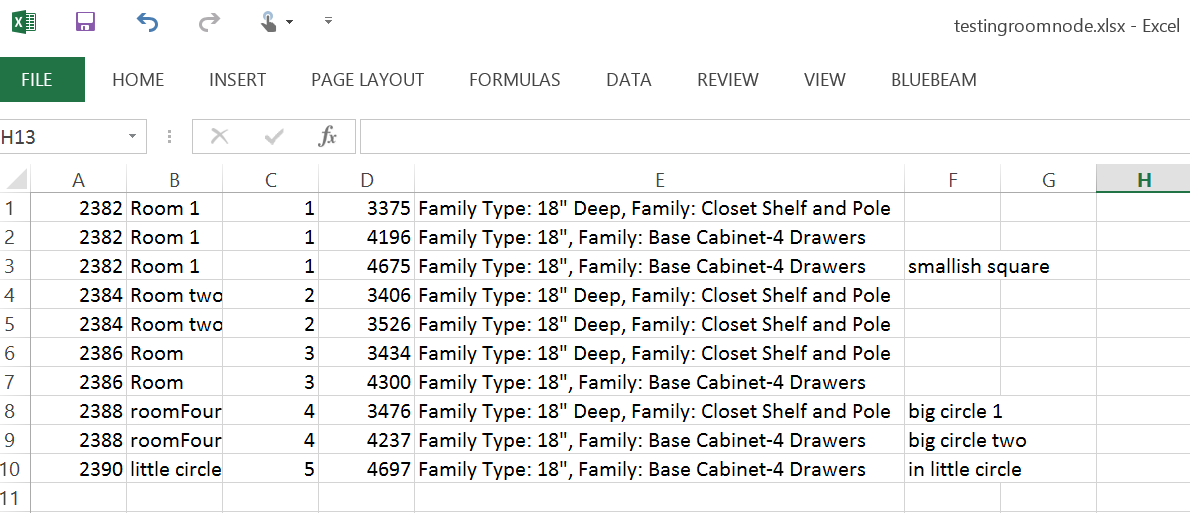
Once we have the Room that an element lives in (mostly thanks to Konrad’s work on Family.InRoom, which I have altered a little bit here), we can do lots of things. I used a Cycle and LaceShortest to get a 1:1 list of Room:Element. This makes it easier to do things with the resulting combined lists. Like, one of the outputs of the node is a detailed 6 index list, which can be directly exported to Excel. The list in Excel can then be filtered by Room. You can choose two parameters from Rooms, two from the Elements, and it also gives you the Element Ids of both:

I could have added headers to the list in Dynamo, but I didn’t do it for this first version (yet):

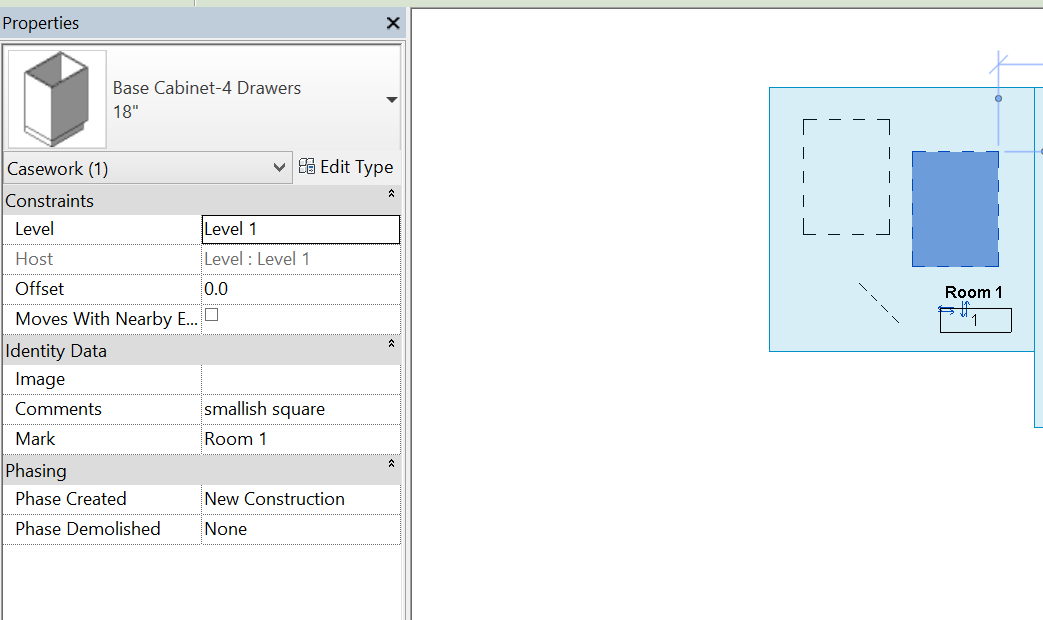
We can also take a parameter from a Room (like Room Name or Room Number) and then write it directly into a parameter in the Elements, like this:

This shows the Mark parameter populated with Room Name:

Or, we can take two parameters from linked Architectural rooms, and drive two Shared Parameters in every element in the current model. I ran the following node to set parameters for about 2500 elements in just a couple of minutes:

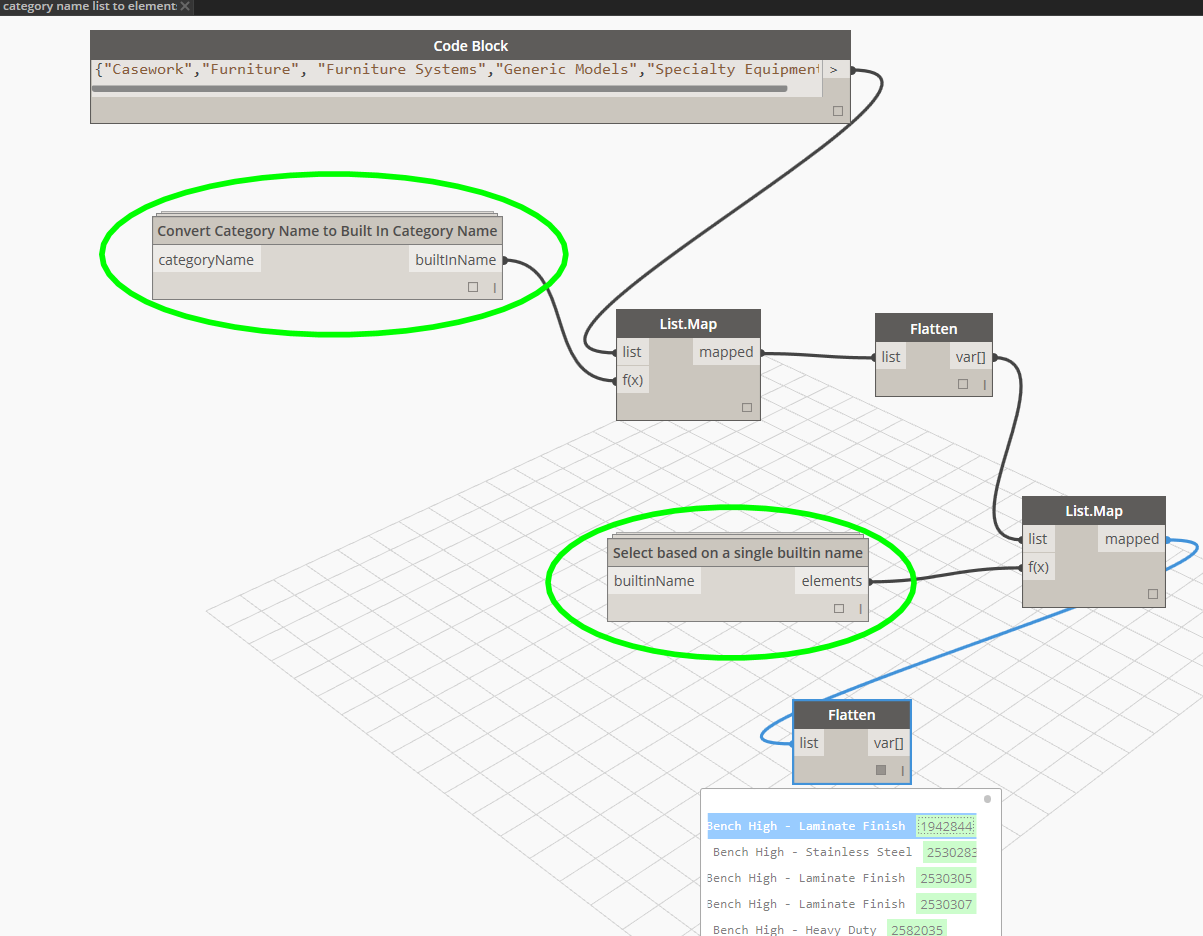
Or, we can use another Bakery node to do a wildcard search and collect elements from one Category across multiple links, and then check against these:

While this is a basic implementation at this stage (and no doubt there may be some hiccups), it demonstrates a powerful concept: to be able to take a mixture of linked Rooms and/or linked Elements and determine their relationship, then export that data or use it to instantly drive other parameters in Revit.

Goooo Dynamo!